TIPS
Practice Triggering: A finger tap to the outside of the transceiver will trigger the system. A data light on both the
transceiver and receiver confirm a successful transmission. Position: Do not position the transceiver on the hip of
the Starter or wear in a pocket. The body may attenuate (reduce) the signal. Elevate: Do not try to send a signal
through a crowd of people on the infield, etc. Elevate the receiver or transceiver if necessary. A longer audio cable
may be required (purchase from Eagle Eye or retailer such as Radio Shack, etc.). This would require operating in
Green mode only (see page 10). Sensitivity: The transmitter is set at 50% gain before shipment. If you believe an
increase in sensitivity is necessary for your facility, please contact Eagle Eye for details. Test: Be sure to test your
wireless start system for successful transmissions prior to each track meet. Pay special attention to the start
locations farthest from the receiver. Be sure to maintain a clear line of sight.
E. HARDWARE SET UP
1. Camera
1. ➔ TURN ON the computer.
2. ➔ INSERT the USB Key into a USB Port (of your choice) on the computer.
3. ➔ TURN ON the camera by plugging in its power supply.
4. ➔ INSERT the data cable into both the back of the camera and the computer’s Ethernet
port. (wait 1-2 minutes for camera to connect)
5. ➔ OPEN software and a live image should appear.
Tip: If live image does not load, go to top toolbar and SELECT > Hardware > Load Grabber and choose
your listed camera (Basler Pylon Gigi Camera).
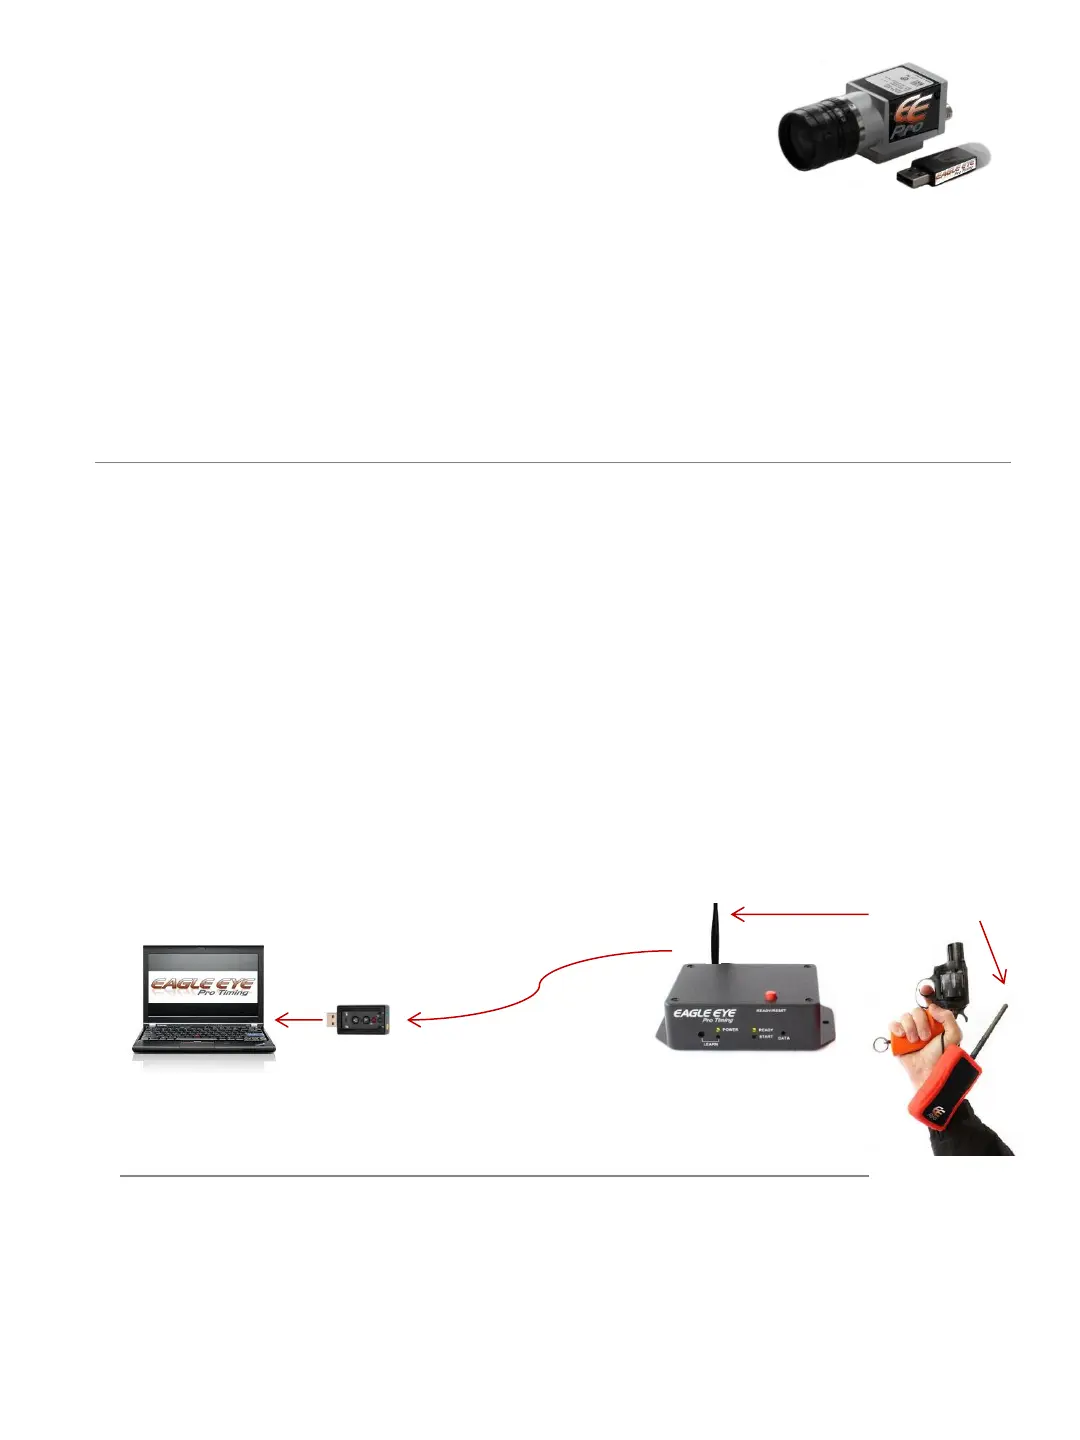
2. Wireless Trigger System/ Gun Sensor (Generation 2)
Instructions below refer to the Generation 2 trigger system (red cover). Instructions for the
Generation 1 (blue cover) can be found on page 35.
1. ➔ ATTACH an antenna to both units.
2. ➔ PLUG IN the large end of the audio cable to the back of the receiver.
3. ➔ PLUG IN the receiver’s power supply.
4. ➔ PLUG IN the other end of the audio cable into the microphone
input on the USB audio card . * Lenovo computers only. See info below for non Lenovo computers.
5. ➔ PLUG IN the USB adaptor to an available USB port on the computer.
6. ➔ SWITCH on the transceiver. At this point both units will automatically pair with one
another (the manual ‘Learn’ process is no longer necessary ). Once paired the flashing red
lights will remain solid red. Pressing the Ready/Reset button on the receiver will turn the
Ready lights green.
*Some non Lenovo computers do not need the USB audio card since they are equipped with
a microphone and head phone jack separate from one another. Your non-Lenovo computer
may allow for the audio cable to be plugged directly into the audio jack without the use of the
USB audio adaptor card.
14
USB adaptor
USB Port
Audio Cable
Antennas
Plug into microphone input