DESCRIPTION AND INSTALLATION
25364 Issue 8 March 2018 2-45
Printer SET-UP
Setting the Ribbon Type
The ribbon type setting is used to set the optimum print parameters for
each ribbon type. This allows for faster set up, better print quality and sets
the correct ribbon length.
Note: The default ribbon type is Custom, this allows the ribbon
diameter and
length to be set manually.
(1) Select Pr
inter Status > Ribbon > Ribbon Type.
(2) Choose the correct ribbon type from the list.
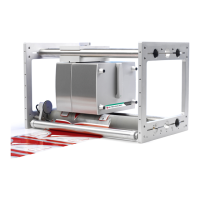
Threading the Ribbon
WARNING: Care must be taken when replacing/threading
ribbons to avoid cutting hands or fingers.
Notes: (1) To ensure good quality print, always clean the print head and
capstan before fitting a new ribbon t
o the printer.
(2) When fitting a new ribbon, ensure loose
ribbon is wound up on
the take-up spool to create tension in the ribbon path. If this is
not done, the ribbon will not be fed correctly around the guides
and rollers in the ribbon path. This will result in poor or no
printing.
(3) When inserting the cassette in
Compact 32c / 53c or
Communicator II printers, ensure that the ribbon fits between
the printer’s guide roller(s) and print head within the printer. If
this is not achieved, it may result in poor quality print and ribbon
breaks.