EasyManuals Logo

GE LOGIQ E9 User Guide

GE LOGIQ E9
256 pages
To Next Page IconTo Next Page
To Previous Page IconTo Previous Page
Page #20 background imageLoading...
Page #20 background image
Getting Started
1-8
LOGIQ E9
User Guide
Direction 5454884-100 English
Rev. 1
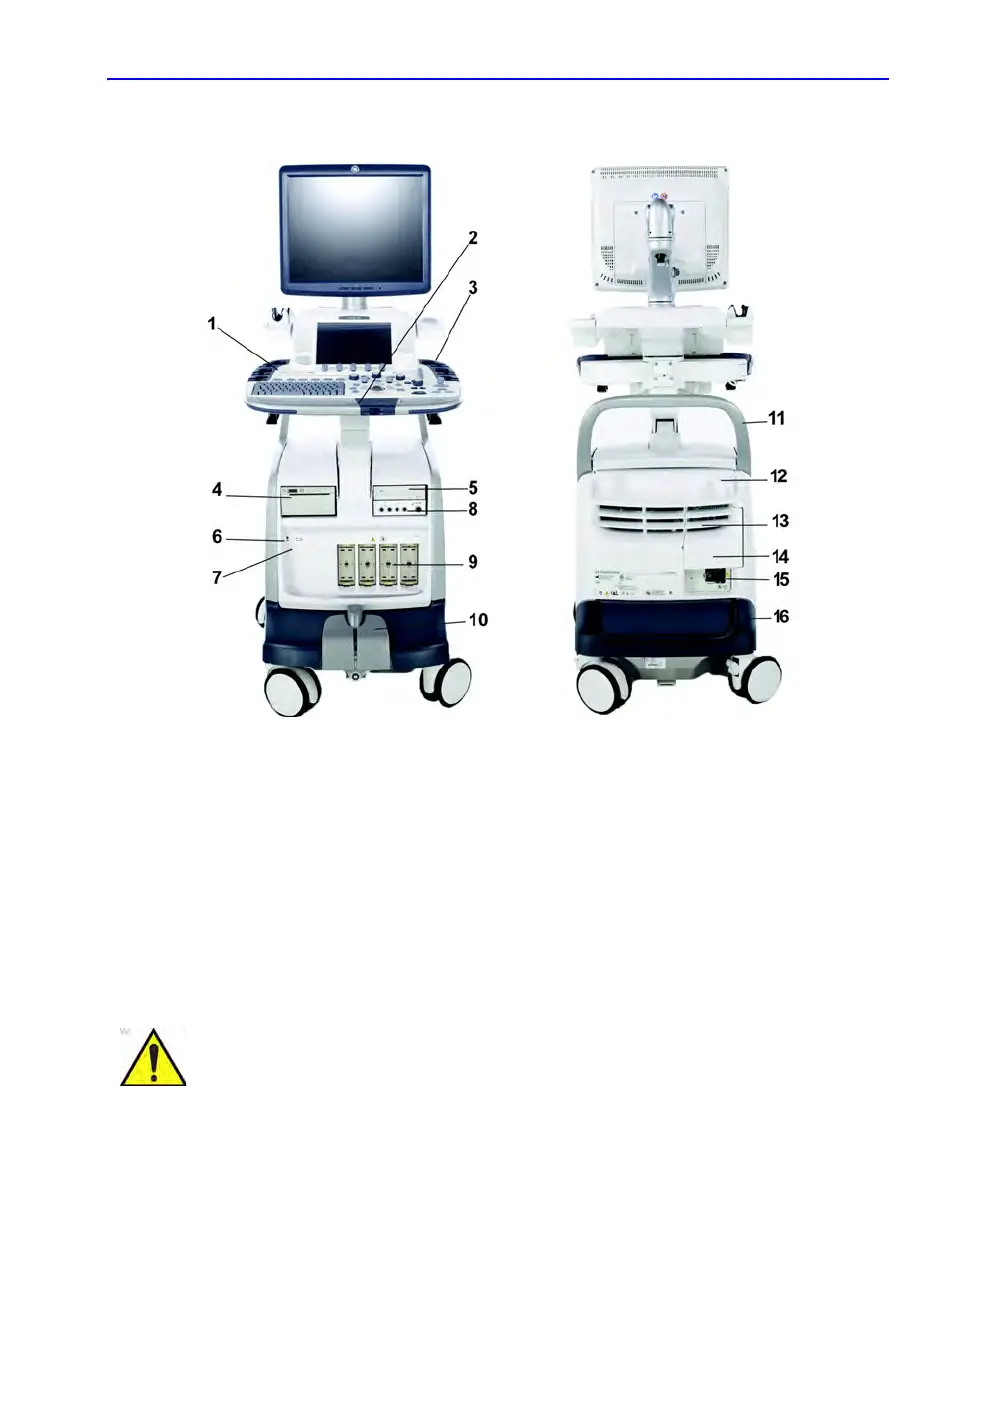
Console Graphics (continued)
Figure 1-3. LOGIQ E9 System (front and back views)
1. Power On/Off; Operator Panel USB Ports
2. Brake and Up/Down Controls
3. Probe Cable Management Hooks (underneath
Operator Panel)
4. Black/White Printer
5. CD/DVD Drive
6. Network and Hard Disk Drive Indicators. USB
Ports
7. Patient I/O (ECG, CW Probe Connector)
8. Volume Navigation Connectors
9. Probe Connectors
10. Brake Pedal
11. Rear Handle
12. Power Cord Hook
13. Op Panel Up/Down Manual Release Lever
14. Access to Peripheral USB Ports, Audio In/Out,
DVI Connector, Ethernet Connectors, S-Video
15. Breaker, Ground and Power Cord
16. Back Filter
WARNING
DO NOT touch the patient and any of the connectors on the
ultrasound unit simultaneously, including ultrasound probe
connectors.
DO NOT touch the conducting parts of the USB, Ethernet,
Video, Audio cables when connecting equipment to the unit.

Table of Contents

Other manuals for GE LOGIQ E9

Questions and Answers:

Question and Answer IconNeed help?

Do you have a question about the GE LOGIQ E9 and is the answer not in the manual?

GE LOGIQ E9 Specifications

General IconGeneral
TypeUltrasound System
3D/4D ImagingYes
Transducer Ports4 active ports
ConnectivityDICOM, USB, Ethernet
ApplicationsAbdominal, Vascular, Musculoskeletal, Small Parts, Urology, Pediatric, Cardiac, Obstetrics/Gynecology
TransducersLinear, Convex, Phased Array, Volume
Doppler ModesColor Doppler, Power Doppler, Pulsed Wave Doppler, Continuous Wave Doppler
ElastographyYes
Advanced FeaturesB-Flow, Volume Navigation
PortabilityCart-based system
Display19-inch high-resolution LCD monitor

Related product manuals