AMX RoomBook Scheduling Touch Panels
11
AMX RoomBook Scheduling Touch Panels - Instruction Manual
RMBK-701
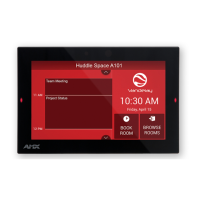
The RMBK-701, 7” AMX RoomBook Scheduling Touch Panel is shown in FIG. 2:
FIG. 2
RMBK-701, 7” AMX RoomBook Scheduling Touch Panel
RMBK-701 Product Specif ications
DIMENSIONS (HWD): 4 7/8" x 7 3/8" x 2 1/4" (123.9 mm x 187.5 mm x 58 mm)
WEIGHT: • 1.05 lbs (.680 Kg), with back box
• 0.8 lbs (.363 Kg), without back box
POWER CONSUMPTION: • Full-On: 11 W (max)
•Typical: 7.5 W
•Standby: 4.5 W
• Shutdown: 0.7 W
EXTERNAL POWER SUPPLY
REQUIRED
Optimal performance requires use of one of the following AMX PoE power supplies (not included):
• PS-POE-AF-TC, PoE Injector, 802.3AF Compliant (FG423-83)
• NXA-ENET8-2POE, Gigabit PoE Ethernet Switch (FG2178-63)
TOUCH SCREEN DISPLAY • Display Type: TFT Active Matrix Color LCD with Fringe Field Switching (FFS) - Wide Viewing Angle
Technology
• Display Size (WH): Landscape: 7.3" x 4.8" (186 mm x 122 mm), 8.8" (222 mm) diagonal
• Viewable Area (WH): Landscape: 6.05" x 3.54" (154 mm x 90 mm), 7.0" (178 mm) diagonal
• Resolution: Landscape: 1024x600
• Aspect Ratio: Landscape: 16:9
• Brightness: 400 cd/m2
• Contrast Ratio: 800:1
• Color Depth: 16.7M colors
• Illumination: LED
•Touch Overlay: Resistive
VIEWING ANGLE 89°/89°/89°/89° (Up/Down/Left/Right)
MEMORY • SDRAM: 1 GB
•Flash: 16 GB
COMMUNICATIONS Ethernet: 10/100 Mbits/s (full duplex) Auto MDI-X, RJ-45 connector. Supported IP and IP-Based
Protocols: UCP, TCP, ICMP, DHCP, SSH (support the use of inbound SSH (Secure Shell) protocol
communications when the SSH feature is enabled)
FRONT PANEL COMPONENTS • Room Status LEDs: 2 red/green LEDs on either side of the panel indicate the current room status
(green = available, red = occupied). Note that these LEDs can be disabled via options on the Room setup
page (see the Setup Wizard: Step 6 - ROOM section on page 31).
• Recessed Settings pushbutton (located on the left top edge) provides access to the SETTINGS window.
To open the SETTINGS window, use a paper-clip or similar tool to press and hold the pushbutton for 5
seconds. See the Accessing the SETTINGS Window section on page 13 for details.
CONNECTIONS • Ethernet: 10/100 port, RJ-45 connector
• USB: (1) USB host 2.0, type A port
• Power: PoE (Power over Ethernet), 802.3af, class 0
Room Status Room Status
LED LED
Pushbutton
 Loading...