Using the Scheduling Panel Setup Wizard
31
AMX RoomBook Scheduling Touch Panels - Instruction Manual
Setup Wizard: Step 6 - ROOM
Use the options in the ROOM pages to set room-level options for this panel (FIG. 39):
Fill in these fields and press Next to proceed (press Back to return to the GROUP page).
NOTE: These settings can be changed later if necessary, via the ROOM Settings page (see Viewing/Editing Room Settings on
page 41).
Changing the Logo Image
The Main Room page on each scheduling panel includes a graphic window for a logo. The logo image can be changed via the Logo
Image option in the Room page:
1. In the Setup Wizard: Step 6 - ROOM page, select Add.
2. In the LOGO IMAGE WINDOW,
enter a URL to an image file and press Upload to upload the selected file to the panel.
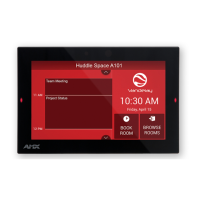
The LOGO IMAGE PREVIEW window provides a preview of the selected image (FIG. 40):
NOTE: The custom logo image window is 375 x 165 (pixels). Acendo panels will automatically scale the uploaded image down to
fit in the window. For best results the downloaded logo should be at least 375 x 165 pixels and have a similar aspect ratio (~2.2).
Press Preview to preview the specified image. The LOGO IMAGE window provides a preview of the selected logo, as it will
appear on both the Available (green) and Occupied (red) backgrounds (FIG. 41):
FIG. 39
Setup Wizard: Step 6 - ROOM page
Setup Wizard - ROOM page options
Room Name Enter the room name as it will appear on this panel.
Default Meeting Subject Enter a default meeting subject to be displayed on this panel.
Note that this default subject can be over-written in the Room page (see the Editing Meeting Details section on
page 70).
Support Contact Name Enter the name of the support personnel as it will appear on this panel.
Support Contact Phone Enter the phone number of the support personnel as it will appear on this panel.
Room Status LED Press to toggle the Room Status LEDs on the panel, which light green when the Room is available, or red when
the Room is occupied (default = enabled).
Logo Image Indicates the current logo image, if applicable. Press Add to add a custom logo image.
• Supported Formats: JPG, PNG
• The custom logo image window is 375 x 165. RoomBook will take the downloaded image and scale it down to
fit in the window. However, to maximize the available space, the downloaded logo should have a similar aspect
ratio (~2.2).
FIG. 40 Setup Wizard: Step 6 - Room page (LOGO IMAGE PREVIEW window showing an example logo image)
 Loading...