Do you have a question about the Himoinsa CEC7 and is the answer not in the manual?
Responsible for information tasks, user control, programming, and error logging.
Monitors and controls the unit, located at the rear for wiring and noise immunity.
Includes emergency stop input (mushroom head stop button).
3 inputs for network contactor confirmation, genset contactor confirmation, etc.
Command network/genset contactors and genset start-up via voltage-free output.
Options like CAN/USB, C2CLOUD, CAN/485, CAN2LAN, etc.
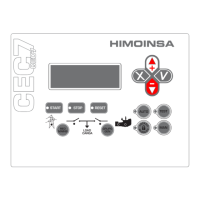
4 lines of 20 digits, backlight off after 10 mins inactivity.
Operating mode, command, and activation buttons for contactors.
Indicates electric signal and contactor status.
Automatic, Test, Locked, and Manual modes with LED indicators.
START, STOP, and RESET buttons with LED functions.
Confirm (V), Cancel (X), Up (+), Down (-) for menu navigation and value adjustment.
RED/MAINS and GROUP/GEN keys for network/genset contactor control.
Indicates network/genset contactor status (active, phase, disconnected).
Indicates network/engine status (active, errors, inactive).
Two levels (User, Maintenance) with default passwords for access control.
User controls start/stop via front panel. Protection devices remain active.
Unit manages supervision; starts genset based on programmed conditions.
Starts genset, monitors operation; ignores most programmable inputs except alarms.
Disables genset startup under any condition.
Lock/unlock modes by pressing AUTO/MAN for 5 secs; indicated by flashing button.
Genset control unit communicates with transfer switch controller.
Unit monitors genset status via voltage; transfer switch controls start/stop.
Monitors genset status via voltage without direct communication.
Handles cooling time, alarms, and genset signal drop differently.
Covers conditions, start delay, commands, and engine started validation.
Details conditions for stopping, switching contactors, cooling, and engine stopped check.
Enables automatic start based on network power consumption.
Assigns programmable input to inhibit genset contactor activation until input is active.
Allows multiple gensets to operate, selecting the one with fewest engine hours.
Avoids power supply zero by synchronizing phase, frequency, and amplitude.
Heats the screen for low-temperature operation.
Handles weekly programming for start-ups, locks, tests, and energy counters.
Have debounce time and can be configured for active/inactive contact states.
Screen shows status of digital inputs and outputs.
Characters indicating emergency stop, programmable inputs 1-3.
Characters indicating network/genset contactors, free voltage contact.
Displays resistance/voltage for fuel level, oil pressure, temp, voltage, etc.
Emergency stop (PEM) input for immediate engine shutdown without cooling.
Inputs for CKR, CKG, and HKG functions (contactor confirmation, enable activation).
Outputs for network contactor (CR), genset contactor (CG), and genset start-up (LT).
SC output for stabilized genset electrical signal or other states.
Alarms can trigger actions or be shown on display; integrates genset/switching alarms.
Use RESET button to view list; UP/DOWN to scroll; second RESET to clear if condition resolved.
Explains 'EN' (engine stopped), 'AN' (warning needs reset), 'A' (auto-resettable).
Alarm detection triggers acoustic signal, flashing screen, AL output; engine stops.
Warning detection triggers signal, flashing screen, AL output; warning persists until reset.
Warning detected triggers signal, flashing screen, AL output; auto-resets when conditions normalize.
Groups alarms by ATS Panel, Generator Electrical Signal, and Network Electrical Signal.
Allows up to 4 warnings that do not stop the genset, configurable via I/O table.
Digital input alarm for immediate engine shutdown without cooling.
Alarm triggered if RMS voltage difference exceeds asymmetry limit.
Alarm triggered if genset RMS voltage exceeds the maximum voltage limit.
Alarm triggered if genset frequency exceeds the maximum frequency limit.
Alarm triggered by incorrect phase order for three-phase configurations.
Alarm triggered if genset RMS voltage falls below the minimum voltage limit.
Alarm triggered if genset frequency falls below the minimum frequency limit.
Alarm if engine stop command is not completed within 90 seconds.
Alarm if no genset voltage detected while engine is running.
Alarm if network RMS voltage exceeds the maximum voltage limit.
Alarm if network RMS voltage falls below the minimum voltage limit.
Alarm if network frequency exceeds the maximum frequency limit.
Alarm for incorrect phase order in network signals for three-phase systems.
Alarm if network frequency falls below the minimum frequency limit.
Alarm if no network voltage is detected in any phase.
Alarm if network or genset contactor fails to activate after command.
Configurable alarms linked to digital inputs of SZ7 expansion.
Stores the last 100 detected alarms with their status.
Identifies and monitors connected electronic devices like modules and firmware.
Details module model, ID, firmware, and associated measurement/display modules.
Assigns unique IDs to interconnected control units for proper identification.
Performs zero calibration for current channels if genset is uncharged.
Connects to a Telesignal device with 12 relay outputs for status indication.
Enables remote connection and control via TCP/IP for monitoring and configuration.
Allows remote connection using TCP/IP over MODBUS protocol.
Enables remote connection using RS485 over MODBUS protocol.
Connects via MODEM RTB/GPRS for remote management via SMS.
Connects to SNMP CCLan device for management via SNMP protocol.
User, Maintenance, and Supervisor levels with default passwords for parameter validation.
Details parameters for timing functions like start delay, cooling time, debounce times.
Defines conversion factor for current transformers.
Covers parameters for starting mode, input configuration, voltage transformer, and control unit type.
Sets limits for voltage, frequency, asymmetry, and load demand parameters.
Defines configuration for various alarms like asymmetric, voltage, frequency, and sequence failures.
Configures programmable warnings and polarity of inputs.
Parameters for synchronization enable, amplitude, phase, frequency, and time.
Parameters for buzzer inhibition, heating, and contrast settings.
Parameters for heater integral/proportional coefficients, target temperature, and contrast.
Displays unit status, current measurement on output/network lines.
Shows voltage, current, and frequency measurements for network.
Displays genset voltage, current, frequency, and phase measurements.
Shows status of genset/network breakers, contactors, and programmable inputs.
Displays engine speed, operating hours, fuel level, temperature, pressure.
Shows status of programmable inputs like start-up, test, forced operation.
Displays actual power, power factor, and total energy consumed.
Shows alarm/warning status, error position, and total number of errors.
Accesses menus for password entry, main menu navigation.
Procedure to enter password using cursor keys.
Provides access to various menus like Inputs/Outputs, Parameters, Counters, etc.
Displays fuel consumption and time counters, including failed starts and correct starts.
Allows selection of previous errors to view conditions at the time of the alarm.
Programming for weekly/bimonthly schedules of actions like lock, start, test.
Details actions like Lock, Forced Start, Test, Free, with priority and range settings.
How to program action type, frequency, start/end times.
Procedure to set the time field (hours, minutes, seconds) and date.
Menu to select the display language from a list.
Procedure to change User and Maintenance passwords.
Calculates voltage/current harmonics, showing spectrum, component values, and THD.
Accessing menus for programming parameters like Measurements, Times, Regulations.
Associates text (max 15 chars) to programmable inputs/alarms.
Allows customization of the manufacturer's screen with company details.
Sets display operation of the generator set's control unit via Screen table parameters.
Table showing menu access for CEM, CEA, Associated, External for CEC7 unit.
Synchronizes genset/network signals by adjusting voltage, phase, and frequency.
Manages transfer of load between network and genset after synchronization.
Access to menu for generator set configuration adjustments.
Procedure for adjusting voltage response and AVR settings.
Steps to adjust generator set frequency response and Speed Gain settings.
Adjusts PID coefficients for amplitude/frequency to optimize synchronization.
Verifies correct synchronization operation by testing amplitude and frequency deviations.
Diagrams and specifications for the PHR7 measurements module.
Detailed wiring diagram for the PHR7 module, showing connections.
Lists signals, descriptions, types, and characteristics for inputs and outputs.
Details electrical specifications for power supply, CAN Bus, PNP/NPN inputs, and analogue inputs.
Provides physical dimensions of the PHR7 module.
Information on the CEC7 module, including installation and wiring.
Instructions for powering and connecting the CEC7 module.
Lists signals, descriptions, types, and characteristics for inputs and outputs.
Details electrical specifications for power supply and CAN Bus.
Provides physical dimensions of the CEC7 module.
Explanation of various warning and safety symbols used in the manual.
Supplied documentation, environmental conditions, and installation guidelines.
List of fuses required for equipment protection and their ratings.
Overview of CAN BUS: reliability, noise immunity, device capacity, length, baud rate.
Describes bus topology, terminator requirements, and impedance for CAN networks.
Cable characteristics based on length and number of nodes; noise immunity techniques.
Diagrams illustrating manual/automatic control unit, switching, CCrs, and USBCan connections.
Adjusts voltage measurements for genset/network; requires manufacturer password.
| Brand | Himoinsa |
|---|---|
| Model | CEC7 |
| Category | Control Unit |
| Language | English |