1-1
TROUBLESHOOTING
1. TROUBLESHOOTING
1.1 Initial Troubleshooting
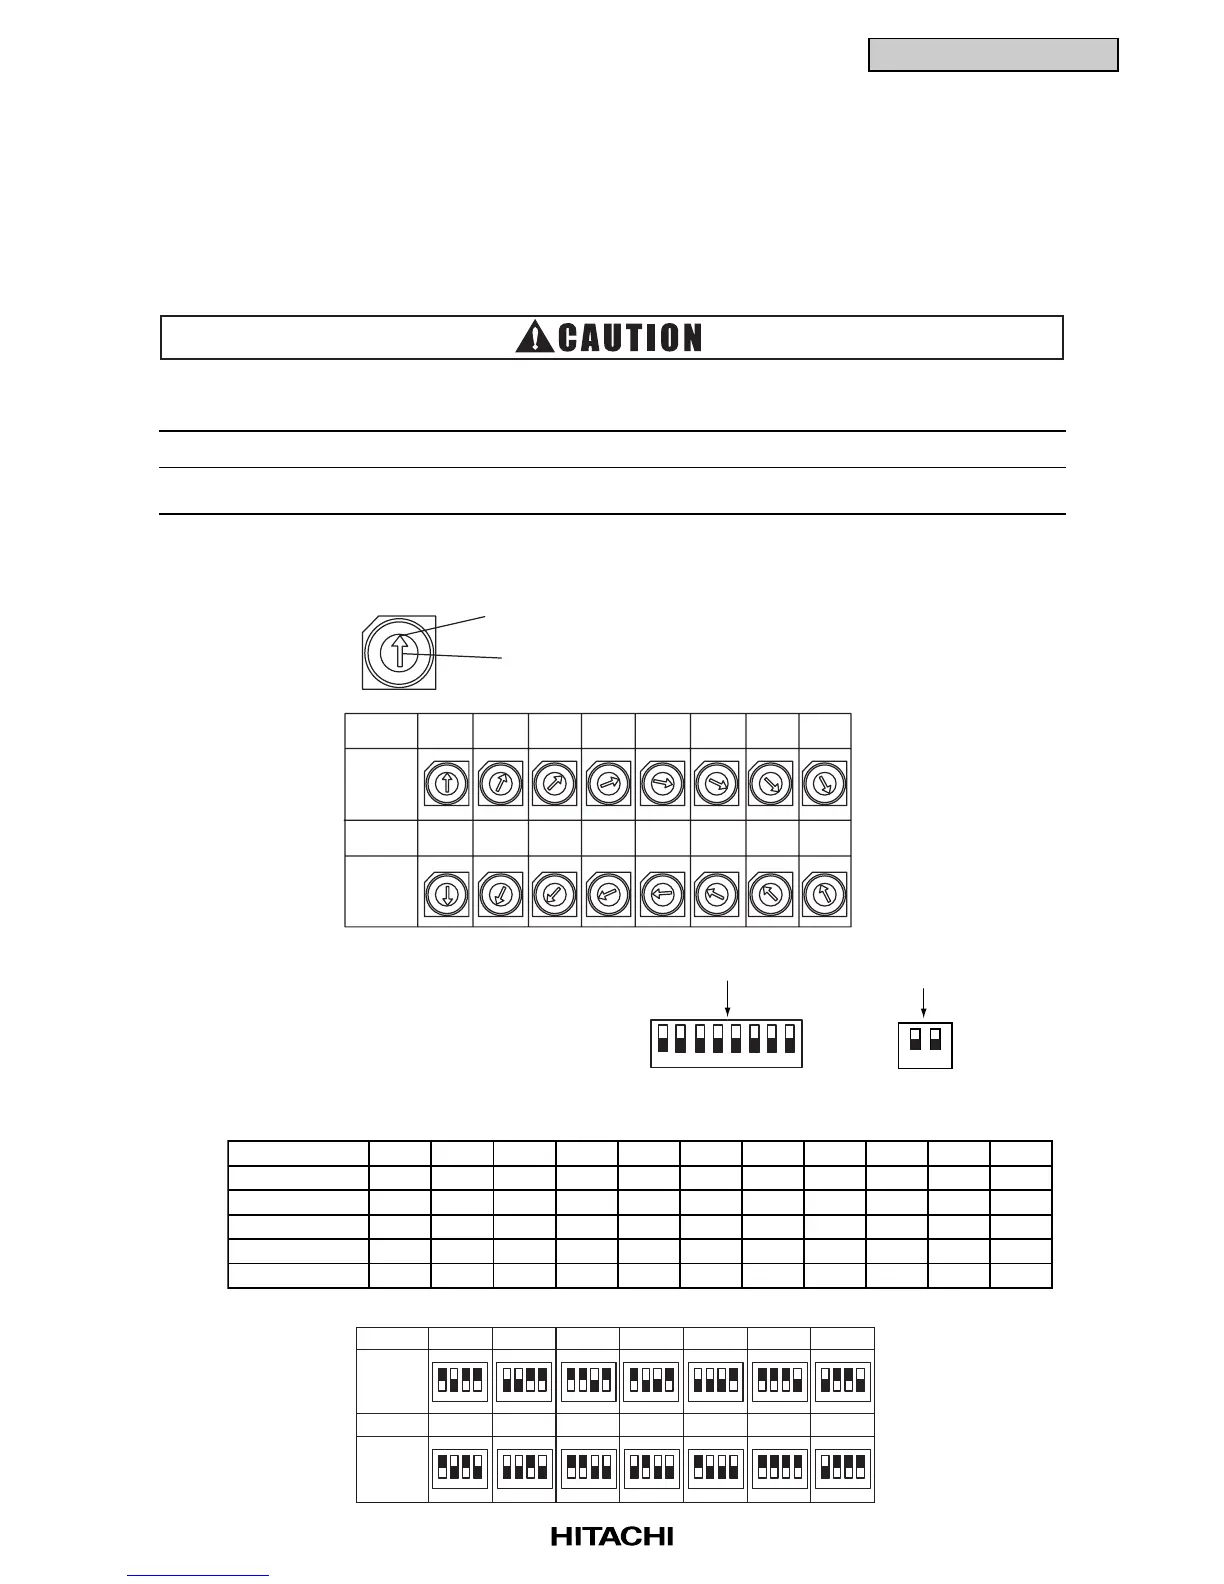
1.1.1 Rotary Switch and Dip Switch Setting
(1) Indoor Unit
The PCB in the indoor unit is equipped with 7 types of dip switches and rotary switch. Before testing
unit, set these dip switches according to the following instructions. Unless these dip switches are
set in the field, the unit can not be operated.
Before setting dip switches, firstly turn OFF power source and set the position of the dip switches.
If the switches are set without turning OFF the power source, the switches can not function.
The “” mark indicates position of dip switches. Figures show the setting before shipment.
a. Unit No. Setting (RSW)
Setting is required. Set the unit No. of all indoor units respectively and serially, by following
setting position shown in the table below. Numbering must start from “0” for every outdoor unit.
b. Optional Function Setting (DSW2)
No setting is required.
Setting position before shipment is all OFF.
0
1
2
3
4
5
6
7
8
9
A
B
C
E
F
D
Rotary
Switch
Setting
Rotary
Switch
Setting
No. 0
Unit
No. 1
Unit
No. 2
Unit
No. 3
Unit
No. 4
Unit
No.5
Unit
No. 6
Unit
No. 7
Unit
No. 8
Unit
No. 9
Unit
No. 10
Unit
No. 11
Unit
No. 12
Unit
No. 13
Unit
No. 14
Unit
No. 15
Unit
Setting Position
Set by inserting slotted screwdriver
into the groove
0
1
2
3
4
5
6
7
8
9
A
B
C
E
F
D
0
1
2
3
4
5
6
7
8
9
A
B
C
E
F
D
0
1
2
3
4
5
6
7
8
9
A
B
C
E
F
D
0
1
2
3
4
5
6
7
8
9
A
B
C
E
F
D
0
1
2
3
4
5
6
7
8
9
A
B
C
E
F
D
0
1
2
3
4
5
6
7
8
9
A
B
C
E
F
D
0
1
2
3
4
5
6
7
8
9
A
B
C
E
F
D
0
1
2
3
4
5
6
7
8
9
A
B
C
E
F
D
0
1
2
3
4
5
6
7
8
9
A
B
C
E
F
D
0
1
2
3
4
5
6
7
8
9
A
B
C
E
F
D
0
1
2
3
4
5
6
7
8
9
A
B
C
E
F
D
0
1
2
3
4
5
6
7
8
9
A
B
C
E
F
D
0
1
2
3
4
5
6
7
8
9
A
B
C
E
F
D
0
1
2
3
4
5
6
7
8
9
A
B
C
E
F
D
0
1
2
3
4
5
6
7
8
9
A
B
C
E
F
D
0
1
2
3
4
5
6
7
8
9
A
B
C
E
F
D
NOTE
c. Capacity Code Setting (DSW3)
No setting is required, due to setting before shipment. This switch is used for setting the capacity
code which corresponds to the Horse-Power of the indoor unit.
1234
ON
OFF
1234
ON
OFF
1234
ON
OFF
1234
ON
OFF
1234
ON
OFF
1234
ON
OFF
1234
ON
OFF
1234
ON
OFF
1234
ON
OFF
1234
ON
OFF
1234
ON
OFF
1234
ON
OFF
1234
ON
OFF
1234
ON
OFF
Setting
Position
Setting
Position
1.00.8 1.3 1.5 1.8
2.32.0
2.8 3.0 4.0 5.0 8.0 10.0
2.5
Horsepower
Horsepower
0.8 1.0 1.5 2.0 2.3 2.5 3.0 4.0 5.0 8.0 10.0
RCI
RPI
RCD
RPF and RPFI
RPK
: Available
12
ON
OFF
RPC(Before Alteration)
RCD(Before Alteration)
RPI-0.8 to 1.5(Before Alteration)
12 3 4 5 6 7 8
ON
OFF
RPF, RPFI, RPI-8,10 and RPK
 Loading...