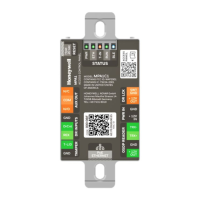
82 MPA2C3 Installation Guide
Push-in terminal block
You can connect a solid or braided wire up to 18 Gauge (0.5 mm diameter) in the
connection points.
The default settings for the door outputs are, using the push in terminal blocks
:
The Door output is a Normally Open (NO) output
• Move jumper to NC when Power-to-unlock device is connected
The Door output is powered from the panel’s internal 12V power source.
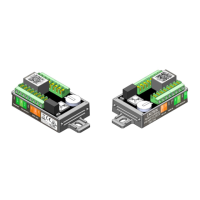
• Always apply a surge device, e.g a diode in antiparallel configuration at the
locking device.
Internal power source for locking devices for a 2-door panel
When the power source is internal 12V, set the jumper OUT to 12V and connect the
locking device on OUT and Return
The available voltage range is 10VDC – 12VDC. The maximum current that can be
switched is 750mA. The internal power source is shared between OUT1 and OUT
AUX1 which has a combined current of maximum 750mA. Separately this internal
power source is shared between OUT2 and OUT AUX2 which has a combined cur-
rent of maximum 750mA.
The below figure shows the connection and relevant jumper setting when internal
power is used to the outputs in a 2-door panel.
 Loading...