4-6 MAX200 Instruction Manual
OPERATION
Monitor the consumable parts periodically for signs of wear. A good rule of thumb is to check the parts after every
150 starts (pierces, edge starts, parts cut, etc.). (Refer to PAC200T/E Consumables in Section 6.)
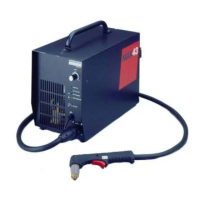
To remove the consumables:
1. Unscrew and remove the retaining cap.
2. Check the shield for external signs of wear. The shield must be clean and clear of metal debris. The gas holes
along the edge of the shield must not be blocked with debris. Check that the center hole does not have any
nicks or gouges, and shows no signs of arcing.
3. Unscrew and remove the shield from the retaining cap. Inspect the gas holes from the inside. Check that the
holes are clear of metal and other debris. (Debris will cause arcing.) If the shield is still good, screw it back on
to the retaining cap and tighten it. If it is damaged, replace it with a new one.
4. Inspect the two O-rings on the torch. They must be lubricated and undamaged. If they are dry, lubricate them
lightly with a very thin film of the lubricant provided in the spare parts kit. If they are damaged, replace them.
5. Using the 3/4" side of the 027194 wrench, remove the nozzle. Inspect it for damage or signs of wear. Check
that the inside of the nozzle is clean and bright, with no deposits from the electrode. If you clean the inside of
the nozzle with steel wool, remove any pieces of the steel wool afterward. The hole in the nozzle must not be
worn or oval-shaped.
6. Using the 3/8" center hole in the 027194 wrench, remove the electrode. If the center of the electrode has a pit
more than 2.0 mm (1/16") deep, replace it. If the electrode is still good, inspect its O-ring – it must be lubricated
and undamaged. If it is dry, lubricate it lightly with a very thin film of lubricant provided in the spare parts kit. If it
is damaged, replace it.
7. Remove the swirl ring from the electrode and inspect it. It must be clean, and the holes on the top and sides
must be unplugged. If the swirl ring is still good, inspect its O-ring. It must be lubricated and undamaged. If it is
dry, lubricate it lightly with a very thin film of lubricant provided in the spare parts kit. If it is damaged, replace it.
8. Inspect the inside of the torch body by using a mirror, or by looking carefully inside. The inside of the torch
body must be clean and undamaged. If the center water tube is nicked or damaged, see Changing the Water
Tube on page 4-8.
Operating Tips
Changing Consumable Parts
WARNING
Always unplug the power supply before inspecting or changing the torch parts.