4
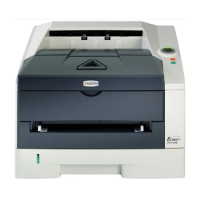
3. Fit the curl eliminator (K) to the eject cover
(1) such that the projections (4) on the cover
fit into the two ends of the curl eliminator (K).
4. Secure the curl eliminator (K) using the two
screws (2) removed in step 2.
5. Close the eject cover (1).
6. Fit the latch catch (B) to the eject cover (1)
using two M4 × 10 binding screws (F).
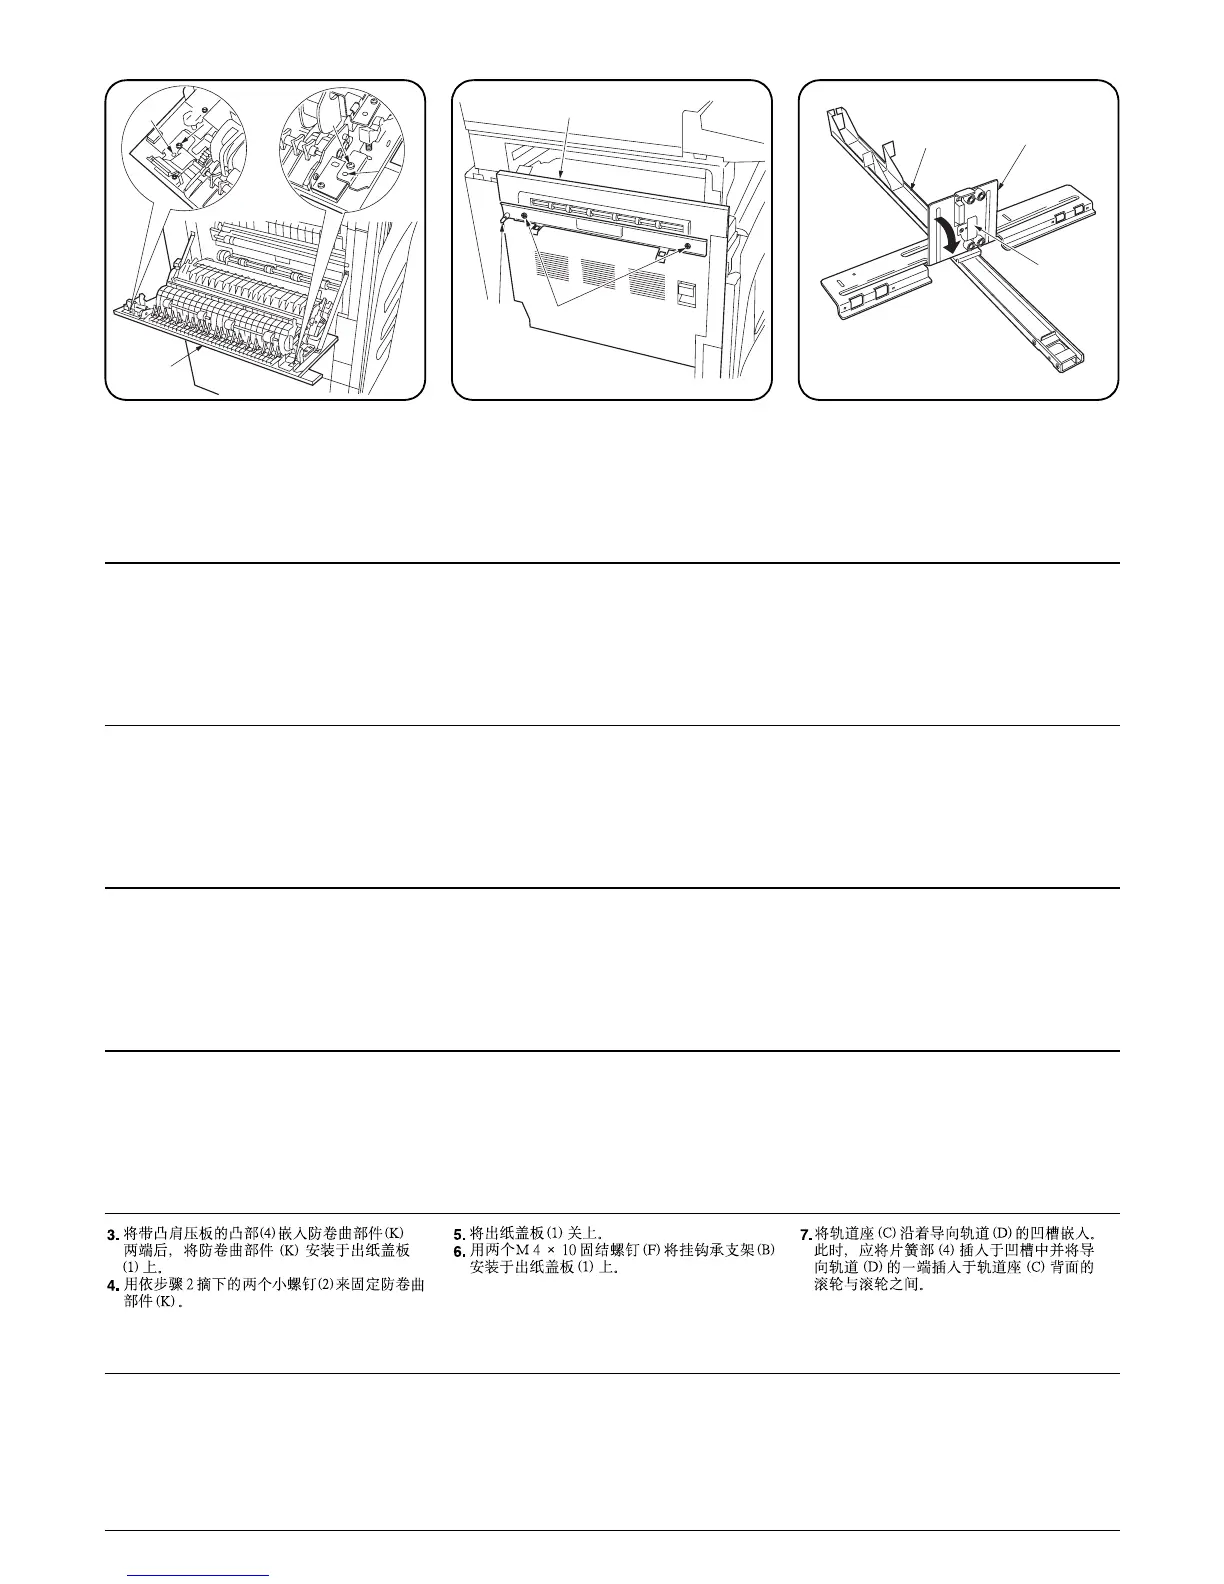
7. Align the rail retainer (C) with the groove of
the guide rail (D) and attach the rail retainer
(C) to the guide rail (D). Make sure that the
plate spring (4) of the rail retainer (C) fits into
the groove and the edge of the guide rail (D)
fits between the pulleys on the reverse side
of the rail retainer (C).
3. Fixer l’élément d’élimination des boucles (K)
au couvercle d’éjection (1) de telle façon que
les projections (4) du couvercle s’insèrent
dans les deux extrémités de cet élément (K).
4. Fixer l’élément d’élimination des boucles (K)
à l’aide des deux vis (2) retirées à l’étape 2.
5. Fermer le couvercle d’éjection (1).
6. Fixer le pontet du loquet (B) au couvercle
d’éjection (1) à l’aide de deux vis de
raccordement M4 × 10 (F).
7. Aligner l’élément de rétention du rail (C) sur
le sillon de la glissière (D) et le fixer à
l’élément de rétention du rail (C) à la
glissière (D). Veiller à ce que le ressort de
plaque (4) de l’élément de rétention du rail
(C) s’adapte au sillon et que l’extrémité de la
glissière (D) puisse passer entre les poulies
sur le côté opposé de l’élément de rétention
du rail (C).
3. Coloque el eliminador de enrollamiento (K)
en la cubierta de expulsión (1) de modo que
las proyecciones (4) de la cubierta encajen
en los dos extremos del eliminador de
enrollamiento (K).
4. Asegure el eliminador de enrollamiento (K)
usando los dos tornillos (2) que quitó en el
paso 2.
5. Cierre la cubierta de expulsión (1).
6. Coloque el cerrojo (B) en la cubierta de
expulsión (1) usando dos tornillos de
sujeción M4 × 10 (F).
7. Alinee el retén del carril (C) con la
acanaladura del carril guía (D) y anexe el
retén del carril (C) al carril guía (D).
Asegúrese de que el resorte de la placa (4)
del retén del carril (C) encaje en la
acanaladura y que el borde del carril guía
(D) encaje entre las poleas del lado inverso
del retén del carril (C).
3. Bringen Sie den Wellenverhinderer (K) so an
die Auswurfabdeckung (1) an, daß die
Vorsprünge (4) auf der Abdeckung in die
zwei Enden des Wellenverhinderers (K)
passen.
4. Befestigen Sie den Wellenverhinderer (K)
mittels der in Schritt 2 entfernten zwei
Schrauben (2).
5. Schliessen Sie die Auswurfabdeckung (1).
6. Bringen Sie den Riegelschloßbausatz (B)
mittels der zwei M4 × 10 Verbundschrauben
(F) an die Auswurfabdeckung (1) an.
7.
Richten Sie die Schienenhalterungseinheit
(C)
mit
der Rille der Führungsschieneneinheit
(D)
aus, und
bringen Sie die Schienenhalterungseinheit
(C)
an
die Führungsschieneneinheit
(D)
an. Stellen Sie
sicher, daß die Tellerfeder (4) der
Schienenhalterungseinheit
(C)
in die Rille paßt und
die Kante der Führungsschieneneinheit
(D)
zwischen den Seilzügen auf der Rückseite der
Schienenhalterungseinheit
(C)
sitzt.
3. Inserire l’eliminatore degli accartocciamenti
(K) nella copertura dell’uscita carta (1) in
modo tale che le proiezioni (4) sulla
copertura siano inserite nelle due estremità
dell’eliminatore degli accartocciamenti (K).
4. Fissare l’eliminatore degli accartocciamenti
(K) utilizzando le due viti (2) rimosse al punto
2.
5. Chiudere la copertura dell’uscita carta (1).
6. Inserire il dispositivo di arresto (B) nella
copertura dell’uscita carta (1) utilizzando due
viti di serraggio M4 × 10 (F).
7. Allineare il fermo della guida (C) con la
scanalatura della guida della rotaia (D) e
fissare il fermo della guida (C) alla guida
della rotaia (D). Assicurarsi che la molla
della piastra (4) del fermo della guida (C) sia
collocata nella scanalatura e che il bordo
della guida della rotaia (D) sia inserito tra le
pulegge sul lato opposto del fermo della
guida (C).
3. デカーラー(K) の両端に半押し (4) がはまる
位置で、デカーラー(K) を排出カバー(1) に
取り付ける。
4. 手順 2 で外したビス (2)2 本でデカーラー
(K) を固定する。
5. 排出カバー(1) を閉じる。
6. ラッチ受け板 (B) をビス M4 × 10 バインド
(F)2 本で排出カバー(1) に取り付ける。
7. レール取付板 (C) をガイドレール (D) の溝
に合わせてはめ込む。
板バネ部 (4) が溝の中に入り、レール取付板
(C) 裏側のコロとコロの間にガイドレール
(D) の端が入るようにする。

 Loading...