6
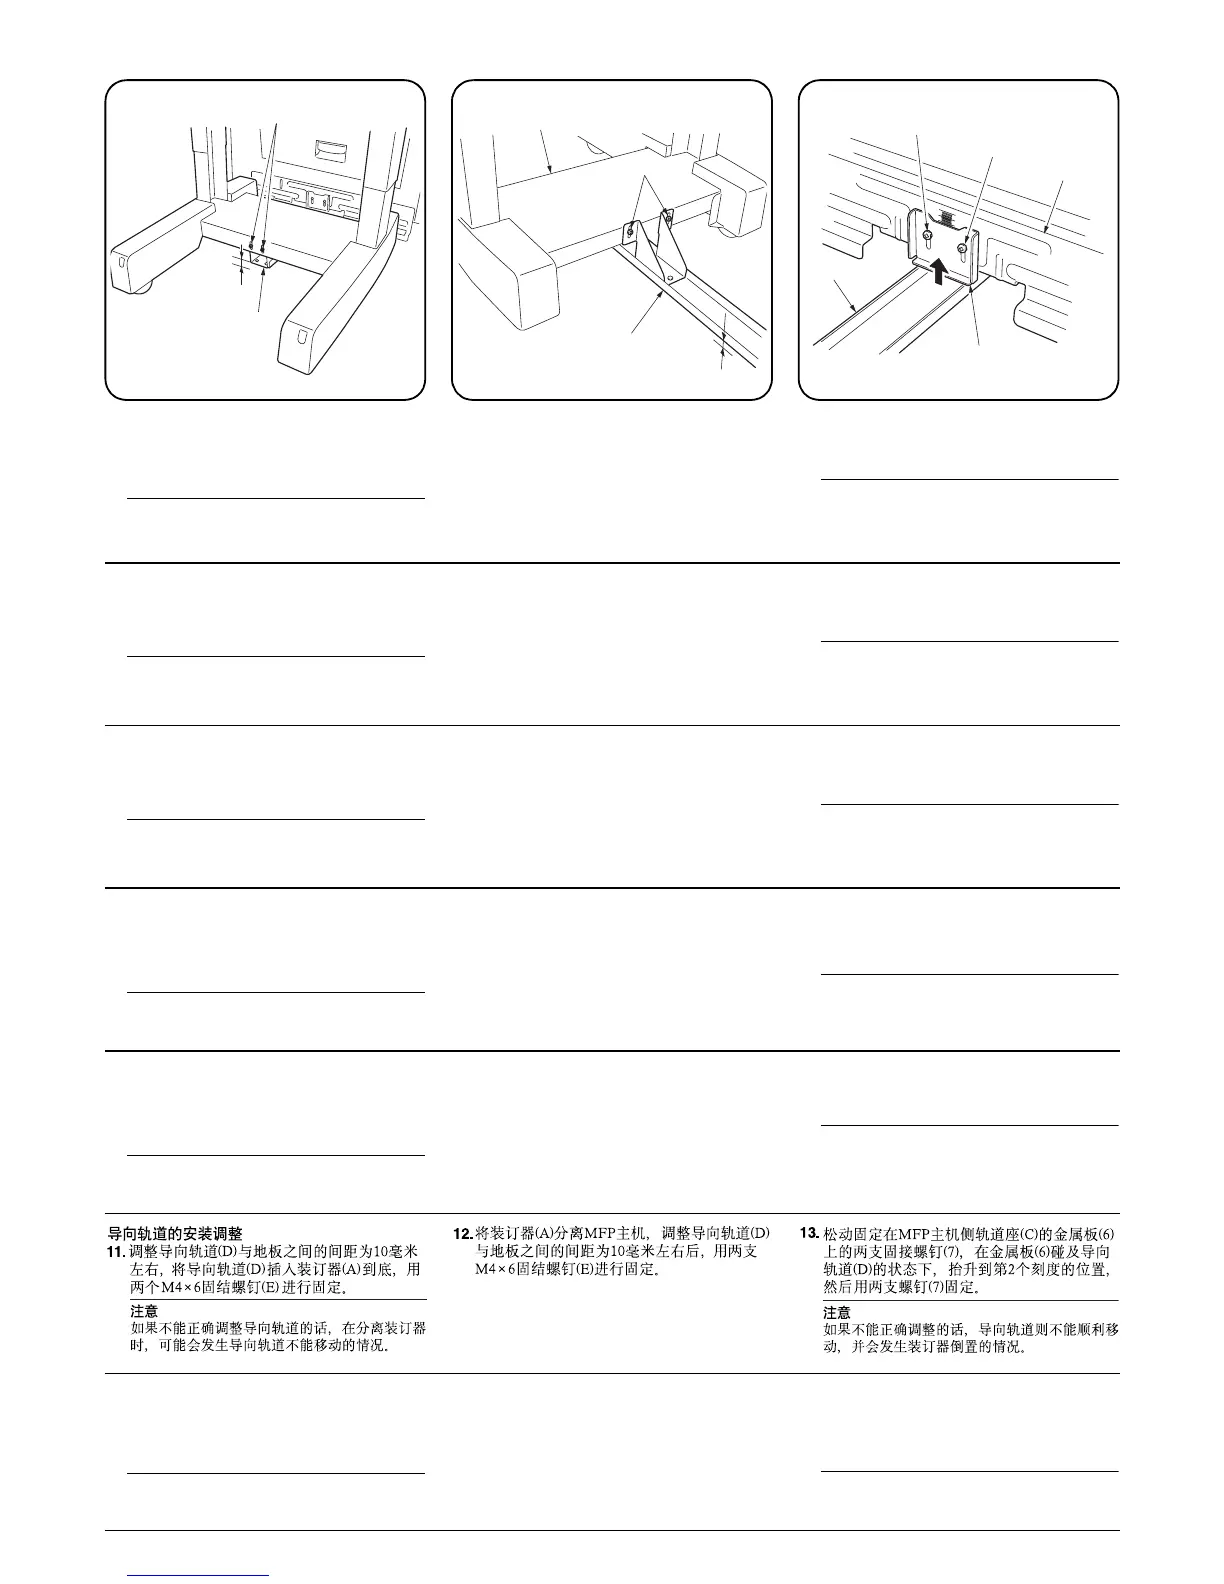
Fitting and adjusting the guide rail
11. While pressing the guide rail (D) to the
document finisher (A) so that the gap between
the guide rail (D) and the floor is approximately
10 mm, secure it using two M4 × 6 binding
screws (E).
Note
If the guide rail is not properly adjusted, the
guide rail may not move when the document
finisher is separated.
12.Separate the document finisher (A) from the
MFP and secure it using two M4 × 6 binding
screws (E) so that the gap between the
guide rail (D) and the floor is approximately
10 mm.
13. Loosen temporarily the two screws (7) that secure
the sheet metal (6) of the rail mounting plate (C) on
the MFP, raise the sheet metal (6) by two divisions
of the scale from the guide rail (D), and tighten the
two screws (7).
Note
If the guide rail is not properly adjusted, the
guide rail may not move smoothly or the
document finisher may fall down.
Fixation et réglage de la glissière
11. Tout en pressant la glissière (D) contre le
retoucheur de document (A) de façon que l’écart
entre la glissière (D) et le sol soit d’environ 10 mm,
la fixer à l’aide de deux vis de raccordement M4 × 6
(E).
Remarque
Si la glissière n’est pas réglée correctement, la
glissière risquera de ne pas se déplacer lorsque le
retoucheur de document sera séparé.
12.Séparer le retoucheur de document (A) du
MFP, puis le fixer à l’aide de deux vis de
raccordement M4 × 6 (E) de façon que
l’écart entre la glissière (D) et le sol soit
d’environ 10 mm.
13. Desserrer provisoirement les deux vis (7) qui fixent
la feuille métallique (6) de la plaque de montage du
rail (C) sur le MFP, élever la feuille métallique (6)
de deux crans sur l’échelle de la glissière (D), puis
resserrer les deux vis (7).
Remarque
Si la glissière n’est pas réglée correctement, la
glissière risquera de ne pas se déplacer
souplement ou le retoucheur de document risquera
de tomber.
Fijación y ajuste del carril de guía
11. Mientras presiona el carril de guía (D) en el
finalizador de documentos (A) para que la
separación entre el carril de guía (D) y el piso sea
de unos 10 mm, asegúrelo utilizando dos tornillos
de fijación M4 × 6 (E).
Nota
Si el carril de guía no está bien ajustado, el carril
de guía puede no moverse cuando se separa el
finalizador de documentos.
12.Separe el finalizador de documentos (A) del
MFP y asegúrelo utilizando dos tornillos de
fijación M4 × 6 (E) para que la separación
entre el carril de guía (D) y el piso sea de
unos 10 mm.
13. Afloje temporalmente los dos tornillos (7) que
aseguran la hoja de metal (6) de la placa de
montaje de carril (C) en el MFP, levante la hoja de
metal (6) con dos divisiones de la escala del carril
de guía (D) y apriete los dos tornillos (7).
Nota
Si no se ajusta correctamente el carril de guía, el
carril de guía puede no moverse suavemente o el
finalizador de documentos puede caer.
Anbringen und Einstellen der
Führungsschieneneinheit
11. Die Führungsschiene (D) gegen den Dokument
Finisher (A) gedrückt halten, so dass der Abstand
zwischen der Führungsschiene (D) und dem Boden
ca. 10 mm beträgt, und mit zwei M4 × 6
Befestigungsschrauben (E) sichern.
Hinweis
Falls die Führungsschieneneinheit nicht korrekt
eingestellt ist, bewegt sie sich beim Trennen des
Dokument Finishers eventuell nicht.
12.Den Dokument Finisher (A) vom MFP
trennen und mit zwei M4 × 6
Befestigungsschrauben (E) sichern, so dass
der Abstand zwischen der Führungsschiene
(D) und dem Boden ca. 10 mm beträgt.
13. Die zwei Schrauben (7), die das Blech (6) der
Schienenmontageplatte (C) am MFP sichern,
vorübergehend lösen, das Blech (6) um zwei
Teilstriche der Skala von der Führungsschiene (D)
aus anheben, und die zwei Schrauben (7) wieder
anziehen.
Hinweis
Falls die Führungsschieneneinheit nicht korrekt
eingestellt ist, bewegt sie sich eventuell nicht
reibungslos, oder der Dokument Finisher kann
herunterfallen.
Montaggio e regolazione della guida della
rotaia
11. Mentre si tiene premuta la guida della rotaia (D)
alla finitrice di documenti (A) in modo che lo spazio
tra la guida della rotaia (D) e il pavimento sia di
circa 10 mm, fissarla a mezzo di due viti di
serraggio M4 × 6 (E).
Nota
Se la guida della rotaia non è regolata
correttamente, potrebbe non muoversi quando il
separatore la finitrice di documenti verrà staccato.
12.Separare la finitrice di documenti (A)
dall’MFP per fissarla a mezzo di due viti di
serraggio M4 × 6 (E) in modo che lo spazio
tra la guida della rotaia (D) e il pavimento sia
di circa 10 mm.
13. Allentare temporaneamente le due viti (7) che
fissano il foglio metallico (6) della piastra di
montaggio della rotaia (C) dell’MFP, sollevare il
foglio di metallo (6) di due posizioni sulla guida
della rotaia (D) e serrare le due viti (7).
Nota
Se la guida della rotaia non è regolata
correttamente, potrebbe non muoversi
scorrevolmente oppure la finitrice di documenti
potrebbe cadere.
ガイドレールの取付調整
11.ガイドレール (D) と床面の隙間が約 10mm に
なるように、ガイドレール (D) をドキュメン
トフィニッシャ(A) に突き当てながら、ビス
M4 × 6 バインド (E)2 本で固定する。
注意
正しく調整しないと、ドキュメントフィニッシャの
切り離し時、ガイドレールが動かない恐れがある。
12.ドキュメントフィニッシャ(A) を MFP 本体よ
り切り離し、ガイドレール (D) と床面の隙間
が約 10mm になるように、ビス M4 × 6 バイン
ド (E)2 本で固定する。
13.MFP 本体側のレール取付板 (C) の板金 (6) を
固定しているビス (7)2 本をいったん緩め、
板金 (6) をガイドレール (D) に当てた状態
から 2 目盛り上の位置にあげて、ビス (7)2
本を固定する。
注意
正しく調整しないと、ガイドレールがスムーズに動
かない。又ドキュメントフィニッシャが倒れる恐れ
がある。
D
E
10mm
D
E
A
10mm
6
D
7
7
C

 Loading...