INSTALLATION & SERVICE MANUAL – EASYLIFT – UK VERS 1.5
Liftup A/S Hagensvej 21| DK-9530 Støvring | Denmark | T: +45 96 86 30 20 | M: support@liftup.dk | www.liftup.dk | CVR DK-1015 3964
Control board LED signal descriptions:
Supply for actuator ready
Supply for ramp (Secondary) / safety barrier
ready (Primary)
Over current ramp (Secondary) / safety barrier
(Primary)
Battery charged = Maintenance voltage 26,22 V
Emergency switch released OK
Volume for audible alarms
Slave actuator end SW, green=down
Master actuator end SW, green=down
12 V DC supply OK (Supply or batteries
connected)
Safety switches Under pan OK or bypassed by
jumper
IR upper step OK or bypassed by jumper
Ramp switch OK or bypassed by jumper
IR stairs and girder squeeze protection OK or
bypassed by jumper
Safety barrier switch OK or bypassed by jumper
Allows auto return and soft stop
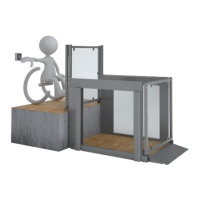
3.5 Control board dipswitches
Dipswitches for resetting and forcing the board into boot mode, is located at the bottom of the
boards.
Push to reset the system. The processor will
restart and reload the current firmware.
To force the board into boot mode. Only for
firmware update.
Push both F-BOOT and RESET, and release
RESET before F-BOOT => The system is now in
boot mode. (The HB LED will stop flashing). See
3.4.