EasyManua.ls Logo

Medonic M16C-US - User Manual

Medonic M16C-US
109 pages
Print Icon
To Next Page IconTo Next Page
Loading...
Art no 1504155 May 2006
Medonic M-series

Table of Contents

Questions and Answers

  • R
    ryan91Aug 2, 2025
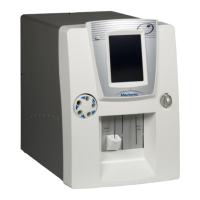
    What to do if results are not being sent to computer after sample analysis on Medonic Measuring Instruments?
    • S
      Sherry KellyAug 2, 2025
      If results are not being sent to your computer after sample analysis with your Medonic Measuring Instruments, first, ensure that the Auto Send Mode is not set to ‘0’. Also, verify that the analyzer is connected to the computer, that the computer is turned on, and that the analyzer is set to serial output and not print mode only. If the serial output has timed out, make sure that the HW handshake has been selected. Wait until the previous sample has finished transmitting, then resend the selected sample.
  • A
    Alan WrightAug 8, 2025
    What to do if results are not printing out after sample or control analysis on Medonic Measuring Instruments?
    • K
      Kayla MedinaAug 9, 2025
      If results are not printing out after sample or control analysis on your Medonic Measuring Instruments, verify that Auto Print Mode is NOT set to ‘0’. Also, check that the printer is connected to the instrument and that the instrument setup is correct for the printer in use. If a Printer Alarm message is displayed, the printer may not be ready to print; wait until the printer has finished with the previous printout.
  • T
    Teresa GreenAug 14, 2025
    Why does the printout have unusual layout or strange characters on Medonic Measuring Instruments?
    • P
      Philip MorrisAug 15, 2025
      If the printout from your Medonic Measuring Instruments has an unusual layout or strange characters, verify that the printer type matches the printer being used and that the correct paper format has been selected for the printer paper. This issue may occur if a new printer was connected but not matched with the analyzer setup.
  • L
    Luke SmithAug 20, 2025
    How to solve serial output Ack problem on Medonic Measuring Instruments?
    • W
      wramirezAug 20, 2025
      To solve the serial output Ack problem with your Medonic Measuring Instruments, make sure that the Send with Ack. has been selected. Verify that the computer is turned on and connected to the analyzer, and ensure that the computer’s receiving program is active.
  • M
    Michael RogersAug 27, 2025
    Why the data sent does not seem correct from Medonic M16C-US?
    • G
      gibsonhaleyAug 27, 2025
      To correct the data sent from your Medonic Measuring Instruments, make sure that the correct HW handshake and Auto Send Mode has been selected in the analyzer. This problem occurs if the serial setup in the analyzer is incorrect.

Summary

Section 1: Safety Instructions

Intended Use

Defines the analyzer's purpose and intended application in vitro diagnostic testing.

Safety Instructions

Lists general safety guidelines for operator and instrument protection.

Biohazards

Addresses handling of potentially biohazardous materials like blood samples.

Section 2: Installation

Installation Checklist and Menu

Guides through the installation steps using a checklist and menu.

Reagent Installation

Describes the process of installing reagents and connecting level sensors.

Section 4: Instrument Setup

Initial Setup

Guides through essential initial settings like date, time, and language.

Reagent Setup

Describes how to enter and manage reagent information and statistics.

Section 5: Sample Analysis

Preparations before Analysis

Details sample collection, handling, and anticoagulant recommendations.

Analyzing the Sample (Open Tube)

Step-by-step guide for analyzing samples using the open tube method.

Analyzing the Sample (Pre-dilution procedure)

Details the process for analyzing pre-diluted samples.

Analyzing the Sample (Micro Pipette Adapter, MPA)

Explains sample analysis using the MPA with venous and capillary blood.

Analyzing the Sample (Cap Piercing Device)

Guides sample analysis using the cap piercing device.

Analyzing the Sample (Autoloader)

Describes how to analyze samples using the autoloader system.

Section 6: Quality Control (QC) and Blood Control Memory

Quality Control (QC)

Details procedures for running control samples and inputting assay values.

Section 7: Calibration

Preparations before calibration

Outlines necessary checks and preparations before performing calibration.

Calibration

Provides the procedure for calibrating the instrument across different modes.

Section 12: Troubleshooting

Communication Issues

Addresses problems related to printers, barcode readers, and serial data communication.

Warning Displays

Describes warning displays and instructs on resolving issues.

Appendix A

Discordant Results

Troubleshooting Discordant Results

Offers a flowchart to diagnose and resolve discordant laboratory results.

Display Issues

Troubleshooting Display Issues

Guides on diagnosing and resolving problems related to the instrument's display.

High Background Counts

TU or TL ERRORS

Medonic M16C-US Specifications

General IconGeneral
CategoryHematology Analyzer
Throughput60 samples per hour
Measurement ParametersWBC, RBC, PLT, HGB, MCV, HCT, RDW, PCT, MPV, PDW, LYM%, MON%, NEU%, EOS%, BAS%, LYM#, MON#, NEU#, EOS#, BAS#
Sample TypeWhole blood
ConnectivityUSB, Ethernet
Power Supply100-240V~ 50/60Hz