32
General Settings
☝ Attention All parameters explained here are banked,
which means you can set different values for three different
banks/ight modes (four, in case you want to use bank four
for autorotation . To use this feature, install the Pro Parame-
ters-App). The parameter for the active bank is highlighted
in white. The highlighting changes immediately when you
operate the switch assigned to bank switching.
☝ Attention Once you enter a value (like ‘Mainrotor Expo’)
and move one of the rotary knobs, the knob automatically
assigns itself to the parameter in question. Note that the
rotary knob position is absolute. This means if it is set to 50
for a specic value, and you enter a bank which has a value
of 70, rotating the knob will make the parameter jump to 50
rst, before it changes to the selected value. The rotary
knob stays assigned until you turn off the transmitter or
change the assignment, even if you exit the setup to the
main screen.
☝ Attention To avoid accidental changing of parameters, you
may assign a switch to temporarily lock and unlock chang-
ing parameters with the rotary knobs. Alternatively you may
lock this feature completely (Transmitter Setup/Assign &
Calibrate/Mandatory Switches).
☝ Attention You may also change values with the EDS Dial.
Note that the position of the EDS Dial is relative. This
means it will always change parameters from where they
are currently set. This feature is only active for the parame-
ter currently selected from the menu.
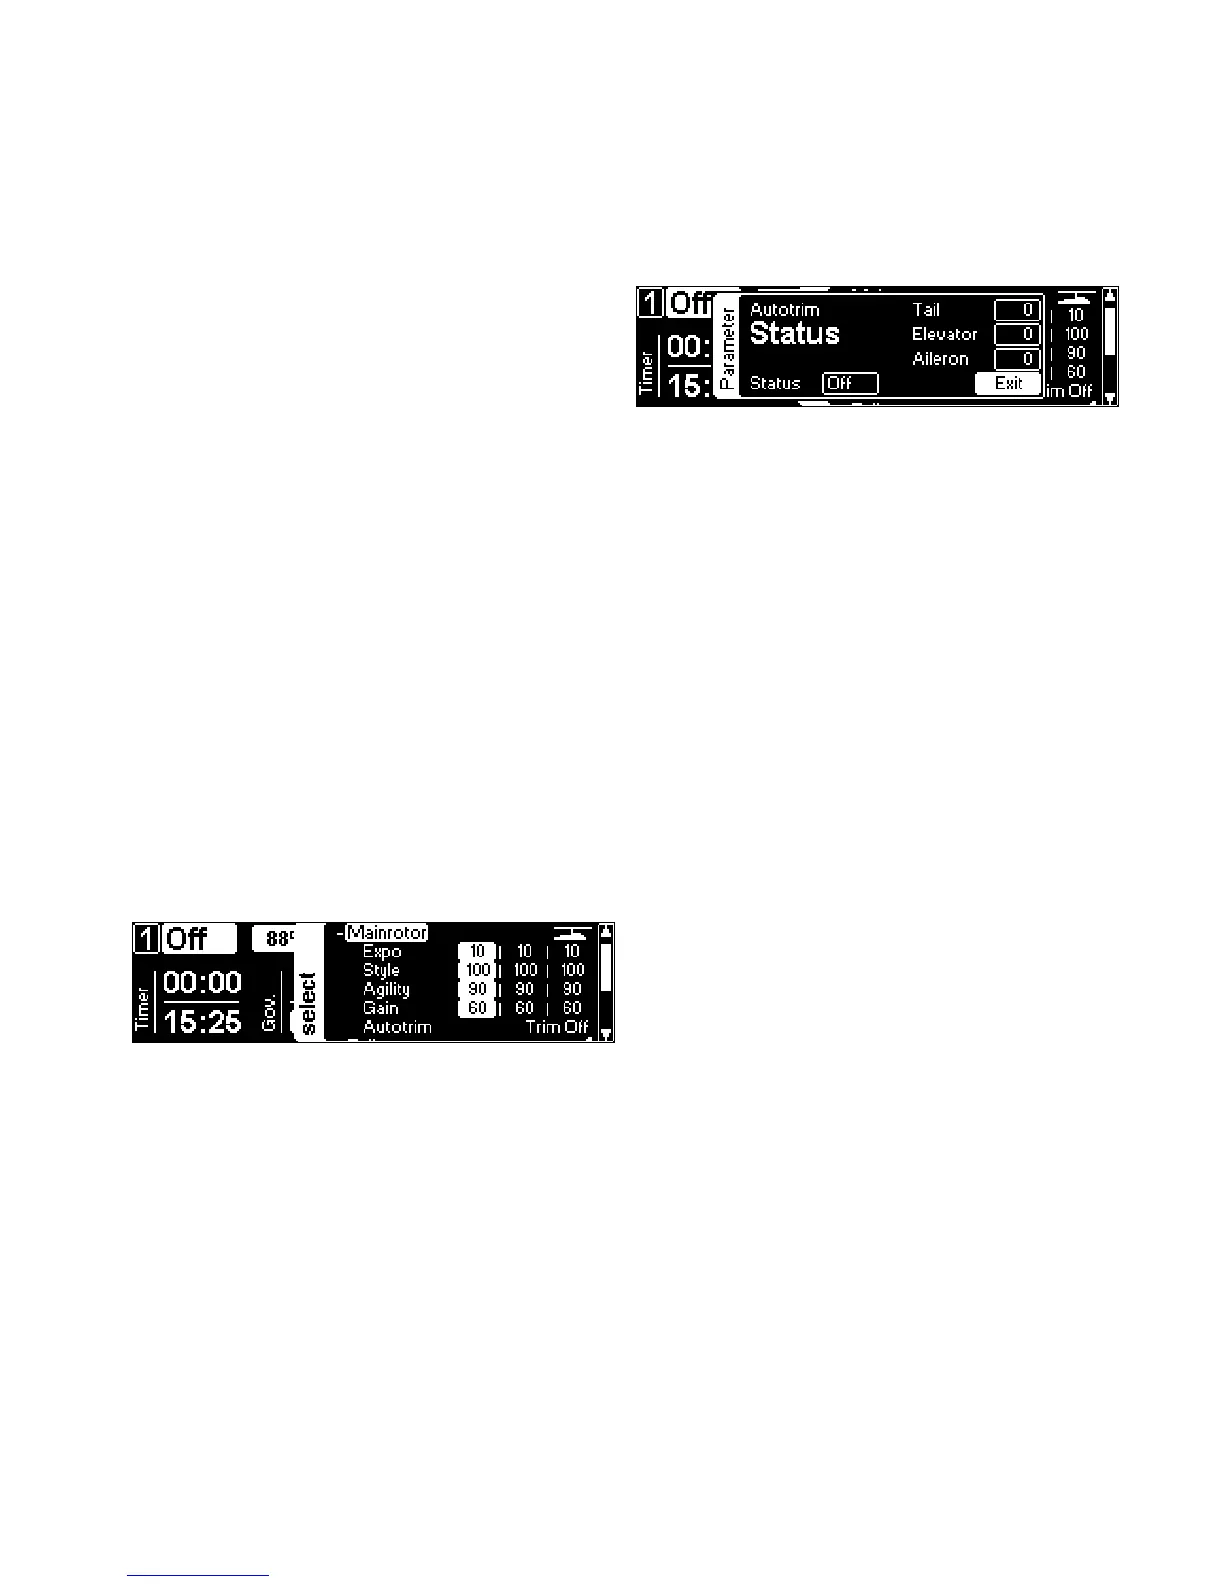
■ Exponential
alters the control curve from stick (input) to swash plate
(output) in a way that it feels less direct/aggressive
around center.
■ Style
affects the overall response of the heli: Higher values
result in a more precise feel (can be compared to a heli
on a simulator), lower values result in a more vivid feel
(can be compared to the feel of a ybarred heli).
■ Agility
sets the overall roll and ip rate of the model. It can be
compared to Dual Rate on conventional radios. The
sensible range is from 60 (for scale ight) through 80-90
(for sports- and 3-D-ying) to 110 (for aggressive 3-D-
ight).
■ Gain
adjusts the gyro gain for the aileron and elevator gyros.
Higher values result in a tighter, crisper feeling on the
cyclic controls. Too high a value will result in oscillations
after stick inputs. The sensible range is from 40 (for 250
size helis) through 90 (for 500-800 size helis) to 120 (for
large scale ships). This value will be pre-set by the
choice of heli in the setup wizard.
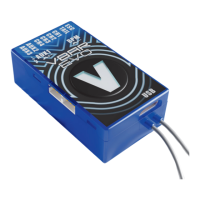
■ Autotrim
Autotrim activates the automatic trim feature of your
VBar Flybarless controller. If enabled, the VBar will au-
tomatically trim the swash plate and the tail when the
following conditions are met: the motor must be running,
collective must be in the range for hovering, and the cy-
clic and tail sticks must be left alone.
To perform a trim ight, bring the heli into a stable hover
in front of you, then let it drift with no further stick inputs.
If heli moves to far away, bring the heli back into a stable
hover in front of you. After a few iterations you will notice
that the heli will drift less and less, until it nally (almost)
remains in the position you put it in.
To verify the quality of a trim ight, do a stationary pirou-
ette: the heli should stay in place.
Now land and move the collective stick to 0° collective
or slightly below, to prevent the autotrim function from
continuing the trim process.
The learned values will be saved if you deactivate the
auto trim feature, or if you cut power your VBar.
Note: Do a trim ight only in calm weather conditions. Wind
will affect the quality of the trim ight.
Note: You can alter the trim values here to manually trim
e. g. the tail center position, too. Swash plate trims should
be done in the Heli Setup Wizard.
Note: Trim ight is a global parameter. You get the best re-
sults if you perform the trim ight at the rpm setting you
mainly intend to use with a particular heli.

 Loading...