EasyManua.ls Logo

Miller Syncrowave 250 DX - User Manual

Miller Syncrowave 250 DX
82 pages
Print Icon
To Next Page IconTo Next Page
Loading...
Visit our website at
www.MillerWelds.com
Processes
Description
TIG (GTAW) Welding
Stick (SMAW) Welding
Arc Welding Power Source
OM-363 213117Z
200812
Syncrowave 250 DX / 350 LX
ESPAÑOL FRANÇAIS ENGLISH
CE And Non-CE Models
File: TIG (GTAW)

Table of Contents

Other manuals for Miller Syncrowave 250 DX

Questions and Answers

  • J
    Joseph RobinsonSep 12, 2025
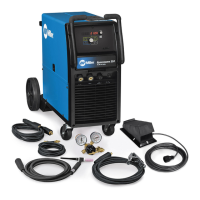
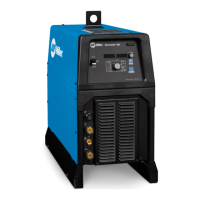
    What to do if there is erratic or improper weld output on Miller Syncrowave 250 DX?
    • M
      Melissa LyonsSep 12, 2025
      Use the proper size and type of weld cable. Clean and tighten all weld connections. Check the position of the Output Selector control. If using a remote control, check the position of the Amperage Adjustment control.
  • C
    cummingspeterSep 9, 2025
    What to do if Miller Syncrowave 250 DX provides only maximum or minimum weld output?
    • J
      jameskatherineSep 9, 2025
      Ensure that the Amperage control is in the proper position. If the issue persists, have a Factory Authorized Service Agent check the unit.
  • C
    christophermillerSep 8, 2025
    What to do if Miller Syncrowave 250 DX Welding System has no weld output but the unit is on?
    • D
      Drew MathisSep 8, 2025
      If you are using a remote control, ensure the Output control is in the Remote 14 position and that the remote control is connected to the Remote 14 receptacle. If a remote is not being used, put the Output control in the On position. You may need to check, repair, or replace the remote control. If problems persist, have a Factory Authorized Service Agent check the unit.
  • L
    lbrewerSep 7, 2025
    What does it mean when my Miller Syncrowave 250 DX indicates Remote Output control is activated?
    • B
      Brittney MartinezSep 7, 2025
      If the unit indicates that Remote Output control is activated, release the Remote Output control to clear the message.
  • B
    Brian Perry DDSAug 23, 2025
    What to do if there is no control of weld output on my Miller Syncrowave 250 DX?
    • M
      Matthew MooreAug 23, 2025
      If you have no control of weld output, and if you're using remote control, place the Output control in the Remote 14 position, and make sure the remote control is connected to the Remote 14 receptacle. If a remote is not being used, place the Output control in the On position. Also, make sure the Amperage control is in the proper position.
  • A
    amber07Sep 5, 2025
    What to do if my Miller Welding System has no output from cooler receptacle RC2 and no high frequency?
    • S
      Sonya KennedySep 5, 2025
      If there is no output from cooler receptacle RC2 and no high frequency, reset circuit breaker CB1.
  • J
    jenniferfloresSep 4, 2025
    What does it mean if the fan is not operating on my Miller Welding System?
    • T
      Travis FloresSep 4, 2025
      If the fan is not operating, it may be because the unit is equipped with Fan-On-Demand, meaning the fans run only when necessary. The unit is also equipped with circuitry to protect against overheating.
  • C
    Carolyn LucasSep 3, 2025
    What does it mean when my Miller Syncrowave 250 DX indicates a short in the thermal protection circuitry?
    • M
      martinmichaelSep 3, 2025
      If the unit indicates a short in the thermal protection circuitry, it means the Rectifier assembly has overheated. The unit has shut down to allow the fan to cool it. Operation will continue when the unit has cooled.
  • G
    grimesjustinSep 2, 2025
    What causes wandering arc and poor control of direction of arc in Miller Welding System?
    • C
      cgomezSep 2, 2025
      If you're experiencing a wandering arc and poor control of the arc's direction, reduce the gas flow rate. Select the proper size tungsten and properly prepare the tungsten.
  • J
    Jacqueline LyonsAug 31, 2025
    What causes a lack of high frequency and difficulty starting GTAW arc with my Miller Welding System?
    • E
      Erin RobertsSep 1, 2025
      If you experience a lack of high frequency and difficulty starting a GTAW arc, reset circuit breaker CB1. Select the proper size tungsten. Ensure the torch cable is not close to any grounded metal. Check cables and torch for cracked insulation or bad connections and repair or replace them. Check the spark gaps.

Summary

Section 1: Safety Precautions

1-2. Arc Welding Hazards

Details the primary hazards associated with arc welding processes.

Section 3: Installation

3-5. Welding Power Source Specifications

Technical specifications for the welding power source, including input and output data.

3-6. Duty Cycle And Overheating

Explains duty cycle ratings and precautions against overheating the welding unit.

3-8. Weld Output Terminals And Selecting Cable Sizes

Information on connecting weld output terminals and selecting appropriate cable sizes.

3-19. Electrical Service Guide

Recommendations for electrical service requirements, including voltage and conductor sizing.

3-21. Connecting Input Power

Step-by-step instructions for safely connecting the unit to the input power supply.

Section 4: Operation

4-1. Controls Overview

Describes the function of each control on the welding unit's front panel.

Section 5: Maintenance

Section 6: Troubleshooting

6-2. Troubleshooting The Welding Power Source

Provides common troubleshooting remedies for power source issues.

Section 8: High Frequency

Section 9: Selecting and Preparing Tungsten

Section 10: Guidelines for TIG Welding (GTAW)

Warranty

Miller Syncrowave 250 DX Specifications

General IconGeneral
BrandMiller
ModelSyncrowave 250 DX
CategoryWelding System
LanguageEnglish

Related product manuals