Doc# E107706 2 - 5
2: Meter Overview
Electro Industries/GaugeTech
The Leader In Power Monitoring and Smart Grid Solutions
Electro Industries/GaugeTech
The Leader In Power Monitoring and Smart Grid Solutions
2.5.1: Hardware Overview
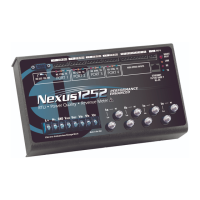
The Nexus® 1250/1252 with the 10/100BaseT Ethernet Option (INP200) has all the
components of the standard Nexus® 1250/1252 plus the capability of connection to a
network through an Ethernet LAN or through the Internet via Modbus TCP, DNP3 LAN/
WAN (1252 only), HTTP, SMTP, FTP and/or DHCP.
The Internal Network Option of the Nexus® meter is an extremely versatile communi-
cation tool. The INP200:
• Adheres to IEEE 802.3 Ethernet standard using TCP/IP
• Utilizes simple and inexpensive 10/100BaseT wiring and connections
• Plugs right into your network using built-in RJ45 jack
• Is programmable to any IP address, subnet mask and gateway requirements
• Communicates using the industry standard Modbus/TCP and DNP3 LAN/WAN over
Ethernet (1252 only) protocols
2.5.2: Hardware Connection
Use Standard RJ45 10/100BaseT cable to connect with the Nexus® meter. The RJ45
line is inserted into the RJ45 Port on the face of a Nexus® meter with the INP200
Ethernet Option.
2.5.3: Software Overview
To make the software connection, follow these steps:
1. Using Port 1 or Port 4 (RS485 connection), connect a PC to the meter. An RS232/
RS485 Converter may be required (Example: Electro Industries Unicom 2500).
2. Open Communicator EXT
TM
software.
3. Click the Quick Connect or the Connection Manager icon in the Icon tool bar. In the
Connect window that opens, click the Serial Port button. Make sure the connection
data (such as Address) matches the meter and then click Connect.