#3 Measuring the Time Between
Burst Pulse #1 and #4
In the previous examples, the synchronization
task has been to identify the start of a mea-
surement and to perform a single-shot time in-
terval measurement. Now, we will complicate
t
he picture even more. In our next example we
will not only arm the start, but also the stop of
a measurement. We will measure the time be-
t
ween the first and the fourth pulse in the
pulse burst. We still have the SYNC signal
available, see Fig. 5-13.
Measuring a time interval inside a
burst.
The measurement function is not Pulse Width
Abut
Time Interval A to A where the settings
for input B are used for controlling the stop
conditions. The desired start and stop trigger
points are marked in the preceding il-
lustration. Our task is now to arm both the
start and the stop of this measurement. The
start arming is already described in example
#1, i.e., synchronize measurement start to the
leading edge of the first pulse. The challenge
is to synchronize the stop of the measurement,
i.e., to arm the stop. If we do nothing, the time
interval measured will be the time between
the first and the second pulse. We must thus
delay the stop. This can be done in different
ways.
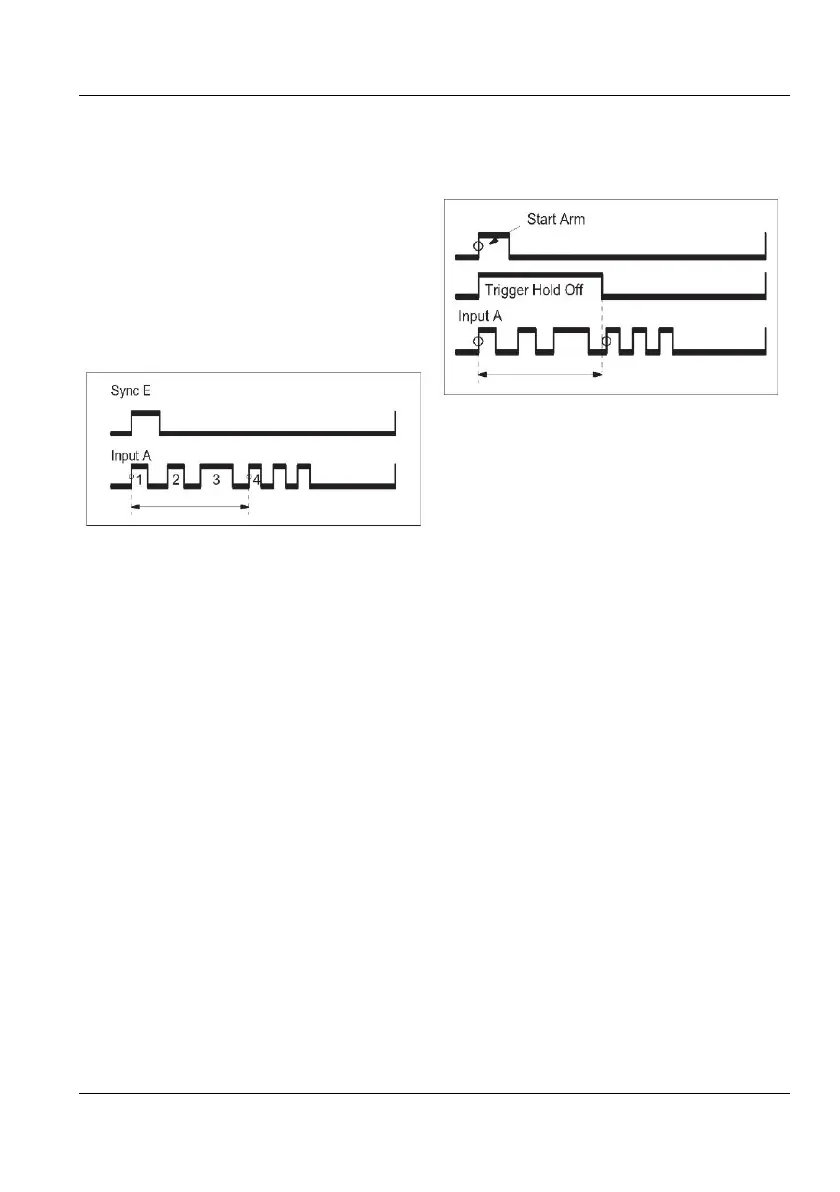
■ A. Using Trigger Hold Off to Delay the
Stop a Certain Time
Trigger Hold Off is used to inhibit stop trig-
gering during a preset time. The Hold Off
period starts synchronously with the start
trigger event. The Hold Off time should be set
to expire somewhere between pulse number 3
and 4, see Fig. 5-14.
If Hold Off expires between pulses
three and four, the correct time interval is
measured.
Use the same test setup as in the preceding
examples. Then proceed as follows:
Use the MEAS/FUNC key to select
Press INPUT B and choose positive slope
and a suitable trigger level.
Press SETTINGS Trigger Hold Off (On)
and enter a suitable Hold Off time.
Make sure the start arming conditions from
example #1 are maintained, i.e. no arming
delay.
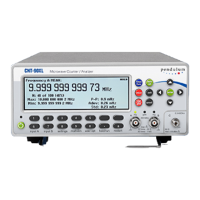
■ B. Using Stop Arming (i.e., External Hold
So far in our examples, the sync signal has been
used exclusively as a start arming signal; i.e.,
we have been concerned only about the leading
edge of the sync signal, and not its duration.
However, the sync signal can also be used as an
External Trigger Hold Off when you select stop
arming on the trailing edge of the sync signal.
If the duration of the sync pulses can be
externally varied, we can select a duration that
expires in the gap between pulse #3 and #4.
USER MANUAL ● CNT 9x Series ● Rev.22 February 2020
5-12