without further tweaking in most cases. Some-
times switching from AUTO to MANual trig-
gering in the
INPUT A/B menus is enough to
get stable readings. The continually calculated
trigger levels will then be fixed.
Input C has always automatic triggering and
AUTOSET only affects the burst synchroni-
zation.
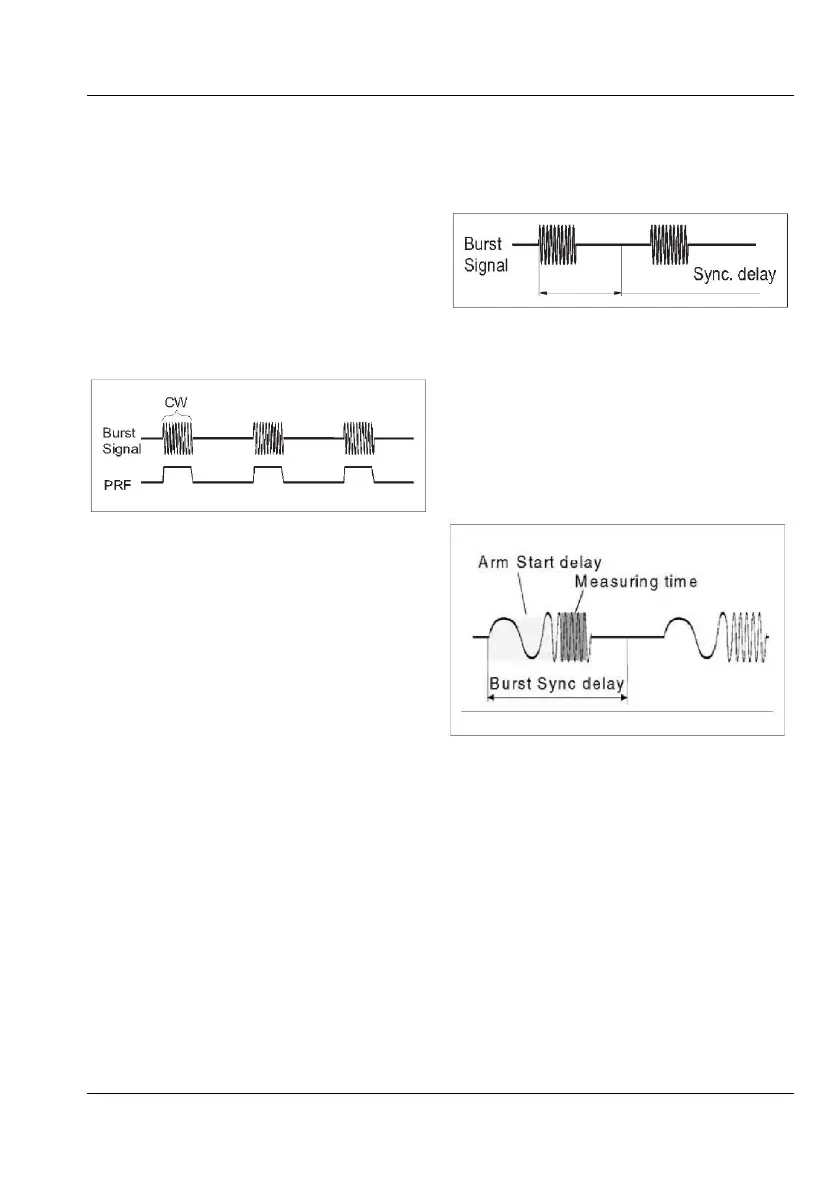
Fig. 4-2 Burst signal.
Burst Measurements using
Manual Presetting
You can measure the frequency on Input A
and Input B to 400 MHz and on Input C with
limited specifications to the upper frequency
limit of the prescaler with the internally syn-
chronized BURST function as follows:
— Select Freq Burst under the Freq menu
— Select A, B, or C as measurement input.
— Press SETTINGS and Burst. Select a Meas
Time that is shorter than the burst duration
minus two CW cycles.
If you do not know the approximate burst pa-
rameters of your signal, always start with a
short measurement time and increase it gradu-
ally until the readout gets unstable.
— Press Sync Delay and enter a value longer
than the burst duration and shorter than the
inverse of the PRF. See Fig. 4-3.
—
Press Start Delay and enter a value longer
than the transient part of the burst pulse.
— Select Frequency Limit (160/400 MHz) if
Input A or Input B is to be used.
Fig. 4-3 Set the sync delay so that it expires
in the gap between the bursts.
Use the low limit if possible to minimize the
number of cycles necessary to make a
measurement.
— Press EXIT/OK to measure.
All relevant burst parameters can be read on
the display simultaneously.
Fig. 4-4 Three time values must be set to
measure the correct part of a burst
■ Selecting Measurement Time
The measurement time must be shorter than the
duration of the burst. If the measurement
continues during part of the burst gap, no mat-
ter how small a period of time, then the mea-
surement is ruined. Choosing a measurement
tim
e that is too short is better since it only re-
duces the resolution. Making burst frequency
measurements on short bursts means using
short measurement times, giving a poorer
resolution than normally achieved with the
counter.
USER MANUAL ● CNT 9x Series ● Rev.22 February 2020
Always try using AUTOSET first. Then the
Auto Trigger and the Auto Sync functions in
combination will give satisfactory results