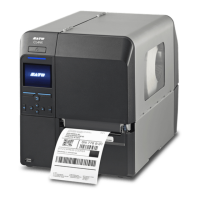
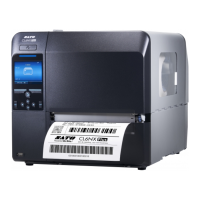
How to fix a paper jam error on a SATO CL6NX?
- AAndrew MoyerAug 23, 2025
If your SATO Printer indicates a paper jam error, it's likely that the media has jammed. To resolve this, remove the jammed media and then load the media again.
How to fix a paper jam error on a SATO CL6NX?
If your SATO Printer indicates a paper jam error, it's likely that the media has jammed. To resolve this, remove the jammed media and then load the media again.
Flash memory | 2000 MB |
---|---|
Storage media | Flash |
Internal memory | 256 MB |
Built-in barcodes | Code 39, Code 93, Code-128 Codabar Library, EAN13, EAN8, GS1 DataBar, Industrial 2/5, Interleaved 2/5, Matrix 2/5 |
Internal storage capacity | 2 GB |
Cables included | AC |
Maximum roll diameter | 220 mm |
Maximum printing width | 167.5 mm |
Printing media thickness | 0.08 - 0.268 µm |
USB port | Yes |
USB connector | USB Type-A / USB Type-B |
Bluetooth version | 3.0 |
Serial interface type | RS-232C |
USB 2.0 ports quantity | 2 |
Connectivity technology | Wired & Wireless |
Wi-Fi | No |
Display type | LCD |
Product color | Black |
Display diagonal | 3.5 \ |
Display resolution | 320 x 240 pixels |
AC input voltage | 100 - 240 V |
AC input frequency | 50 - 60 Hz |
Storage temperature (T-T) | -20 - 60 °C |
Operating temperature (T-T) | 0 - 40 °C |
Storage relative humidity (H-H) | 30 - 90 % |
Operating relative humidity (H-H) | 30 - 80 % |
Type | POS printer |
Print speed | 10 ips |
Print technology | Direct thermal / Thermal transfer |
Maximum resolution | 203 x 203 DPI |
Depth | 457 mm |
---|---|
Width | 338 mm |
Height | 321 mm |
Weight | 20000 g |
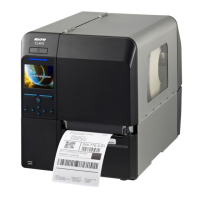
High-performance labeling system with robust casing and versatile functions.
Guidance on safe and correct use of the printer to prevent injury and damage.
Instructions for safe installation and handling of the printer.
List of items included with the printer after unpacking.
List of optional devices available for the printer.
Identification of printer components via diagrams.
Explanation of the operator panel's display and operation functions.
Procedures for installing the printer in a suitable location.
Guidelines for installing the printer in appropriate locations, avoiding specific environmental factors.
Steps for connecting the power cord and powering the printer on/off.
Functionality and flow of the startup guide for initial printer settings.
Setting whether to use the ribbon or direct thermal media for printing.
Setting the sensor type for detecting the media correctly.
Explains how to connect the printer to a computer and install the driver/tool.
Procedures for installing the printer driver via USB, including offline installation steps.
Procedures for installing the printer driver for LAN/Wireless LAN connections.
Procedures for installing the printer driver for Bluetooth connection.
Procedures for configuring printer driver settings as an administrator.
Configuring driver settings via the [Properties] > [Driver settings] tab.
Configuring printer settings through [Printing Defaults] or [Printing Preferences] screens.
Explanation of print methods (thermal transfer, direct thermal) and media/ribbon usage.
Precautions for loading media and the routing path of the media roll.
Procedures for loading fan-fold media, including top cover and head lock lever operations.
Procedures for loading media when the optional cutter unit is installed.
Methods to check remaining media/ribbon via printer window or notifications.
Conditions that trigger paper end errors during feeding or printing operations.
Access to frequently used settings directly from the [Shortcut] menu.
List of available settings within the [Printing] menu for media and print configurations.
Setting the length of the media, with ranges varying by printer resolution.
Adjusting media sensor levels for Gap and I-mark sensors.
Correcting offset position, print position, and print darkness.
Fine-tuning the print darkness, with a setting range from 0 (lightest) to 99 (darkest).
Settings for using LAN and wireless LAN for communication between host and printer.
Settings for wireless LAN connection, including IPv4, IPv6, Proxy, Wi-Fi Protected Setup, Wi-Fi Direct, SSID, Mode, Channel, and Security.
Setting IPv4, IPv6, or proxy for the LAN connection.
Setting the printer language, with options like AUTO, SBPL, SZPL, SIPL, SDPL, STCL, SEPL.
Settings for SBPL (Sato Barcode Printer Language) commands, including Show Error, Orientation, Font Settings, Compatible.
Setting font properties like Code Page, New Font Encoding, Proportional Pitch, and Zero Slash.
Setting display language, time zone, calendar, and unit for the printer.
Setting functions to notify when cleaning or replacing parts like print head, cutter, or platen roller.
Setting the period before the printer enters sleep mode (Sleep Timeout).
Performing test prints to check printer settings, including factory test, list configuration, QR code, and paper sensor.
Saving hex dump print data or buffer data to USB memory.
Initializing printer data and setting values, including fonts and graphics.
Viewing guidance videos for loading media/ribbon, cleaning, and replacing parts.
Displays printer information: Name, Date, Checksum, Kernel Version, Boot Version.
General procedures and precautions for cleaning the printer's components.
Step-by-step procedure for cleaning the printer using a cleaning kit.
Procedures for safely removing and replacing a damaged or worn print head.
Procedures for easily removing and replacing a damaged or worn platen roller.
Detailed specifications for the printer, including hardware, power supply, and processing.
Specifications for hardware components like SDRAM, registration area, receive buffer, LCD, LED, and display language.
Lists standard and optional interfaces supported by the printer for data communication.
List of built-in functions like status return, graphic, font settings, guidance video, and self-diagnosis.
Information about SATO Online Services for remote maintenance and printer monitoring.
Information on SATO maintenance support services and access to support sites.