Home
Seastar Solutions
Automobile Electronics
Optimus 360
Seastar Solutions Optimus 360 Installation Manual
4
of 1
of 1 rating
104 pages
Give review
Manual
Specs
To Next Page
To Next Page
To Previous Page
To Previous Page
Loading...
6-7
© 201
4 S
eaStar Solu
tions
Optimus 360 Installa
tion Supplement
, Rev
. B
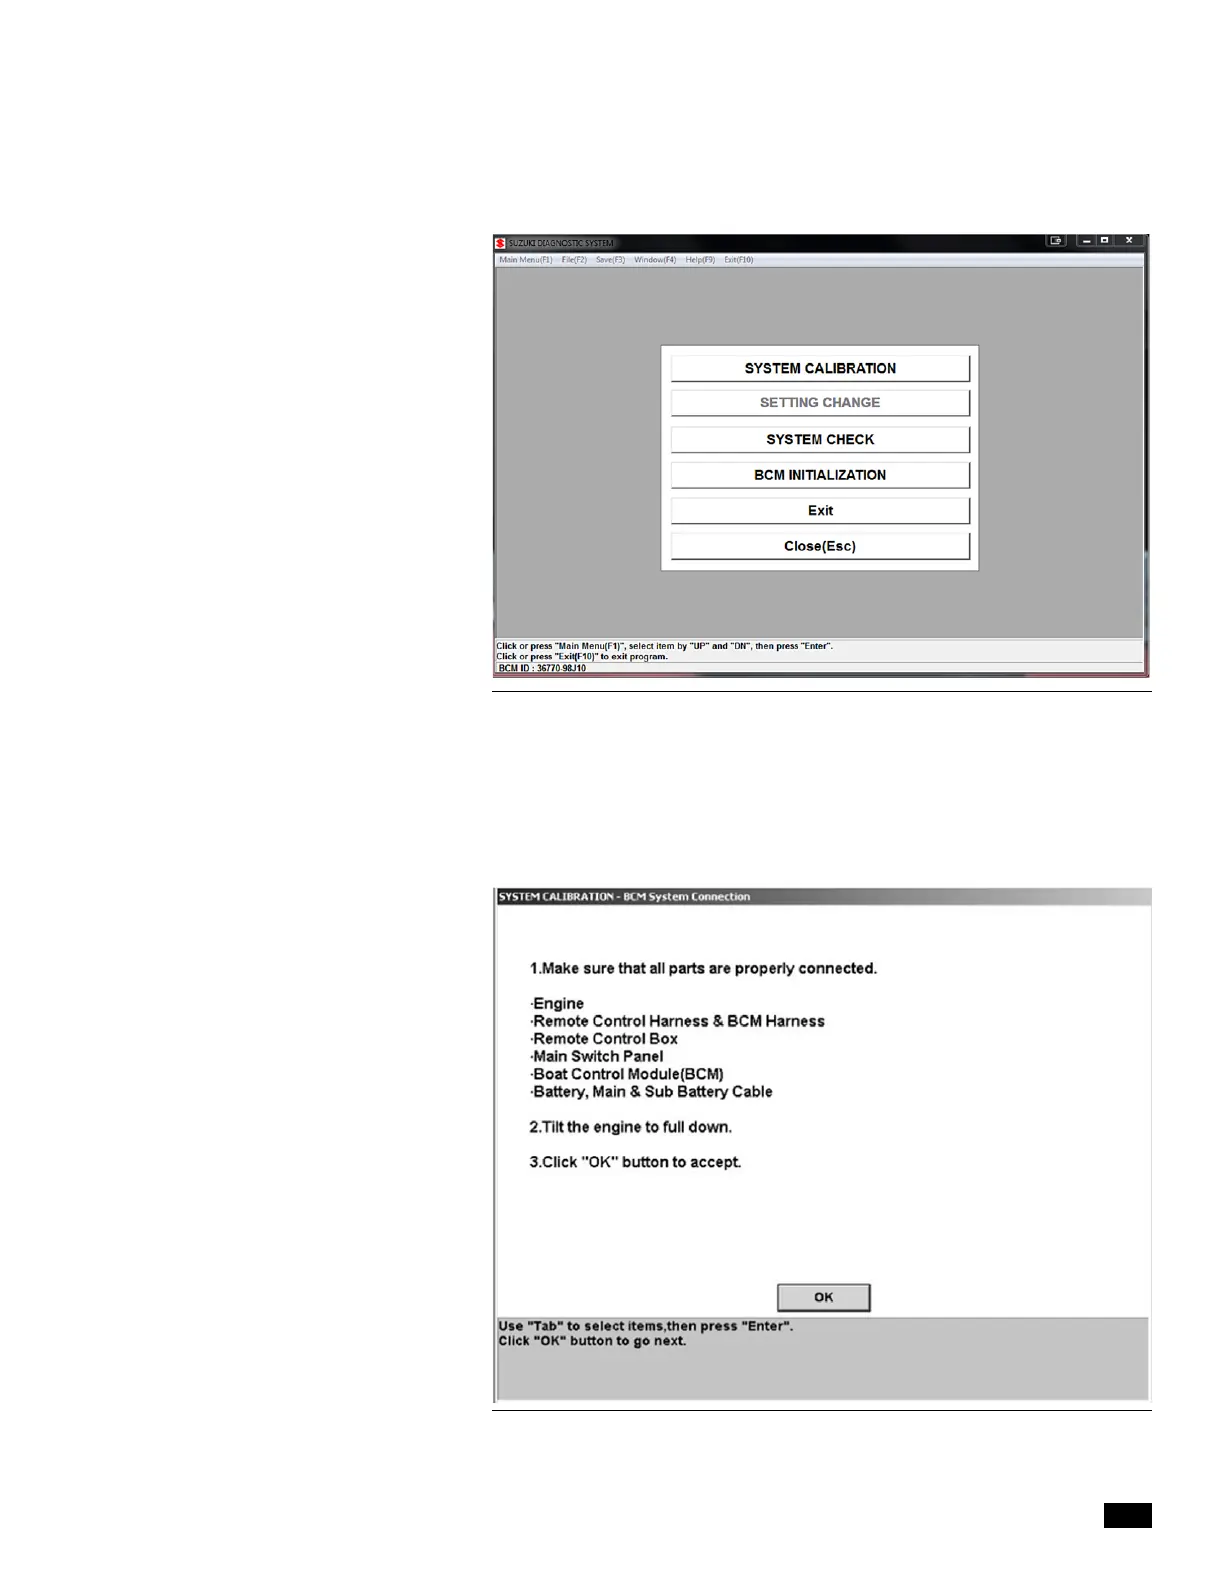
Figure 6-
8. SDS hom
e window.
1.
Click
Sy
stem Cali
bration
to star
t the c
al
ibration wizard. The
dialog box s
hown in F
ig
ure 6
-
9 wi
ll be displ
ayed. Review the
checklist and when you’
ve confirme
d that all the items are
complete
, click
OK
.
Figure 6-9. Pre-ca
libratio
n chec
ks.
32
34
Table of Contents
Default Chapter
5
Table of Contents
5
1 Safety Information
9
2 System Overview
11
System Description
11
3 Installation Overview
13
Important Information/Technical Support Contact
13
Part 1: Component Installation
13
Part 2: System Calibration, Purging and Setup
14
Installing the Joystick
15
Joystick Types
15
CAN1 Harness Connections
16
CAN2 Harness Connections
17
4 System Setup, Purge, and Calibration
19
Initial System Setup
19
Purge and Calibrate
21
Engine-Specific Setup
21
5 Evinrude
23
ICON EST and Optimus 360 Network Interconnection
23
Control Head Setup
26
6 Suzuki
27
Gateway Installation
27
Suzuki EST Gateway and Optimus 360 Interconnection
28
Suzuki BCM CAN Network Connection
29
Suzuki Switch Panel Harness Connection
30
Optimus EST Gateway Connection
31
Optimus Can1 and Can2 Connections
31
Optimus PCM Ignition Sensing
31
Suzuki SPC System Calibration
32
7 Yamaha
39
Yamaha Remote Control Connections
39
EST Gateway Installation
43
Yamaha EST Gateway Setup
47
8 Yanmar
49
Installing the Control Head
49
Control Head Trim Switch Connection
49
Yanmar and Optimus 360 CAN2 Interconnection
51
Control Head Setup
54
9 Joystick Setup
55
Joystick Tuning Overview
56
Joystick Tuning Procedure
57
STEP 1 - Import Engine-Specific Settings
57
STEP 2 - Set Throttle Limits
59
STEP 3 - Run Throttle Wizards
61
STEP 4 - Set Forward Heading Correction
62
STEP 5 - Balance Rotation Power
63
STEP 6 - Set Sideways Rudder Angle
64
STEP 7 - Balance Sideways Power
65
STEP 8 - Adjust Power Levels
67
STEP 9 - Sea Trial
68
STEP 10 - Save the Joystick Tuning File
69
Importing a Joystick Tuning File
70
Using a Template File
70
Replacing a Joystick
70
Updating Joystick Firmware
71
Basic Import Procedure
71
10 Post-Installation Warranty Checklist
73
11 Updating Firmware
73
12 Warranty
75
Statement of Limited Warranty
75
Return Goods Procedure
75
Technical Support
75
Appendix A - Mounting Templates
77
Joystick
77
Control Head (Yanmar/Optimus
79
Appendix B - Setup and Tuning with Datalink
81
Using Datalink
81
System Setup
83
System Parameters
83
Settings Menu Access
84
Cycle Power to System
84
Joystick Tuning Procedure
85
General Notes
86
Before You Start
86
STEP 1 - Import Engine-Specific Settings
87
STEP 1A - System
87
STEP 2 - Set Throttle Limits
87
STEP 3 - Run Throttle Wizards
89
STEP 4 - Set Forward Heading Correction
90
STEP 5 - Balance Rotation Power
91
STEP 6 - Set Sideways Rudder Angle
92
STEP 7 - Balance Sideways Engine Power
93
STEP 8 - Adjust Power Levels
94
STEP 9 - Sea Trial
95
STEP 10 - Saving the Joystick Tuning File
95
Adding a Second Control Station
96
Configure the Secondary Helm and Cantrak Display
96
Configure the Secondary Control Head (Yanmar Only
96
Configure the Secondary Joystick
96
Importing a Joystick Tuning File
97
Configuring a Second Joystick
97
Using a Template File
97
Replacing a Joystick
98
Updating Joystick Firmware
98
Basic Import Procedure
98
Yamaha EST Gateway Setup
100
System
101
LPS Calibration
101
Other manuals for Seastar Solutions Optimus 360
Operating Instructions & User Manual
80 pages
Operation Manual
76 pages
Configuration And Commissioning
17 pages
4
Based on 1 rating
Ask a question
Give review
Questions and Answers:
Need help?
Do you have a question about the Seastar Solutions Optimus 360 and is the answer not in the manual?
Ask a question
Seastar Solutions Optimus 360 Specifications
General
Brand
Seastar Solutions
Model
Optimus 360
Category
Automobile Electronics
Language
English
 Loading...

