Installation
6.6 Installing the CPU
Automation system
System Manual, 01/2023, A5E03461182-AK
143
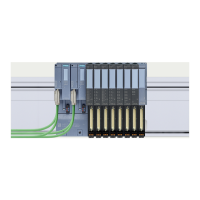
3. Ensure that the U-connector is inserted at the system power supply. Swivel the CPU in to the
rear.
4. Screw the CPU tight (tightening torque 1.5 Nm).
Figure 6-11 Installing the CPU
Uninstalling the CPU
The CPU is wired, and is followed by additional modules.
To uninstall a CPU, follow these steps:
1. Open the front cover.
2. Switch the CPU into STOP mode.
3. Turn off the feed supply voltage.
4. Pull off the connector for the supply voltage.
5. Loosen the bus connectors for PROFIBUS/PROFINET with the screwdriver.
6. Disconnect the bus connector from the CPU.
7. Undo the CPU fixing screws.
8. Pivot the CPU out of the mounting rail.

 Loading...