RSA-G2 Getting Started Guide Page 35
Installing the RSA-G2
TA Instruments recommends that you schedule a service technician to unpack and install your
instrument. The instructions given here are provided for reference, if needed.
Connecting the Air Dryer
CAUTION: Read the installation, operating, and maintenance instructions that were supplied with
your air dryer. Failure to properly operate and maintain your air dryer will result in extensive dam-
age to this instrument.
MISE EN GARDE: Lisez les instructions d'installation, d'utilisation et de maintenance fournies avec
votre déshydrateur d'air. L'utilisation et la maintenance inappropriées du déshydrateur d'air entraî-
nent d'immenses dégâts sur l'instrument.
CAUTION: Excessive moisture in the air supply may damage the test station.
MISE EN GARDE: L'excès de moisissure dans l'alimentation en air peut endommager la station
d'essai.
The dew point of the supplied air should be 10°C or lower. We highly recommend installing the optional
air dryer/filter between the test station and the air supply. If your air supply has excessive moisture levels
that result in immediate condensation, a pre-air dryer system is required. An oil-less compressor system is
recommended as well.
The air source going into the dryer should have a minimum pressure of 80 psi (0.55 MPa). Follow the
instructions below to install the air dryer.
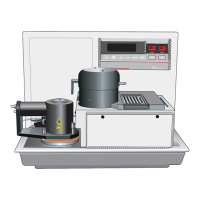
1 Mount the air dryer to a wall in close proximity to the RSA-G2, allowing the lines to reach the back of
the instrument. See the figure below.
Figure 17 Air dryer.
WARNING: Make sure there is no power going to the power supply unit while making the con-
nections described in the sections below. If necessary, turn the power switch to the off position.
AVERTISSEMENT: Assurez-vous que le bloc d'alimentation électrique n'est pas alimenté en
courant pendant le réglage des connexions décrites dans les sections ci-dessous. Si néces-
saire, placez l'interrupteur d'alimentation sur la position d'arrêt.
Inlet from
air source
Filters
Outlet to RSA-G2
Pressure regulator knob