Do you have a question about the Arturia KEYLAB ESSENTIAL MK3 and is the answer not in the manual?
Introduces the Arturia KeyLab Essential as a versatile MIDI controller for music production.
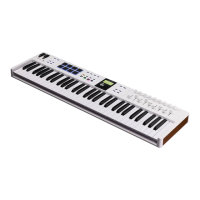
Lists the key hardware and software features of the KeyLab Essential controller.
Guide on updating the KeyLab Essential's firmware using the MIDI Control Center software.
Instructions for connecting the KeyLab Essential to a computer via USB.
Describes all controls and features on the front panel, including buttons, knobs, and display.
Details the ports and connectors available on the rear panel of the device.
Explains the function and information shown on the KeyLab Essential's main display.
Explains the function of the pitch-bend and modulation wheels.
How to change the MIDI channel for sending notes and controller data.
Details how to switch between pad banks A and B for triggering notes.
How to transpose the keyboard by semitones and octaves.
Information on the velocity and pressure-sensitive pads and their default MIDI note assignments.
How to use KeyLab Essential to control Digital Audio Workstations (DAWs).
Configuring MIDI settings within your DAW for KeyLab Essential.
How to cycle through and select the main operating modes (Arturia, DAW, User).
Explains the Part feature for controlling multiple instruments or presets.
How to define keyboard split points for different parts.
How to edit parameters like octave and MIDI channel for individual parts.
How to use the Hold function to sustain notes.
How to memorize and play custom chords or predefined chord types.
Selecting and playing various predefined chord types.
Steps to create and memorize your own custom chords.
How to use Scale mode to play in specific keys and tonalities.
Introduction to the Arpeggiator function for creating rhythmic patterns.
How to turn the Arpeggiator function on and off.
How to enter and exit the Arpeggiator editing interface.
Detailed explanation of various Arpeggiator parameters like Mode, Division, Gate.
In-depth explanation of Arpeggiator parameters like On/Off and Mode.
Details on Division and Gate settings for the Arpeggiator.
Explanation of Swing and Rate settings for the Arpeggiator.
Details on Sync and Octave settings for the Arpeggiator.
How to use Tap Tempo to set the Arpeggiator's internal clock.
Explains how Arpeggiator, Chord, Scale, and Hold modes interact.
Describes Vegas Mode, an idle screen saver feature.
How to reset the KeyLab Essential to its original factory settings.
Explains the default operating mode and parameter variability with presets.
Configuring audio and MIDI settings for Analog Lab V.
Specific MIDI controller settings within Analog Lab V.
How to navigate and load sound presets within Analog Lab V using KeyLab Essential.
How to browse and select instrument types and subtypes in Analog Lab V.
How knobs and faders control Analog Lab V parameters via Macros.
How pads send MIDI notes, referencing previous chapter details.
Overview of controlling multi presets and individual parts in Analog Lab V.
Steps to add a new part to a preset in Analog Lab V.
How to edit existing multi presets, including split points and part parameters.
Details on editing parts, including octave, MIDI channel, and replacing parts.
How to load a preset into a specific part within Analog Lab V.
How to select and control individual parts (Part 1, Part 2) for editing.
Information on DAWs that offer advanced integration with KeyLab Essential.
How to use transport buttons (Play, Stop, Record) to control DAW playback.
How to control DAWs using Mackie Control Universal or HUI protocols.
FCC compliance statement for the device.
Canadian compliance statement for the device.
CE compliance statement for the device.
ROHS compliance statement for the device.
| Number of Keys | 49 or 61 |
|---|---|
| Key Type | Synth-action |
| Aftertouch | No |
| Pads | 8 RGB backlit pads |
| Encoders | 9 |
| Transport Controls | Yes |
| Power | USB bus-powered |
| Faders | 9 faders |
| Display | LCD display |
| Connectivity | USB, MIDI Out, Sustain Pedal Input |
| Software Included | Ableton Live Lite |