59
Installation
EN
Installation
Warning!
Danger to life due to electric shock: Improper wiring is life-threatening and can ruin the motorised multi-
point lock 519. The connection of the power supply may only be carried out by a trained, qualified person.
Caution!
Risk of injury due to sharp edges and chips: There is a risk of injury due to sharp edges and chips from
drilling or other cutting work. Take particular care to protect your eyes with suitable protective goggles.
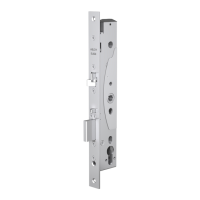
Preparation for mounting
Caution!
Unsuitable doors reduce personal safety and intrusion protection: Only approved and technically flaw-
less doors are suitable for installation of the motorised multi-point lock 519. Prior to the installation of the
motorised multi-point lock 519, the door must be checked to ensure that it is attached properly and is not
warped. The door must be approved for use of the motorised multi-point lock 519.
1 Create the lock pocket at a suitable mounting position in the door leaf. Factor in an additional 30 mm
for the cable loop for the depth.
2 Finish the holes for the fixing screws (Pic. 18).
3 Drill the holes for the lock fittings (only with lock removed).
4 Clean the lock pocket and all holes by blowing them out or vacuuming.
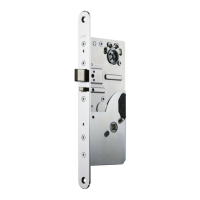
Electrical connections
1 Prepare the wiring for the motorised multi-point lock 519
(“Electrical connection”, page61).
2 Connect the cables for the power supply and control unit
(“Flexible lead cover”, page79).
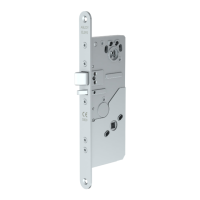
Install the motorised multi-point lock 519
1 Fasten the motorised multi-point lock 519 in the lock pocket.
2 Fasten the lock fittings.
3 Check the motorised multi-point lock 519 for ease of movement.
Once the striking plate has been mounted, the motorised multi-point lock 519 is ready for use.
!
!
!
Prepare
and clean
lock pocket
Connecting cables
Fastening the motorised
multi-point lock