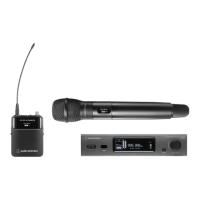
Setting ATW-R1440
70
4
Turn the control dial to select “EQ:” and press the control dial.
5
Turn the control dial to select “On” and press the control dial.
You can now select the equalizer setting.
6
Turn the control dial to select “Recall preset:” and press the control dial.
7
Turn the control dial to select
“NEUTRAL”/“WARM”/“BRIGHT”/“USER1”/“USER2”/“USER3”/“USER4” and press the control dial.
Use the dedicated software (Wireless Manager) to set “USER1”/“USER2”/“USER3”/“USER4”.
The setting is complete.
Setting the compressor
You can use the dedicated software (Wireless Manager) to configure more detailed settings.
1
Press the CH MENU button to select the channel to set.
Each press of this button switches the channel to set.
2
Turn the control dial to select “UTILITIES” and press the control dial.
3
Turn the control dial to select “COMPRESSOR” and press the control dial.
4
Turn the control dial to select “COMP:” and press the control dial.
5
Turn the control dial to select “On” and press the control dial.
You can now select the compressor setting.
6
Turn the control dial to select “Recall preset:” and press the control dial.
7
Turn the control dial to select “VOCAL”/“SPEECH”/“USER1”/“USER2”/“USER3”/“USER4” and press
the control dial.
Use the dedicated software (Wireless Manager) to set “USER1”/“USER2”/“USER3”/“USER4”.
The setting is complete.