2828
EN
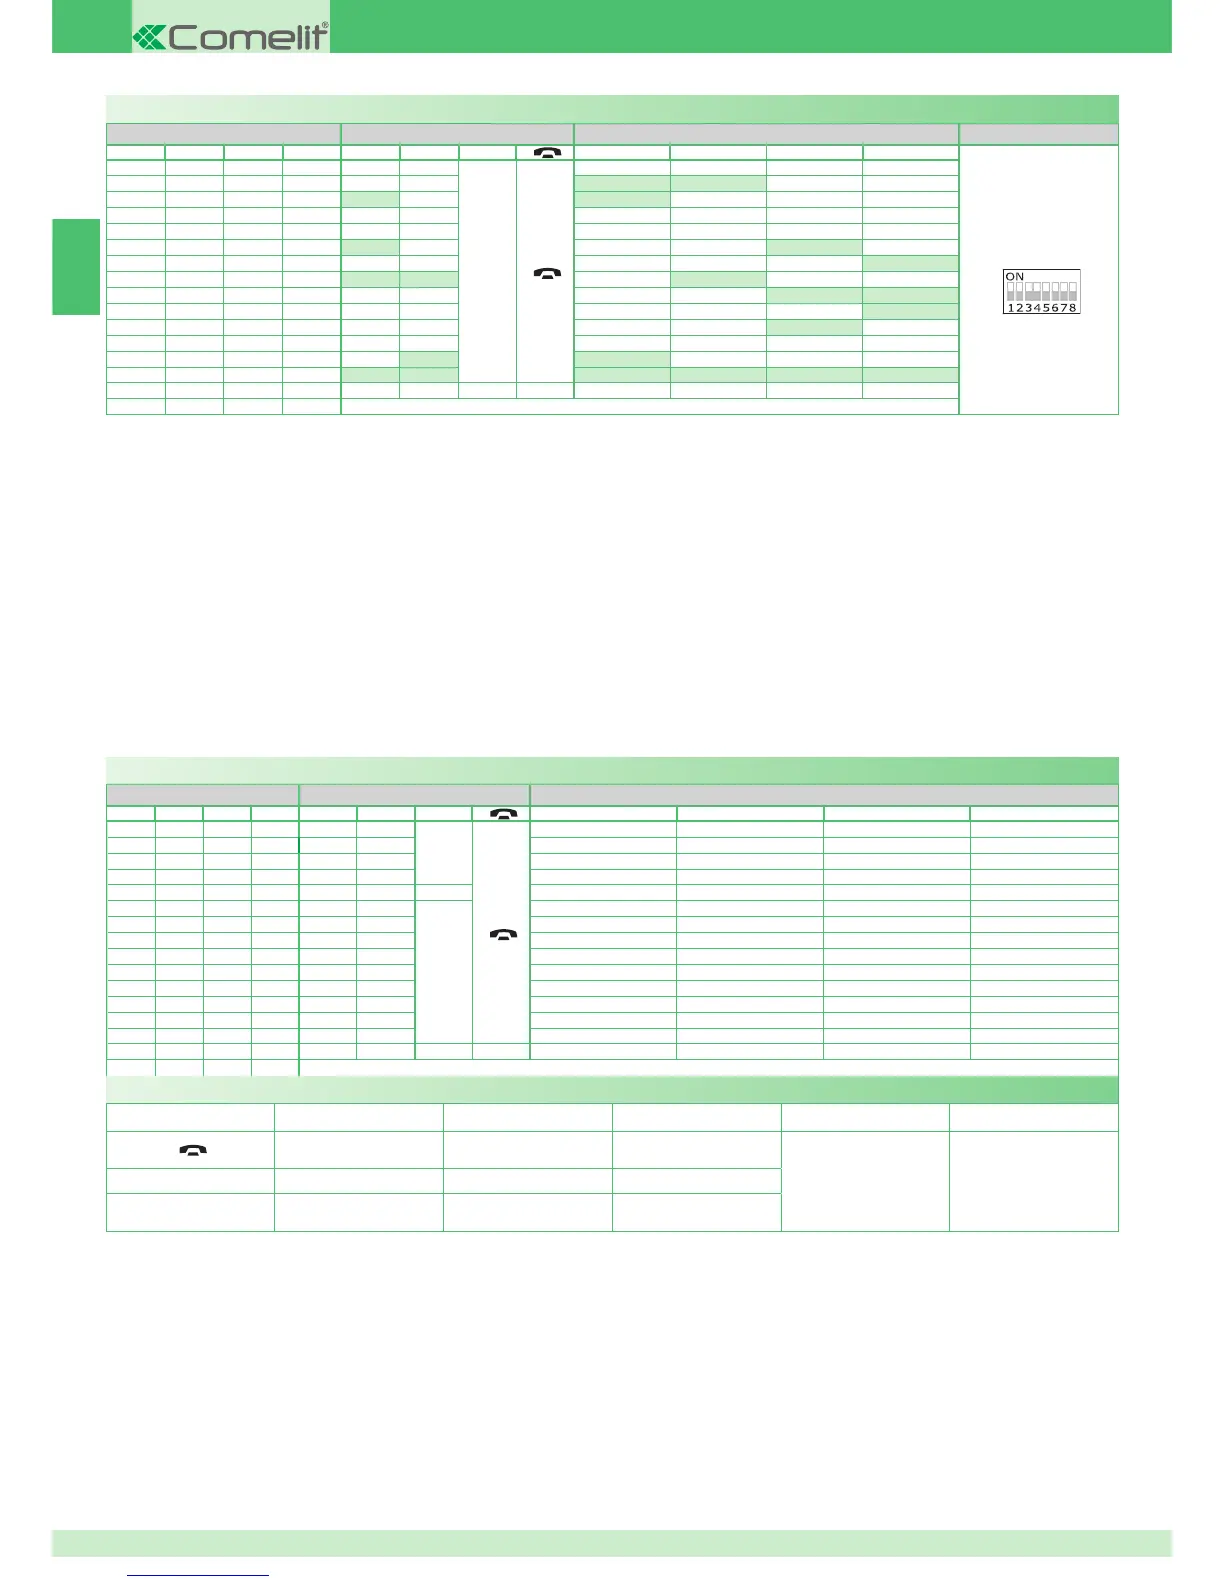
Programming buttons for intercom call
DIP S2 with Art. 6433, 6434 DIP S1
DIP 1 DIP 2 DIP 3 DIP 4 P1 P2
A
P3 P4 P5 P6
ADDRESS
0000
A
1000
INT INTb
0100
INT INTb
1100
0010
1010
INT INTb
0110
INTb
1110
INTb INT INT
0001
INT INTb
1001
INT
0101
INT
1101
0011
INTb INT
1011
INT INT INT INT INT INT
0111
1111
PROG
Example 1 - Selective intercom
on a monitor with user code 1 and intercom address 1, P3 programming =
selective intercom with address 2, P4 = selective intercom with address 3.
Example 2 - KIT intercom
(intercom between 2 contiguous addresses in the range from 1 to 30, with
the fi rst being an odd number):
on a monitor with user code 1, P3 programming = general internal call, P4
= two-family intercom with address 2.
1. Set S2 DIP switch 5-6 to the combination 01.
» the LED (green) fl ashes.
2. Refer to the table on page 28 and select a combination in which the
intercom function (INT or INTb) is listed for the buttons you wish to
program.
E.g. 1: for P3= single-family intercom, set S2 DIP switches 1-2-3-4 to the
combination 1000 or 0011 or 1011 (P3=INT), set S1 with address 2 in
accordance with table B on page 27, go to point 3.
E.g. 1: for P4= selective intercom, set S2 DIP switches 1-2-3-4 to the
combination 1110 or 1011 (P4=INT), set S1 with address 3 in accordance
with table B on page 27, go to point 3.
E.g. 2: for P3= general internal call and P4= two-family intercom, set S2
DIP switches 1-2-3-4 to the combination 1000 (P3=INT, P4=INTb), set S1
with user code 1 in accordance with table A on page 25, go to point 3.
3. Press and release the button to be associated with the function.
» the LED (green) lights up.
» confi rmation tone in handset.
4. To exit programming mode, set S2 DIP switches 5-6 to the combination
00.
» the LED (green) switches off.
5. When programming is complete, set S2 DIP switches 1-2-3-4 to the
combination 1111. Restore the user code setting on S1, see table
A on page 25.
Programming buttons for other functions
DIP S2 with Art. 6433, 6434
DIP 1 DIP 2 DIP 3 DIP 4 P1 P2
A
P3 P4 P5 P6
0000
CCS AI
A
D PAN K
1000
AI D CCS
0100
AI CCS CCP
1100
CCS CCP PAN K D
0010
1010
A
CCS CCP PAN
0110
AI D K CCS CCP
1110
AI PAN D
0001
CCS PAN D AI
1001
K CCS PAN CCP AI
0101
CCP K PAN AI
1101
PAN CCP CCS K D
0011
D AI CCS
1011
0111
NULL NULL NULL NULL NULL NULL NULL NULL
1111
PROG
Legend
A
Lock- release
CCS
Switchboard call
NULL
No function
Speech
K
Guardian door-entry phone
call
PROG
Programmed functions
AI
Self-ignition
D
Doctor
CCP
Main switchboard call
PAN
Panic
Example:
on a monitor with user code 5, P5 programming = self-ignition, P6 =
switchboard call.
1. Set S2 DIP switch 5-6 to the combination 01.
» the LED (green) fl ashes.
2. Refer to the table on page 28 and select a combination in which the
desired/necessary functions are listed for the buttons you wish to
program.
E.g.: for P5= self-ignition, P6= switchboard call, set S2 DIP switches 1-2-
3-4 to the combination 0011 (P5=AI, P6=CCS).
3. Press and release the button to be associated with the function.
» the LED (green) lights up.
» confirmation tone in handset.
4. To exit programming mode, set S2 DIP switches 5-6 to the combination 00.
» the LED (green) switches off.
5. When programming is complete, set S2 DIP switches 1-2-3-4 to the
combination 1111.
 Loading...