30
AUTO CLOSE SETUP
To prevent accidents, Safety Beams must be used when enabling the Auto Close funcon.
Enable Auto Close
Enabling this funcon allows the gate operator to Auto Close. If the gate is obstructed and Safety Beams
are connected, the Auto Close Time delay will reset when the obstrucon is removed.
Auto Close Time
This feature delays the closing of the gate when Auto Close is enabled. The delay can be set from 1- 600
seconds. If beams are connected, the mer will reset each me the beams are blocked.
AC On Full Open
If enabled, the gate will Auto Close from the fully open posion.
AC On Part Open
If enabled, the gate will Auto Close if it was stopped while sll opening.
AC On Part Close
If enabled, the gate will Auto Close if it was stopped while it was closing.
Allow Party Mode
‘Party Mode’ is a feature which overrides Auto Close. By enabling the Allow Party Mode funcon, it is
possible to place the operator into Party Mode with the Trigger buon on the remote.
REMOTE SETTINGS
Up to 1024 Remotes can be added to the TRITEK onboard Receiver.
The TRITEK controller uses Remote Grouping for managing remote access. All remotes must be pro-
grammed to a group for it to funcon. By default, all remotes will be programmed to the Master group,
Group 0, unless a new group is created. If groups have been created, the controller will prompt the user
to select the group into which the new remote must be programmed.
If Groups are being used, it is important to keep track of your remotes. This can be done by wring down
the remote number seen on the LCD screen during programming and engraving the remote number on
the back of the remote. This is helpful when you wish to delete a lost/stolen remote.
Add Remotes (No groups)
If a new group has not been created, the controller will prompt for a Program Method by which to add
the new remote/s.
First Method: Teach Single Funcon to the Remote Buon. This will program a single funcon to a
buon. It begins at Funcon 1, which is Trigger, and scrolling le will run through all the available func-
ons up to 16. These include Pedestrian Trigger, Alarm Acvate, Party Mode, Light Trigger etc.
Having selected the parcular funcon required, the controller prompts to hold the Joysck Up (North)
and, while holding the joysck in this posion, add the remote/s by pressing the buon that is required
to perform the selected funcon.
Second Method: Duplicate Group Funcons to Remote. This will duplicate the funcons already setup on
the exisng remotes in Group 0 to the new remote now being programmed.
When selected, the controller prompts to hold the Joysck Up (North) and, while holding the joysck in
this posion, the exisng funcons are duplicated onto the new remote by pressing any buon on it. All
funcons in Group 0 will be copied onto the new remote.
The default funcon sengs for Group 0 are:
1. Trigger 2. Pedestrian Trigger 3. No Funcon
4. No Funcon 5. Holiday Lockout 6. Alarm Acvate
7. No Funcon 8. No Funcon 9. Alarm Acvate
10. Party Mode 11. No Funcon 12. Light Trigger
13. No Funcon 14. No Funcon 15. Remote Joysck
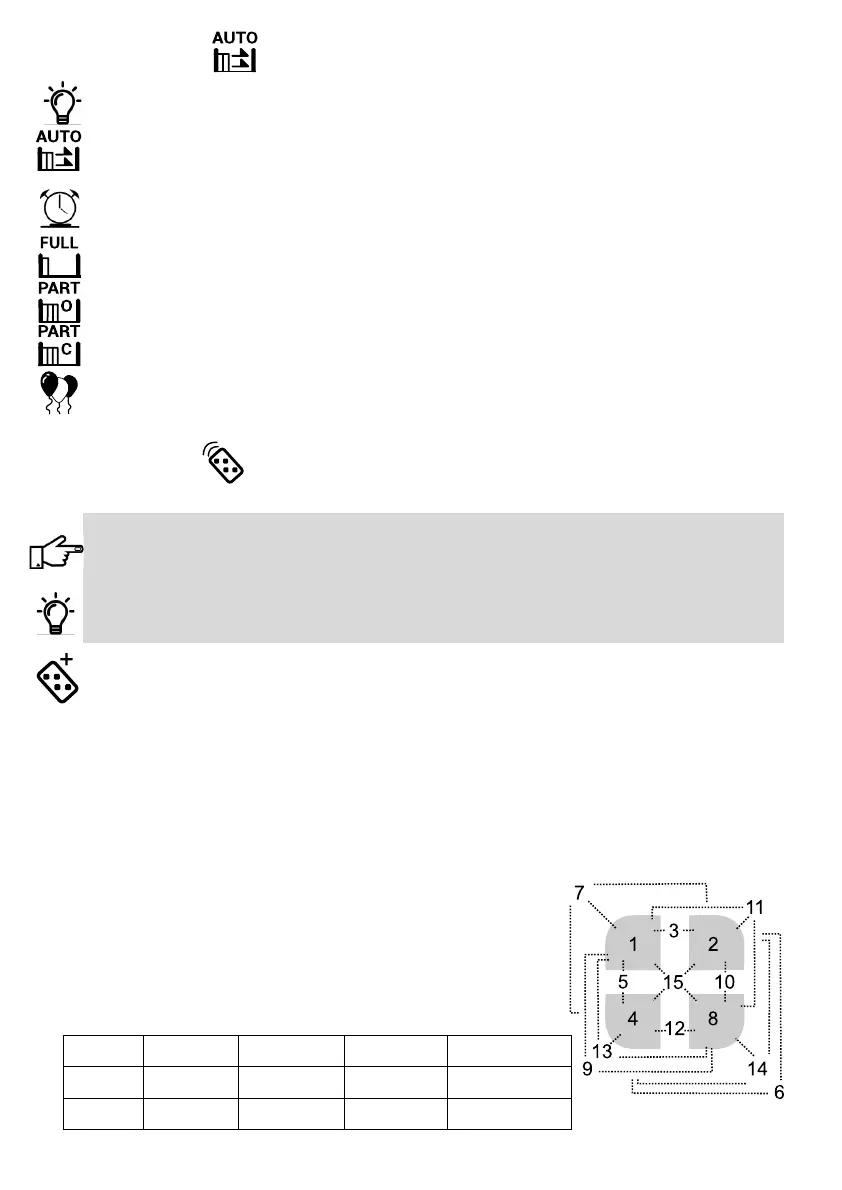
The funcon number relates to the remote buon number or
buon conguraon as illustrated.
Connues……...
1 = 1 2 = 2 3 = 1 + 2 4 = 4 5 = 1 + 4
6 = 2 + 4 7 = 1 + 2 + 4 8 = 8 9 = 1 + 8 10 = 2 + 8
11 = 1 + 8 12 = 4 + 8 13 = 1 + 4 + 8 14 = 2 + 4 + 8 15 = 1 + 2 + 4 + 8