AIR_Manual_506a_ENG_rev_1.pdf Page 8/96
The mini USB socket can be used to power the instrument and simultaneously charge the internal battery.
An external stabilized 5VDC power supply (e.g. a solar panel, external power bank, etc.) with a minimum of
150mA is necessary to turn the instrument on; any excess power will be used to charge the internal lithium
battery. Proper solar panels are suitable to power the instrument.
: do not keep your Digifly AIR connected to its USB port in flight or in any situation where the
USB cable could create an undesired movement to the charging port, applying force on the soldered connection
of the mini USB, resulting in its detachment from the board. This also applies when you carry your AIR in your
harness or a backpack: do not have the USB cable connected to it.
KEYBOARD - NORMAL OR LONG KEY PRESS
The time length you keep the keys pressed on your Digifly instrument selects the available functions.
For a
press the button for less than a second
For a
keep the button pressed down for at least 2 seconds
: When not specified, the key press has to be considered as a normal key press (less than a second).
To
your Digifly AIR
, press the key for at least 4 seconds, until you hear it “beep”.
To
your Digifly AIR
, press the key for at least 4 seconds, until you hear it “beep”. If the logger is
recording, you will be prompted to confirm your choice by pressing the key or, to cancel, press the key;
it will automatically cancel the request within 3 seconds of no input.
After switching your Digifly off, wait at least 5 seconds before attempting to turn it on again; this prevents
unwanted operation.
After turning your Digifly on, the first screen briefly shows the vario model, pilot name (if set), microSD status,
logger status, vario serial number, firmware version and battery voltage.
DISPLAY CONTRAST ADJUSTMENT
To change the contrast of the display, press the key to enter the “MAIN
SETUP” menu, select CTRS (
, go to the edit mode
pressing the key, set the preferred contrast using the keys: ‘arrow UP’
or ‘arrow DOWN’ , then save the changes by pressing the key.
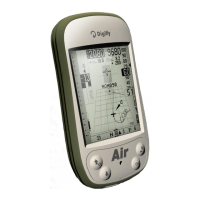
To navigate the menus of your instrument, press the key (“MENU”
function).
To select the sub-menus, scroll UP or DOWN the list using the arrow
keys, then confirm your choice pressing the key (“ENT” function).
To exit and get back to the main screen press the key (“ESC” function).