THIS DOCUMENT CONTAINS CONFIDENTIAL INFORMATION PROPRIETARY TO ENERGATE INC. NO PART OF ITS CONTENTS MAY BE DISCLOSED OR CONVEYED TO,
USED BY, OR COPIED TO A THIRD PARTY WITHOUT PRIOR WRITTEN CONSENT BY ENERGATE INC. PRINTED COPIES WILL BE CONSIDERED UNCONTROLLED.
AW000873-G 56
For information on how to associate the MAC address with the gateway using LMS, see 11.1.3 Use LMS to Associate
a Thermostat .
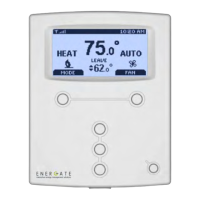
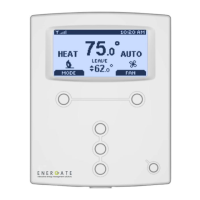
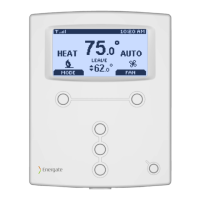
3. Use the following indicators to confirm that the provisioning process was successful:
The link status indicator at the top-right of the home screen changes from an “X” to a series of signal strength
bars. A "Z" is displayed to the right of the signal strength bars to indicate that ZigBee is the primary
communication method. (If the thermostat is also configured with a pager module, a “D”, for dual, is displayed
instead.)
The ZigBee Link Info screen under the Installer Setup menu displays the status message "Connection Active".
4. To verify that the thermostat and gateway can communicate, send a text message to the thermostat from the
website provided by the electric utility.
If your utility uses LMS, see 11.1.4 Use LMS to Send a Text Message to the Thermostat.
Alternatively, for ZIP Connect gateways, use the Identify function. For information, see the Load Management
System Guide.
11.1.3 Use LMS to Associate a Thermostat with a ZigBee Gateway
1. Log in to LMS and, on the Homes menu, click Manage Homes.
2. To search for the appropriate home configuration, enter information in one or more fields, and then click Submit.
For example, enter the account number.
3. In the list of homes, for the appropriate home, under Actions, click Provision.
4. On the Provision Devices Details page, under the information for the appropriate gateway, click Provision New End
Device.
5. On the Provision New End Device page, beside the MAC Address field, click the search button.
6. Enter all or part of the thermostat’s MAC address, and then click Search.
Alternatively, you can search using all or part of the thermostat name or Install Code.
7. In the search results, click the current thermostat to select it, and then click Select.
8. On the Provision New End Device page, enter a name for the thermostat and, optionally, a description. Then click
Submit.
11.1.4 Use LMS to Send a Text Message to the Thermostat
1. Log in to LMS and, on the Homes menu, click Manage Homes.
2. To search for the appropriate home configuration, enter information in one or more fields, and then click Submit.
For example, enter the account number.
3. In the list of homes, for the appropriate home, under Actions, click Provision.
4. On the Provision Devices Details page, for the thermostat that you provisioned, under Actions, click Send Message.