Room Scheduling System • Room Agent Installation and Configuration 15
c. Verify or change settings (panel appearance, time, and audio clicks) on the General
Settings tab (see General Settings window on page 20).
5. Select the Calendar type and connect to the Calendar server. The exact procedure
depends on the calendar that you select:
• Ad Astra Setup on page 41
• CollegeNET 25Live Setup on page 44
• EMS Setup on page 46
• Google Calendar Setup on page 55
• Microsoft Exchange Setup on page 61
• Microsoft Office 365 Setup on page 70.
• Rendezvous by NFS Setup on page 79
6. Enter the information required for each panel under the various column headings as
described in the procedures for each calendar type.
7. Customize the appearance of your panels as desired. See the following:
• Layout tab on page 44
• Background tab on page 46
• Date & Time tab on page 48
• Panel Message tab on page 49
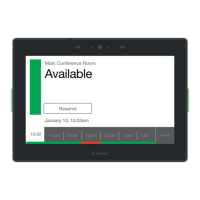
8. Configure one or more panels (see Configure panels on page 24).
NOTE: The Panel Design menu includes the DefaultTLPTemplate, which is the
default that is installed as part of the Room Agent software, as well as any
templates that you have created and saved (see Templates pane on page 52).
9. Send the configuration to selected panels (see Send and retrieve the configuration on
page 40).