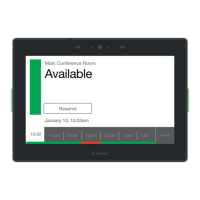
Room Scheduling System • Reference Information 90
Wall Mounting
Mount the panel directly into drywall as follows:
ATTENTION:
• Do not install the panel in a fire resistant rated wall or partition assembly.
• Veuillez ne pas installer les écrans tactiles dans un mur protégé par un dispositif
coupe-feu ou dans une cloison.
• All structural steps and electrical installation must be performed by qualified
personnel in accordance with local and national building codes and electrical
codes.
• Toute étape structurelle et installation électrique, doit être effectuée par un
personnel qualifié, conformément aux codes du bâtiment, aux codes incendie et
sécurité, et aux codes électriques, locaux et nationaux.
� (TLS 525M) Obtain an optional Extron RWM 1 Recessed Wall Mount Kit.
� (TLS 725M) Obtain an optional Extron RWM 2 Recessed Wall Mount Kit.
� Use the cut-out template (available from www.extron.com) to mark the wall at a
suitable location.
� Use a drywall saw or jigsaw to cut away the hole.
� Route the cables, leaving enough slack to connect them to the back of the panel.
� Plug the cables into the rear panel connectors.
� Install the panel.
Window Mounting (TLS 520M, TLS 525M, TLS 725M, TLP Pro 520M, and
TLS 1025M)
Mount the panel to a conference room window or other non-porous surface as follows:
� (TLS 520M, TLP Pro 520M) Obtain an optional Extron SMB 1 Low Profile Surface
Mount Box and a GMK 1 Glass Mount Kit.
� (TLS 525M) Obtain an optional Extron SMK 1 Low Profile Surface Mount Kit.
� (TLS 725M) Obtain an optional Extron SMK 2 Low Profile Surface Mount Kit.
� (TLS 1025M) Obtain an optional Extron SMK 3 Low Profile Surface Mount Kit.
� Decide where to place the panel and clean the glass surface.
� Affix the adhesive patch included with the glass mount kit.
� Affix the glass mount kit plate to the adhesive patch.
� Mount the surface mount box to the glass mount kit.
NOTE: If required, drill a hole in the side of the surface mount box to run cables and
raceway from the side of the mounting kit.
� (TLS 520M, TLP Pro 520M) Secure the surface mount box to the glass mount kit.
� Secure the wallplate adapter to the surface mount kit.
� Run cables through the cable cutout and connect them to the back panel of the panel.
NOTE: If required, mount an adhesive raceway (not provided) to run the cables.
� Press the panel onto the wallplate adapter. Four catches hold it in place.