53
EN
However, on fast FLYER e-bikes in the EU, this
is the other way round for legal reasons. The left
brake lever is for the back wheel and the right bra-
ke lever is for the front wheel. Your FLYER dealer
will record the brake lever settings in the service
booklet.
However,beforetherstrideyoushouldalways
check how the brake handles are connected on
yourFLYERasitmaybedierent.
Before each ride, and any time your bike has
been left unattended for a short period of time,
make sure to check if each screw, quick-release
fasteners, thru-axles or other important compo-
nents are properly secured where they belong. A
table listing the most important screw connections
and the prescribed fastening torques is provided
in the separate “Technical Data” operating in-
structions document. The most important screw
connections and the prescribed fastening torques
is provided in the “technical data” for your FLYER,
while notes on the correct use of quick-release
fastenersandquick-releaseaxlesareprovidedin
Chapter 13.1.
When you are riding with clipless/step-in pedals:
Functional testing is required. The pedals should
release easily and smoothly.
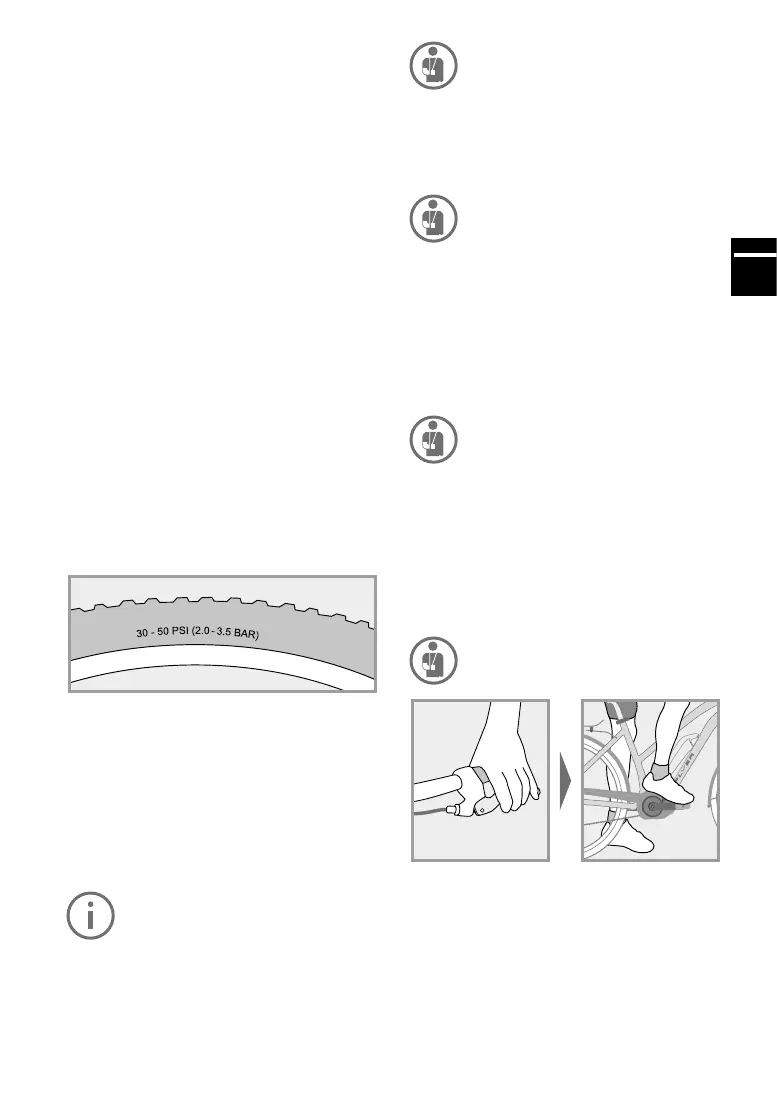
Check the tyre pressure. The manufacturer guide-
lineswhichmaynotbeexceededorundercutare
printed on the side of the tyres.
It is also necessary for you to check the following
components of your E-Bike:
• Please check that the battery is secure.
• Check the charging state of the battery to en-
surethat the charge issucient for the drive
planned.
• Familiarise yourself with the functions of the
operating element.
Familiarise yourself with your new
FLYER E-Bike’s riding and handling per-
formance by testing its features out in a
safe and quiet area.
Exampleoftyrepressureinformation
Only use a FLYER with a frame size that
suits you.
Ensure that your legs have enough room
to manoeuvre.
You must be able to dismount quickly
without touching the frame.
Insucient clearance or room to ma-
noeuvre may lead to severe injuries.
Please note that while preparing to mount
your FLYER that it will immediately start
moving as soon as you put your foot onto
the pedal when the support mode is
switched on. Do not place your foot on
the pedal when mounting. Hold the
brake, as the unfamiliar thrust may other-
wise lead to falls or other accidents.
Stand to one side of the FLYER and lift
your leg over the E-Bike. Firmly hold the
handle bars with both hands, as you
would do with a bicycle.
Modern brakes have a substantially
higher braking performance than con-
ventional brakes. Carefully practise us-
ing your brakes.
Note that when riding in wet conditions
and on slippery roads, your bike’s brak-
ing power, particularly the rim brakes,
can be severely weakened.
Expectalongerbrakingdistance ifyou
are riding in wet conditions.
Look ahead while riding and familiarise
yourself with the brakes' response time.
Brake discs can become very hot. Do
not touch the brakes immediately after
braking (risk of burns to skin).