37
EN
Preventextremeoverheatingduetoex-
ternaleectsoroverloading.
Only use the battery with your FLYER.
• Never use a damaged battery. If you
discover cracks, deformation of the
housing or leaks, stop using the bat-
tery and have your FLYER checked
by a specialist retailer. Damaged bat-
teries must not be posted.
• The lighting function will still continue
forapprox.onehourafterthebattery
is empty.
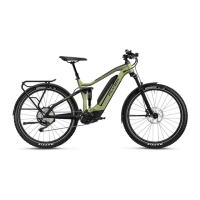
5.28 seattubebatterySTB
1LEDchargestatusdisplay
Shows the battery’s remaining charge. If an error
occurs, an error code is displayed (see Chapter
5.29 Battery error codes)
Akkuladestandsanzeige
Jede leuchtende Akkuladestandsleuchte steht für ca. 20 % der Akkukapazität.
Akkuladestandsleuchten
5 an
4 an 3 an 2 an
1 an 1 blinkt*
1
5 an 4 an 3 an 2 an 1 an 1 blinkt*
1
Anteil der Akkukapazität
im Vergleich zum voll
geladenen Akku
81 % bis 100 % 61% bis 80% 41% bis 60% 21% bis 40% 11% bis 20% 1% bis 10%
*
1
Wenn keine Restkapazität mehr im Akku vorhanden ist, blinkt eine Akkuladestandsleuchte schnell.
1
3
4
2
2Controlbuttonforbatterychargelevel
Let the LED battery charge level indicator blink to
verify the remaining battery power.
3 Charger port
4 Rubber cap
Protects the connectors for the charger when the
battery is not being charged.
Check whether the battery is fully char-
ged after you have purchased it and be-
foreusingitforthersttime.
To check if the battery is charging, press the con-
trol button to be shown the battery charge level.
Charge the battery when none of the LEDs light
up. Only use the original charger. Never use char-
gers supplied by third-party companies.
Charging status indicator
The charging status of the battery is indicated by
veLEDs.
Afast-ashingLEDindicatesthatthebatteryhas
been completely discharged.
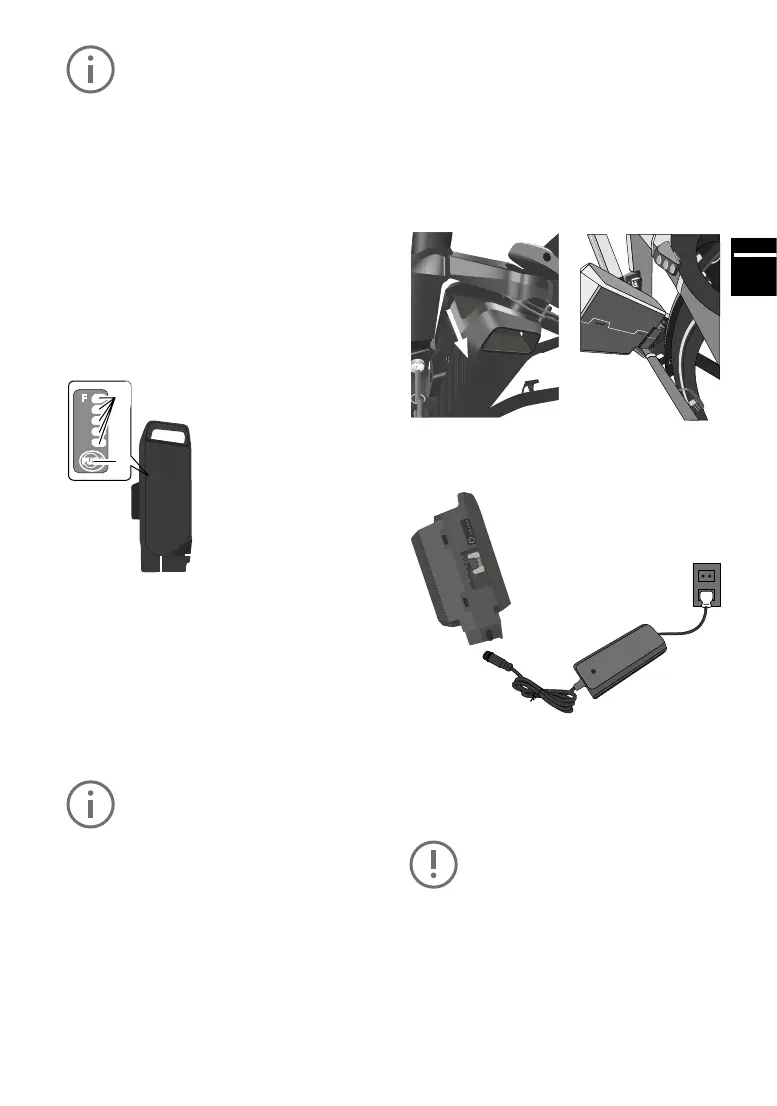
Removingthebattery
1) Switch o the electrical system rst. Press
theon/obuttonforthispurpose.
2) Unlock the battery with the battery key and
removeitfromtheholder.Holdthebatteryrmly,
as it is heavy.
Loadingthebattery
The battery can be charged while it is installed in
the e-bike or once it has been removed.
1)Removetherubbercap
Open the rubber cap on the battery.
Connect the mains plug to a mains socket (220
V - 240 V AC) and connect the charger to the
battery.
Do not connect the charger to the mains
socket immediately after a sudden tem-
perature change from cold to warm. It is
possible that condensed water has col-
lected on the contacts and this will lead
to a short circuit. Do not connect the bat-
tery to the charger immediately after a
sudden temperature change from cold to
warm. Wait until both devices have rea-