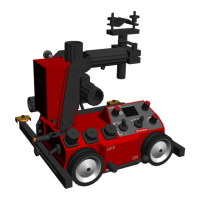
4. Set the welding torch inclination:
- Loosen the clamping lever (c)
- Twist the torch holder (d) and set
the required inclination
- Tighten the clamping lever (c)
5. Release all other necessary clamping
levers and position the welding torch.
1. Turn the adjusting dial (a) to the left
and release the torch holder.
2. Insert the welding torch (b).
3. Turn the adjusting dial (a) to the right
and x the welding torch in position.
Mounting and
adjusting the
welding torch
(a)
(c)
(b)
(d)
6. Turn the adjusting dial on the relevant
mechanical adjustment unit (e, f) until
the correct welding torch position is
reached.
(e)
(f)
41