Default Eng. Code - 4567 Default User Code - 1111 (Irl) 1234 (UK)
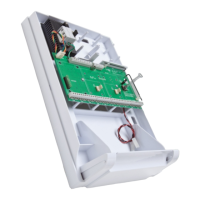
RF-PIRCAM - Continued
2 Devices Menu
2 Wired Devices Menu
1 RF Devices Menu
1 Add & ID RF Devices
1 Add & ID RF Devices
1 Image Size
2 Color
3 Num Images
4 Live Images
2 Locate RF Devices
2 Locate RF Devices
3 Remove RF Devices
3 Remove RF Devices
4 RF Devs Options
5 RF System Options
6 RF Camera Options
4 RF Devs Options
1 Service Menu
3 Zone Menu
• To get to either the RF-Zones or RF-Points options menu; select the Devices Menu. Then RF Devs Menu.
Next select the RF Devs Options.
• The RF-PIRCAM’s programmable options can be accessed as follows;
• From there go to either the RF Zone Opts or RF Point Opts menu and then select the RF-PIRCAM number
in question.
• You can now select the sensitivity of the RF-PIRCAM. The three levels are LOW, MED and HI.
• Another option is Mon Sup (Monitored Supervisory signal) is defaulted to YES. When the device is “lost” for
>120 minutes, a supervisory alarm is flagged by the panel. This can be turned off by selecting NO. However,
we recommend that this feature is left as YES
• The final section is Flash. There are three conditions; ON, OFF and AUTO. The default is ON - this means
that the RF-PIRCAM always triggers the flash when it takes an image. With OFF there is no flash (unless you
are taking a live snapshot) and with AUTO, the flash is only triggered when the room is dark.
• There are 4 sections to the RF Camera Opts menu...
2 Mon Sup YES
1 Settings MED
3 Flash ON
1 Add & ID RF Devices
1 RF Zone Opts
2 RF Point Opts
2 Locate RF Devices
3 Remove RF Devices
4 RF Devs Options
• Image Size is defaulted to VGA which is 640x800 pixels. If you press NO you can select QVGA which has a
lower resolution of 320x240 pixels but has a quicker transmission time.
Color is defaulted to YES. You can select black and white by pressing NO but unless there are specific site-
related reasons for choosing black and white we recommend keeping the colour on.
Num images is shorthand for “Number of images” and is defaulted to 3. When the system is armed and the
PIRCAM is triggered, 3 snapshots are taken at 1 second intervals. This number can be changed by pressing
YES and then pressing any number between 1 to 5.
• Live images is defaulted to NO. When YES is selected, you can take a snapshot on your smart phone
whenever you want
•
•
!
To utilise the camera, the system needs to be connected to SecureComm and have the HKC app
2 Wired Devices Menu
1 RF Devices Menu
PIR located -LED turns on/off every second
• In the Locate: RF Zones or Locate: RF Points you will observe the following;
Note: To locate an RF-PIRCAM go to the Devices Menu in engineer mode and follow menu path below...
• You will automatically be brought to either zone 1 or the first point (P50)
• When you want to move on to the next zone or point then press
1 Locate:RF Zones
2 Locate:RF Points
1 Add & ID RF Devices
2 Locate RF Devices
3 Remove RF Devices
#
next
17
 Loading...