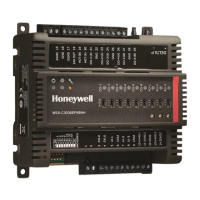
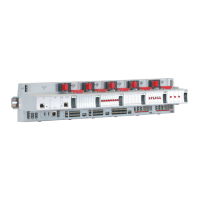
Legend
1.
RS232 / RJ45 socket (for connection of M-Bus and other RS232-based protocols; factory
debugging)
2.
Three-position slide switch (for setting bias and termination resistance of RS485-1)
3.
Two Ethernet / RJ45 sockets (for BACnet IP communication); 10/100 Mbit/s; 1 "link" LED + 1
"activity" LED
4.
USB 2.0 Host Interface (for connection of IF-LON2); max. 200 mA, high speed
5.
RS485-1* (isolated; for BACnet MS/TP, Panel Bus, Modbus RTU communication, etc.)
6.
RS485-2* (non-isolated; for BACnet MS/TP, Panel Bus, Modbus RTU communication, etc.)
7.
LEDs
8.
USB 2.0 Device Interface (for connection to WEBs N4 web browsers, and 3
rd
-party touch panels)
9.
HMI (or RJ45 socket for connection of portable HMI)
*Modbus RTU Master/Slave communication is possible on the two RS485 interfaces.
Risk of electric shock or equipment damage
It is prohibited to connect any of the RJ45 sockets of the CIPer Model 50 controller to a so-called PoE-
enabled device ("Power over Ethernet").
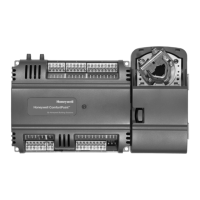
RS232 / RJ45 Socket
Via its RS232 / RJ45 socket, the CIPer Model 50 controller can be connected (using an TECHTOO USB 3.0
and YIOVVOM DB9 Breakout Connector) to a PW M-Bus Adapter and thus to M-Bus networks. See also
section "M-Bus Connection"
Figure 4: RS232 / RJ45 socket

 Loading...