Do you have a question about the i-CAT FLX and is the answer not in the manual?
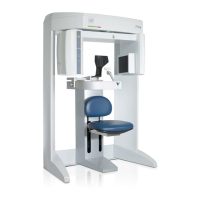
Step-by-step guide for physically installing the i-CAT FLX scanner unit.
Instructions for securely attaching cord retention brackets to the scanner.
Connecting and setting up the scanner's primary control interface components.
Procedure for ensuring the scanner's gantry is properly leveled for optimal performance.
Verifying the installed version of the SmartScan STUDIO software.
Configuring the system's date, time, and time zone settings.
Optional configuration for updating technical support and remote assistance web links.
Procedure for calibrating the scanner's image receptor panel.
Aligning the internal crosshair laser for accurate positioning.
Steps to correctly align the patient chair with the scanner's gantry.
Fine-tuning the centerline laser for precise patient positioning.
Performing geometric calibration to ensure image accuracy and quality.
Calibrating the scanner's shutter mechanism for optimal image acquisition.
Aligning the head holder to ensure correct patient head positioning during scans.
Overview of different software installation scenarios and requirements for the system.
Steps for a new i-CAT FLX installation without DEXIS.
Process for replacing older i-CAT or KaVo systems with the i-CAT FLX.
Steps for installing the i-CAT FLX with DEXIS software.
Upgrading existing DEXIS installations to integrate with the i-CAT FLX.
Configuring network settings and permissions for the i-CAT FLX system.
Guidelines for assigning static IP addresses to system components.
Procedures for setting up non-standard network configurations.
Detailed steps for installing SmartScan STUDIO server and client components.
Guide for installing client software on workstations for data entry and viewing.
Instructions for installing TxSTUDIO software for viewing QA tests and patient images.
Configuring optional PACS modules for image storage and retrieval.
Configuring settings for the Modality Worklist to retrieve patient data.
Setting up query and retrieve functions for accessing data from PACS servers.
Optional configuration for integrating with legacy Practice Management systems.
Procedures to verify successful installation and configuration of the system.
Performing final checks after a standard i-CAT FLX installation.
Performing final checks after a DEXIS integrated i-CAT FLX installation.
Overview and execution of Quality Assurance tests for scanner performance.
Performing the line pair test to evaluate scanner resolution.
Conducting the material test to measure Hounsfield Units (HU) of phantom materials.
Performing the air/water test to assess scanner performance with water.
Performing the PAN test to evaluate panoramic imaging capabilities.
Instructions for mounting the operator control box to a wall with the cable visible.
Instructions for mounting the operator control box to a wall with the cable concealed within the wall.
Procedures for powering on the scanner and its controller.
Accessing various utility functions from the service menu.
Procedures for safely shutting down the scanner and controller.
Configuring network share permissions for remote Image Root access in a domain.
Setting up a network shared Image Root folder in a Windows Workgroup environment.
| Brand | i-CAT |
|---|---|
| Model | FLX |
| Category | Dental equipment |
| Language | English |