Do you have a question about the Intralox ThermoDrive and is the answer not in the manual?
General information on safety labels and symbols used in the manual.
General warning sign usage and importance for specific procedures.
Explanation of DANGER, WARNING, and CAUTION severity indicators.
Definitions of warning symbols within triangles, circles, and blue circles.
Identification of specific hazards associated with the equipment.
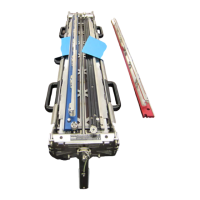
Overview of the ThermoDrive Splicing System's function and power requirements.
Lists the main parts of the splicing system included with the unit.
Describes the use of cut guides and utility knives for preparing belt ends.
Explains how the fixture holds belt ends for melting and joining.
Details the heat wand's function and temperature control box.
Lists additional items included with the splicing system for various tasks.
Details of accessories like trimmers, spacers, storage case, tape, and tools.
Describes the all-metal fixture for holding belt ends during melting.
Explains the metal plates used for guiding belt preparation and securing ends.
Details the electrically operated heat wand and its control box.
Describes the temperature control box, electric cord, power switch, and wand cord.
Lists essential items and safety gear required for setup.
Steps for preparing the conveyor for belt splicing setup.
Instructions for setting up the clamping fixture on the conveyor.
Methods to firmly attach the clamping fixture to the conveyor frame.
Procedure for connecting the crank handle to the clamping fixture.
Steps for connecting the heat wand and checking voltage requirements.
Guidance on selecting the correct temperature based on belt material.
Instructions for letting the heat wand reach and stabilize its temperature.
Discusses conditions for new, prepared, and existing belts before cutting.
Importance of preparation for drive bar pitch and contamination-free splicing.
Procedures for cleaning belt ends to ensure splice quality.
Detailed steps for cutting belt ends using the correct cut guide.
Criteria for ensuring belt ends are properly cut, straight, and clean.
Steps for opening the fixture and clearing debris before alignment.
Procedures for centering belt ends and lightly securing them with cut guides.
How to inspect and finalize the alignment and securing of belt ends.
Verifying the clamping fixture remains closed when the crank handle is released.
Checking for parallel and perpendicular alignment of belt ends.
Ensures system setup and belt alignment are complete before splicing.
Instructions for heating and joining the belt ends using the heat wand.
Procedures for cooling the splice and cleaning the heat wand.
Criteria for verifying the quality of the melted and cooled splice.
Step-by-step guide to removing the first weld bead using a skiver.
Techniques for removing the second weld bead using trimmers and a skiver.
Procedures for trimming flash and rough spots from belt edges.
Checks for smooth surfaces, straight edges, and proper drive bar pitch.
Steps for powering down the system and cleaning components.
Instructions for allowing the heat wand and stand to cool completely.
Guidance on safely storing the splicing system components in the case.
Introduction to troubleshooting tables and problem-solving approach.
Emphasizes systematic checks and quality inspection at each step.
Addresses issues with belt preparation and splice integrity.
Troubleshooting common issues related to voltage, connections, and components.
Solutions for problems with fixture operation, alignment, and locking.
Addresses issues with belt end shape, alignment, and tension.
Guides on resolving issues like poor finish, melting, drive pitch, or cracks.
Solutions for when the belt does not lie flat on the carryway.
How to correct horizontal and vertical misalignment of splices.
Troubleshooting common belt failures like tears or sprocket engagement.
Instructions for setting up the system away from the main carryway.
Procedure for creating new belt tabs if existing ones are missing.
Using tape to correct vertical misalignment of belt top surfaces.
An alternative method for removing the second weld bead.
Checks for smooth operation and proper contact of fixture components.
Explains how nubs affect clamping and trimming.
Steps for using the skiver to remove nubs from belt ends.
How to cut and prepare silicone spacers for clamping.
Guidance on positioning silicone spacers during alignment.
Explains how troughing grooves can affect splicing quality.
Using tape to shim the grooved deck for proper alignment.
Instructions for trimming tape to avoid contact with the heat wand.
Introduces challenges specific to S8126 belting and required attention.
Specific steps for preparing S8126 belt ends, including shimming and tabs.
Key steps for aligning and securing S8126 belt ends for splicing.
Specific techniques for splicing S8126 belt ends, including crank handle control.
Special care needed for inspecting drive bar pitch on S8126 splices.
Verifying all components and the instruction manual are in the storage case.
Ensuring all safety labels are correctly adhered to the equipment.
Checking the fixture, blades, cords, and heat wand for proper operation.
Ensuring all parts of the splicing system are securely fastened.
Instructions for cleaning the temperature control box and removing dust.