– 15 –
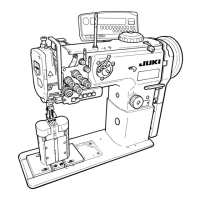
3-3. Installing the detector (PLC-2710, 2760, 2760L, 2765; when the option kit is used)
1) Installing the detector mounting base
Install detector mounting base ❶ on the main
shaft of the sewing machine.
2) Installing the detector support
Remove the belt cover mounting screw. Install
detector support shaft ❷.
Install detector support bar ❸ on detector support
shaft ❷ with screw ❹.
3) Installing the detector
Temporarilyxdetector❺ with setscrew ❻.
4) Adjusting the stopping position
・ Adjusting the lower stopping position
Adjust the lower stopping position of the sewing
machine by turning joint ❼ of the detector ❺ so
that the sewing machine stops at a position where
the machine does not come in contact with needle
clamp ❽ when the presser is lifted.
When the sewing machine stops in its correct
lower stopping position, as a guide, the lower end
of needle clamp ❽isapproximately30mmabove
the top surface of throat plate ❾ while moving
down needle clamp ❽ from its upper position.
Be sure to turn the power OFF before turn-
ing joint ❼ of detector ❺.
(Approx.
30 mm)
❸
❶
❷
❹
❺
❻
❼
❽
❾
❷
 Loading...