66
3
© 2018 KOSTAL Solar Electric GmbH
Installation
The battery’s DC cables may only be connected to
the inverter if the inverter and battery storage are
voltage-free.
1. De-energise the battery storage and inverter.
2. Correctly fit the plug on the positive cable and
the socket on the negative cable. The inverter is
equipped with plug connectors from PHOENIX
CONTACT (type SUNCLIX). During installation,
always observe the most recent specifications from
the manufacturer (e.g. permissible tightening torques
etc.).
1
3. When mounting the sockets and plugs on the DC
cables used by the battery, ensure their polarity is
correct!
4. Plug the sockets and plugs of the battery’s DC
cables onto the inverter. Keep the plug seals out of
the plug connectors.
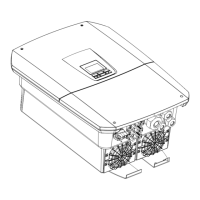
BMS
DC3
Fig. 37: Overview of battery DC connection
DANGER
RISK OF DEATH DUE TO ELECTRI-
CAL SHOCK AND DISCHARGE!
The battery’s DC cables may be
energised. Be sure to de-energise
the battery storage system. Please
also observe the instructions in the
operating manual provided by the
battery manufacturer.
1
You can find information about the Sunclix
installation specification at:
www.phoenixcontact.com
IMPORTANT
INFORMATION
The cross-section of the DC cables
should be as large as possible,
a maximum of 4 mm² for flexible
cables
and 6 mm² for rigid cables.
We recommend using tin-plated
cables. If non-tin-plated cables
are used, the copper strands may
oxidise, as a result of which the
transition resistance of the con-
nections will be too high. Also note
the details provided by the plug
manufacturer.
3.12 Connecting battery’s DC cables
 Loading...