LIGHTMED TruScan Pro – Operator’s Manual Rev. No. 01 Page 77 of 109
5.3 Tools and Equipment
The following tools and equipments are required for the Service Technician or installer to have in
order to carry out a complete installation or uninstallation of the TruScan Pro laser system. These
items can also be purchased from the Manufacturer:
• Installation or uninstallation tools:
o Phillips screwdriver
o 2 mm hex wrench
o 5 mm hex wrench
o Cable ties
• Optical alignment toolkit:
o Model eye
o Laser target tool
o Photographic thermal paper (Zap-It or equivalent)
o A set of Allen keys (metric)
o Phillips or Robertson screwdrivers
• Laser power meter (to measure from 0 to 3 W).
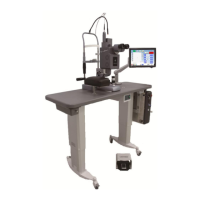
5.4 Installation Process
The TruScan Pro laser system consists of the following functional units that need to be assembled
by a trained and authorized Service Technician or installer:
• Ophthalmic table
• TruScan module integrated CSO SL950 slit lamp
• 10-inch LCD screen
• Footswitch
• Accessories (chinrest, target rod, binoculars, etc.)
1. Remove the foam packaging and place the table on the flat ground (Figure 17).
Figure 17: Remove the foam packaging.
2. Plug in the power cable to the table and switch the power ON. Make sure the light on the
switch is ON.
3. Raise the table to the maximum height.