FXS Gateway Overview
- 26 -
Chapter 2
Web Configuration with FXS Introduction
This Chapter describes how to login into the WEB and navigate through it.
2.1 Web Configuration with FXS Overview
The embedded web configuration allows you to use a web browser to
manage the VoIP Gateway.
2.2 Accessing the Web Configuration
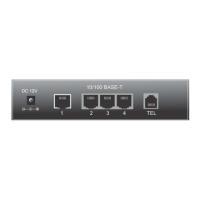
You will need a computer with and Ethernet 10BaseT, 100Base-TX
Network Interface Card (NIC). Connect to the LAN port in the FXS.
Use Internet Explorer 5.5 and later or Netscape Navigator 6 and later
versions.
Use the following instructions to login on to the web configuration.
2.3 Login and welcome screen
Step 1. Start your web browser.
Step 2. Launch your web browser and enter [10.1.1.3] (the default IP address
of the VoIP Gateway) in the Location or Address field. Press Enter.
Step 3. The Password screen now appears. Type [root] in the user name field
(it may display automatically for you) and your password (default [Null]) in
the password field.
Step 4. Click OK.