SERVICE MANUAL
25
www.norcold.com
Diagnostic Mode
The diagnostic mode is a tool incorporated within the controls
and can be accessed via the optical display. This tool is designed
to assist in verifying temperature, inputs, outputs, and to retrieve
recorded faults stored by the controls by displaying the various
information via the LCD. Ten (10) screens, each having a particular
function, are used to display this information. For example, screen
three (3) displays the fresh food n thermistor temperature, and
screens four (4) and ve (5) display stored fault history.
The LCD utilizes a dual 7-segment display within the LCD. The
screen number is displayed utilizing the left-side 7-segment dis-
play while inputs, outputs, and various fault related information is
displayed utilizing individual segments of the right-side 7-segment
display. These individual segments will be dened/explained under
each of the individual screen descriptions to follow.
Access Diagnostic Mode
1. Press and hold both the MODE and the Temperature Set but-
tons at the same time.
2. Release the MODE and the Temperature Set buttons as soon
as screen
displays.
3. A few seconds later,
code
set
displays.
Change Screens
To change screens, press and hold the MODE button until the next
screen displays.
Exit Diagnostic Mode
4. Press and hold both the MODE and the Temperature Set but-
tons at the same time.
5. Release the MODE and the Temperature Set buttons when the
mode icons and temperature setting once again display.
Turning the refrigerator OFF then back ON also exits the Diagnos-
tic Mode.
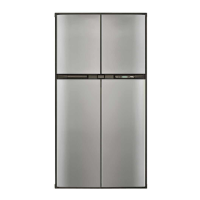
Screens and Diagnostic Segments Information
Screen 1. All Diagnostic Icons ON
Screen 1 (Initial view) Screen 1 (Second view)
Screen 1 veries all icons are operational by turning them on.
Diagnostic Screen 1 (Initial View)
NOR000125A-1-1
code
set
Diagnostic Screen 1 (Second View)
Screen 2. All Diagnostic Icons OFF
Press the MODE button to bring up screen 2.
Screen 2 (Initial view) Screen 2 (Second view)
Screen 2 veries all icons are operational by turning them off
Screen 3. Fresh Food Fin Temperature
Press the MODE button to bring up screen 3.
Screen 3 (Initial view) Screen 3 (Second view)
Screen 3 displays the actual n temperature being sensed by the
thermistor. This is not the fresh food cabinet air temperature.
The example shows the n temperature to be 20°F.
■ If the thermistor is “open”, the second view will show “00”.
■ If the thermistor is “shorted”, the second view will show “99”.
Screen 4. Stored Fault History
Press the MODE button to bring up screen 4.
Screen 4 (Initial view) Screen 4 (Second view)
All segments shown as being on.
Screen 4 displays stored fault history using lighted LED segments.
Refer to illustration below for fault history denitions of the indi-
vidual LED segments. If a fault occurred, its assigned fault history
Diagnostic Screen 2 (Initial View)
Diagnostic Screen 2 (Second View)
NOR000125A-2
Diagnostic Screen 3 (Initial View)
Diagnostic Screen 3 (Second View)
NOR000125A-3
Diagnostic Screen 4 (Second View)
Note: All segments shown as being on
1
2
3
5
6
7
4
Door Ajar
AC mode selected
but not available
Ignition Fault
DC voltage low
DC voltage high
AC relay stuck closed
AC heater failed open
Individual segment identification:
Diagnostic Screen 4 (Initial View)
NOR999125-4
Diagnostic Screen 4 (Second View)
Note: All segments shown as being on
1
2
3
5
6
7
4
Door Ajar
AC mode selected
but not available
Ignition Fault
DC voltage low
DC voltage high
AC relay stuck closed
AC heater failed open
Individual segment identification:
Diagnostic Screen 4 (Initial View)