Do you have a question about the Omron ZN-CTX21 and is the answer not in the manual?
Details on included and website-available manual types and their content.
Important factors for using OMRON products in specific applications.
Information on specification changes, errors, and copyright.
Important safety information, signal words, and precaution symbols.
Guidelines and precautions for safe operation and handling of the product.
Recommendations for proper installation, wiring, and battery usage.
Explanation of symbols used for GUI elements like menu items.
Explanation of 'Important' and 'Note' marks for user attention.
Details on the product's capabilities like easy operation, network connection, and logging.
Describes the two types of product configurations: Standalone and Network Connection.
Explains the process of performing easy power measurements using the device.
Outlines the step-by-step procedures for standalone and network operations.
Step-by-step guide for setting up and operating the product in standalone mode.
Step-by-step guide for setting up and operating the product via a network connection.
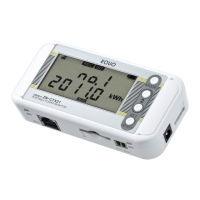
Details of the device's display screen, indicators, and status messages.
Description of the unit's control keys, reset switch, and SD card slot.
Details the function of each key on the control unit.
Instructions for safely inserting and removing SD cards.
Details on the product's input and output specifications, including alarm terminals.
Information about the alarm output terminals and their electrical specifications.
List of items included in the product package.
List of items required for using the product, including accessories.
Steps to configure the unit, including connecting the dedicated CT.
Instructions for connecting the dedicated current transformer (CT) to the unit.
Instructions for connecting external power supplies (AC adapter or DC cable).
Guide to setting up measurement parameters like channels, circuit type, and voltage.
Instructions for connecting the device to a network using LAN cables.
Defining IP addresses and subnet masks before network connection.
Detailed steps for setting the IP address of the Portable Power Monitor.
Procedure for configuring network settings on Windows XP.
Procedure for configuring network settings on Windows Vista.
Procedure for configuring network settings on Windows 7.
Instructions for connecting LAN cables to the network.
Procedures for installing the Portable Power Monitor unit.
Instructions for placing the unit on a desk or elevated surface.
Using the provided magnets to mount the unit on a vertical surface.
Using screws to mount the unit, including screw hole dimensions.
Methods for mounting the unit using screw hooks.
Detailed instructions on how to attach the dedicated CT to wires.
Overview of setting procedures and the three operation modes (RUN, FUN, THR).
Detailed settings available in the FUN operation mode.
List of all settable items within the FUN mode.
Instructions on how to switch the unit to the FUN operation mode.
Guide on navigating and selecting items within the FUN mode.
Detailed explanation of each setting item in FUN mode.
How to clear the recorded ranking data.
Setting the interval for recording measurement values.
Selecting the measurement mode: NORM, SLEEP, or HISPD.
Restoring unit settings to factory defaults.
Setting thresholds for alarm output in THR mode.
List of setting items available in THR mode for alarm thresholds.
Instructions on how to switch the unit to the THR operation mode.
Definition of threshold items for alarm output in THR mode.
Setting the upper limit for kWh or higher integrated power alarms.
How to copy settings to multiple units using an SD card.
Introduction to recording methods, focusing on unit recording.
Instructions for selecting the RUN mode for power measurement.
Navigating through different display screens in RUN mode.
Procedures for starting and stopping data recording.
How to initiate the recording process.
How to stop the recording process and save data.
Methods for outputting recorded data to an SD memory card.
How to cancel an active alarm indicator.
Technical data including connectable sensors, power, operating conditions, and dimensions.
List of error codes and their corresponding troubleshooting steps.
Reference for character displays and main messages on the unit.
Details on the file and folder structure for SD memory cards.
Note that portable power monitor units do not require calibration.
Diagrams showing mounting and installation dimensions.