2-2
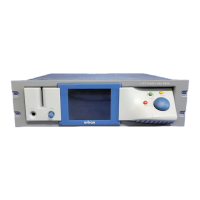
INSTALLATION ORBAN Model 8400
Installing the 8400
Allow about 2 hours for installation.
Installation consists of: (1) unpacking and inspecting the 8400, (2) checking the line volt-
age setting, fuse, and power cord, (3) setting the Ground Lift switch, (4) mounting the
8400 in a rack, (5) connecting inputs, outputs and power, (6) optional connecting of re-
mote control leads and (7) optional connecting of computer interface control leads.
When you have finished installing the 8400, proceed to “Quick Setup,” on page 2-23.
DO NOT connect power to the unit yet!
1. Unpack and inspect.
A) If you note obvious physical damage, contact the carrier immediately to make a
damage claim. Packed with the 8400 are:
1 Operating Manual
2 Line Cords (domestic, European)
2 Fuses (1A-250V Slow-Blow for 115V; 1A-250V for 230V)
2 Fuse holders (gray for 115V fuses and black for 230V fuses)
4 Rack-mounting screws, 10-32 x ½—with washers, #10
1 Null modem cable (for software upgrades and PC Remote connection)
1 PC Remote Software CD
B)
Save all packing materials! If you should ever have to ship the 8400 (e.g., for ser-
vicing), it is best to ship it in the original carton with its packing materials because
both the carton and packing material have been carefully designed to protect the
unit.
C) Complete the Registration Card and return it to Orban. (please)
The Registration Card enables us to inform you of new applications, per-
formance improvements, software updates, and service aids that may be de-
veloped, and it helps us respond promptly to claims under warranty without
our having to request a copy of your bill of sale or other proof of purchase.
Please fill in the Registration Card and send it to us today. (The Registration
Card is located after the cover page).
Customer names and information are confidential and are not sold to any-
one.
2. Check the line voltage, fuse and power cord.
A) DO NOT connect power to the unit yet!
B) Check the Voltage Select switch. This is on the rear panel.
The 8400 is shipped from the factory with the Voltage Select switch set to
the 230V position. Check and set the
Voltage Select switch to your local