Chapter 1 Preparation — About your projector
ENGLISH - 35
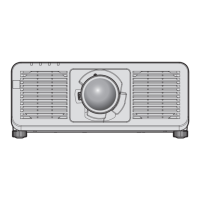
Projector body
2 3 4 5
6 7
7
8
6
7
14 15 16
106 6
9
1
11 13
12
172345 18
1 Remote control signal receiver (front)
2 Power indicator <ON (G)/STANDBY (R)>
Indicates the status of the power.
3 Light source indicator <LIGHT1>
Indicates the status of light source 1.
4 Light source indicator <LIGHT2>
Indicates the status of light source 2.
5 Temperature indicator <TEMP>
Indicates the internal temperature status.
6 Adjustable feet
Adjusts the projection angle.
7 Intake vent
8 Projection lens
(Only models with lens)
9 Remote control signal receiver (rear)
10 Exhaust vent
11 Control panel (x page 36)
12 Security slot
This security slot is compatible with the Kensington security
cables.
13 Connecting terminals (x page 37)
14 <MAIN POWER> switch
Turns on/o the main power.
15 <AC IN> terminal
Connect the supplied power cord.
16 Power cord holder
17 NFC touch point
This is the touch point when using the near eld communication
(NFC, Near Field Communication) function. A device such as a
smartphone equipped with the NFC function can be connected
to the projector by holding it near the touch point.
18 Security bar
A wire, etc., can be attached to prevent theft.
Attention
f Do not block the intake/exhaust vents of the projector.
Front Side
Rear
Top
Bottom
Projection direction