Installer reference guide / Mono tank integrated type 40
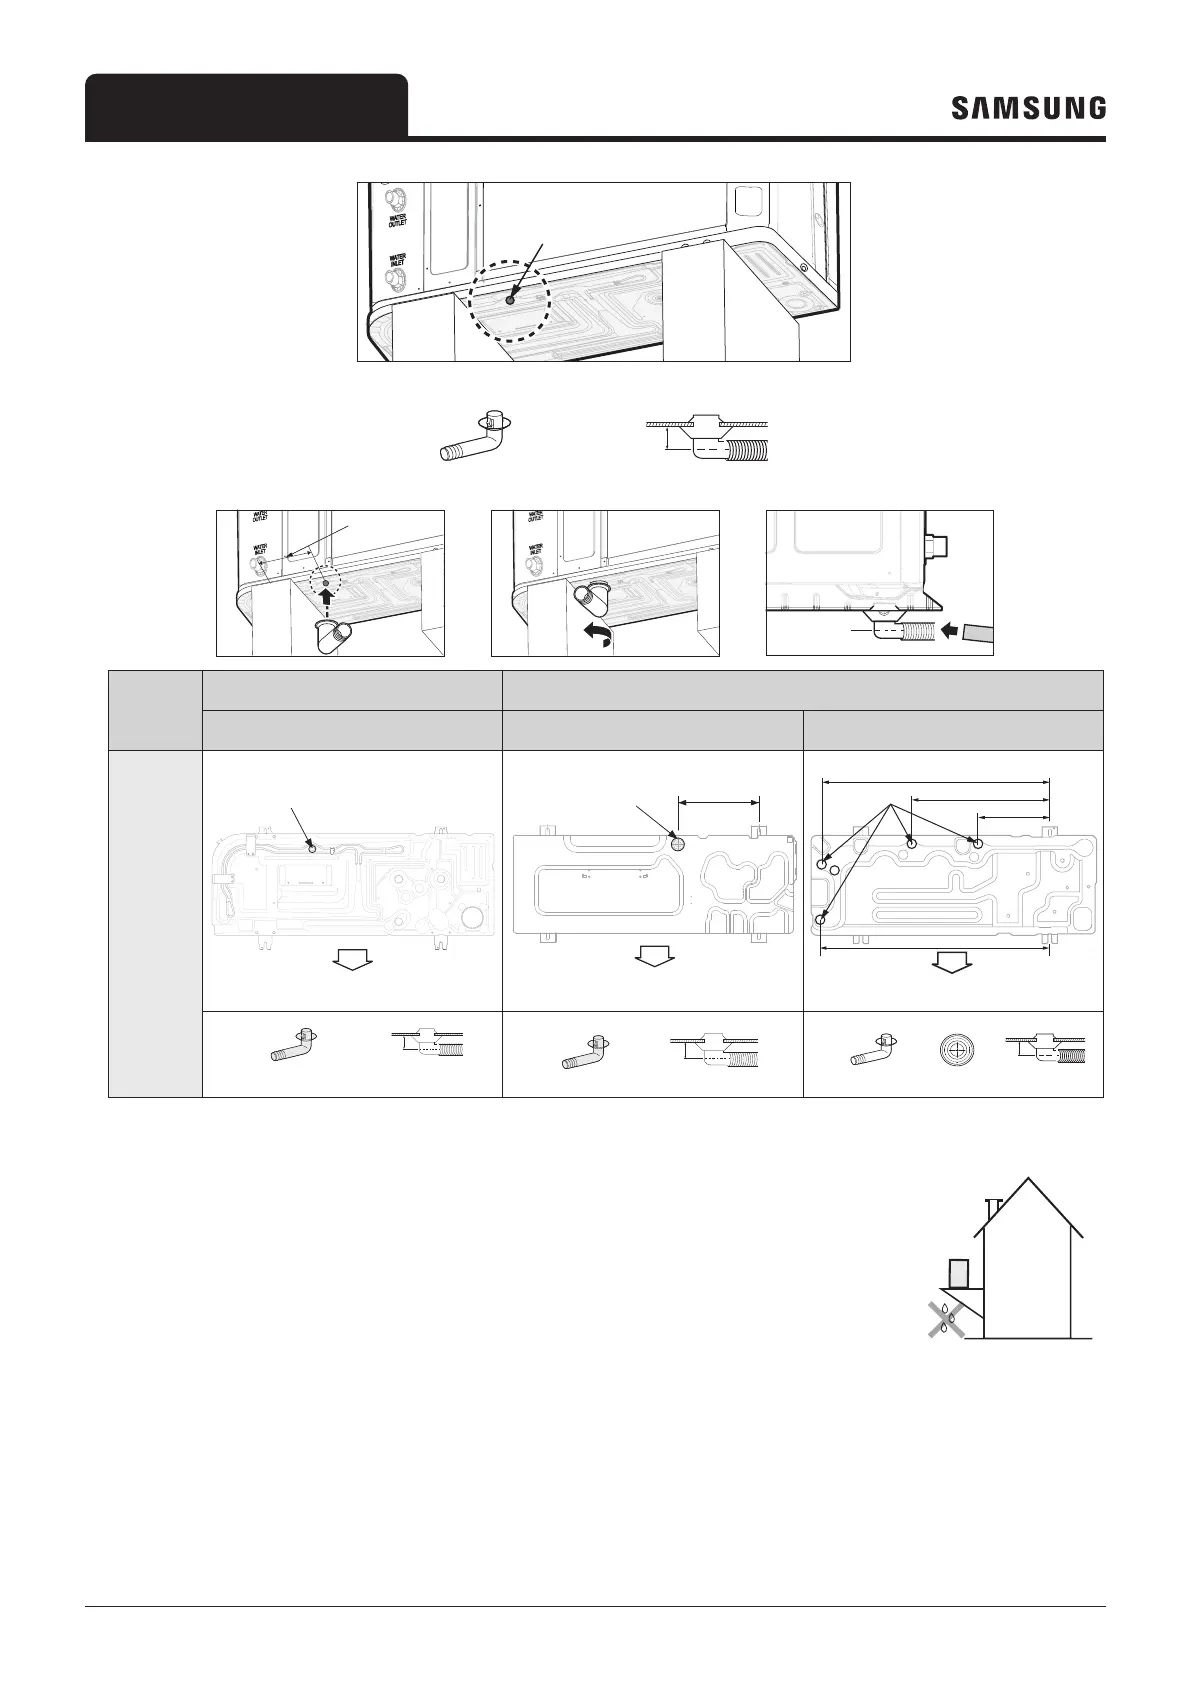
Drain plug x 1ea
Drain hole Φ20
13mm
212.5mm
Model
Mono HT Quiet
Mono
AE080/120/140BXYD** AE050RXYDEG AE080/120/160RXYD**
Drain
hole
shape
Drain hole Φ20
Air discharge side
Drain hole Φ20 234.8mm
Air discharge side
Drain hole Φ20 x 4 ea
Air discharge side
815.9mm
822.2mm
521.5mm
303.9mm
Drain plug x 1ea
13mm
ENGLISH-21
02 INSTALLATION
Drain work
• General area
While Air-Water Heat Pump is running in heating mode, Ice can begin accumulate on the surface of condenser.
To prevent Ice from growing, system go into De-frost mode and then Ice on the surface changes to water.
Dropped water from condenser shall be eliminated through running drain holes to prevent Ice growing at low temperature.
In case there is not enough space for drainage out of the unit, additional drain
works are required. Follow the description as below
- Make space more than 100mm between the bottom of the outdoor unit and
the ground for installation of the drain hose.
- Insert the drain plug into the hole on the bottom of the outdoor unit.
- Connect the drain hose to the drain plug.
- Make sure dusts or small branches should not go into the drain hose.
≥100mm
• If drain work is not enough, it can lead to system performance degration and system damages.
WARNING
Drain plug x 1ea
Drain hole Ø20
Air discharge side
30 mm
1. Prepare a water drainage channel around the foundation, to drain waste water from around the unit.
2. If the water drainage of the unit is not easy, please build up the unit on a foundation
of concrete blocks, etc. (the height of the foundation should be maximum 150mm).
3. If you install the unit on a frame, please install a waterproof plate within 150mm of
the underside of the unit in order to prevent the invasion of water from the lower
direction.
4. When installing the unit in a place frequently exposed to snow, pay special attention
to elevate the foundation as high as possible.
5. If you install the unit on a building frame, please install a waterproof plate (eld
supply) (within 150mm of the underside of the unit) in order to avoid the drain
water dripping. (See gure)
Drain plug x 1ea
ENGLISH-21
02 INSTALLATION
Drain work
• General area
While Air-Water Heat Pump is running in heating mode, Ice can begin accumulate on the surface of condenser.
To prevent Ice from growing, system go into De-frost mode and then Ice on the surface changes to water.
Dropped water from condenser shall be eliminated through running drain holes to prevent Ice growing at low temperature.
In case there is not enough space for drainage out of the unit, additional drain
works are required. Follow the description as below
- Make space more than 100mm between the bottom of the outdoor unit and
the ground for installation of the drain hose.
- Insert the drain plug into the hole on the bottom of the outdoor unit.
- Connect the drain hose to the drain plug.
- Make sure dusts or small branches should not go into the drain hose.
≥100mm
• If drain work is not enough, it can lead to system performance degration and system damages.
WARNING
Drain plug x 1ea
Drain hole Ø20
Air discharge side
30 mm
1. Prepare a water drainage channel around the foundation, to drain waste water from around the unit.
2. If the water drainage of the unit is not easy, please build up the unit on a foundation
of concrete blocks, etc. (the height of the foundation should be maximum 150mm).
3. If you install the unit on a frame, please install a waterproof plate within 150mm of
the underside of the unit in order to prevent the invasion of water from the lower
direction.
4. When installing the unit in a place frequently exposed to snow, pay special attention
to elevate the foundation as high as possible.
5. If you install the unit on a building frame, please install a waterproof plate (eld
supply) (within 150mm of the underside of the unit) in order to avoid the drain
water dripping. (See gure)
30mm
Drain plug x 1ea Drain cap x 3ea
13mm
1 Prepare a water drainage channel around the foundation,
to drain waste water from around the unit.
2
If the water drainage from the unit is inadequate, please raise the unit on construction
concrete blocks, etc. (the height of the construction should be at least 150 mm).
3 If you install the unit on a frame, please install a slanted waterproof plate within 150mm
of the underside of the unit to prevent water from plashing against the bottom plate from
below.
4 When installing the unit in a place frequently exposed to snow, pay special attention to elevate the foundation as high
as the average snow height plus the additional required 150mm.
5 If you install the unit on a wall support bracket, please install drainage pipework. In order to avoid the drain water
from dripping on the floor potentially creating a slippery surface or an ice layer under freezing conditions. (See figure)
※
Please securely mount the outdoor unit before connecting the water piping.