S&C Instruction Sheet 461-509 15
Installing and Replacing a Backup Battery
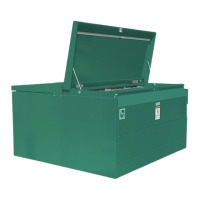
Top bracket
Spring-loaded
screw
Nuts (4)
Spring-
loaded
screw
Figure 6. Battery installation.
Follow these steps to replace a battery in the communications gateway:
STEP 1. Disconnect the ac power cable connected to the bottom of the gateway
(See Figure 2 on page 9) and then disconnect the ac line fuse located at the
lower right corner of the gateway box. See Figure 5 on page 14.
STEP 2. Remove the pre-installed battery located in the bottom-middle section of the
enclosure. See Figure 6.
(a) Disconnect the red and black battery leads from white 2-pin connector on
the PS/Battery board. See Figure 5 on page 14.
(b) Unscrew the four nuts that hold the battery pack and top bracket in place.
(c) Loosen the two spring-loaded screws and remove the battery pack from the
enclosure.
STEP 3. Install a new battery. Follow the procedure as outlined in the “Installing a New
Battery” section on page 14.
Replacing a Battery
 Loading...