ILCE-9
d-830-100-11 (1)
C:\d830100111\d830100111ILCE9UC2\01GB-ILCE9UC2\030BAS.indd
2019/02/19 10:01
GB
128
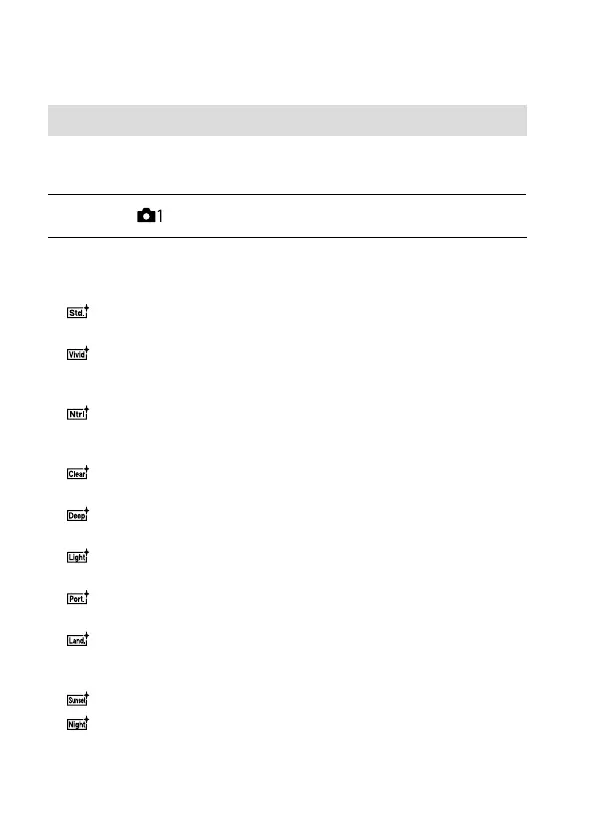
Setting how to process images
Creative Style
Allows you to set the desired image processing and finely adjust contrast,
saturation and sharpness for each image style.
1
MENU (Camera Settings 1) [Creative Style].
2
Select the desired style or [Style Box] using the top/bottom
sides of the control wheel.
Standard: For shooting various scenes with rich gradation and
beautiful colors.
Vivid: The saturation and contrast are heightened for shooting
striking images of colorful scenes and subjects such as flowers,
spring greenery, blue sky, or ocean views.
Neutral: The saturation and sharpness are lowered for shooting
images in subdued tones. This is also suitable for capturing image
material to be modified with a computer.
Clear: For shooting images in clear tones with limpid colors in
highlight, suitable for capturing radiant light.
Deep: For shooting images with deep and dense colors, suitable
for capturing the solid presence of the subject.
Light: For shooting images with bright and simple colors, suitable
for capturing a refreshingly light ambience.
Portrait: For capturing skin in a soft tone, ideally suited for
shooting portraits.
Landscape: The saturation, contrast, and sharpness are
heightened for shooting vivid and crisp scenery. Distant landscapes
also stand out more.
Sunset: For shooting the beautiful red of the setting sun.
Night Scene: The contrast is lowered for reproducing night scenes.