Do you have a question about the Zoom Q8 and is the answer not in the manual?
Details the controls and ports located on the left side of the unit.
Details the controls and features located on the top of the unit.
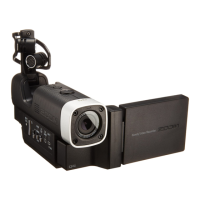
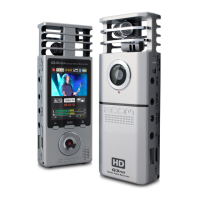
Describes the front view, lens, and LCD screen operation.
Details rear components, jacks, and ports.
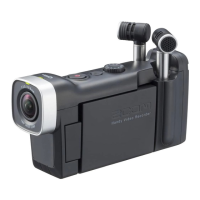
Describes the right side view and battery cover.
Step-by-step instructions for raising the microphone capsule.
Step-by-step instructions for lowering the microphone capsule.
Procedure for attaching the microphone capsule to the unit.
Procedure for detaching the microphone capsule from the unit.
Illustrates scenarios for connecting external microphones and mixers.
Explains the elements and indicators on the main display screen.
Details the interface elements visible during video playback.
Overview of the audio mixer interface for adjusting levels and settings.
Steps required to power on the recording device.
Steps required to power off the recording device.
Explanation of the MOV recording mode, saving video and mixed audio.
Explanation of MOV+WAV mode, saving video and separate WAV audio files.
Explanation of STEREO AUDIO mode, saving only mixed stereo audio.
Explanation of MULTI AUDIO mode, saving separate WAV audio files.
Describes additional playback controls like jump and pause.
How to seek to a specific point within a video.
How to choose audio tracks during playback.
How to navigate and play files from the file list screen.
Introduction to the audio mixer interface and its basic functions.
Instructions for adjusting levels and panning using sliders.
Specific settings for various microphone capsules.
How to enable stereo linking for inputs 1 and 2.
How to enable and set phantom power for microphones.
How to use the PAD function to reduce input signal levels.
Enabling plug-in power for compatible microphones.
Using dynamics processing effects like Limiter and Compressor.
How to use the low-cut filter to reduce noise.
Connecting headphones or external audio amplifiers.
Connecting the device to an HDMI TV for high-definition output.
Connecting to a computer or iPad as storage or microphone.
Connecting to a computer to use the device as a webcam.
How to lock or unlock the LCD screen orientation.
How to view, play, and manage recorded video files.
| Sensor type | CMOS |
|---|---|
| Total megapixels | 3 MP |
| Optical sensor size | 1/3 \ |
| Optical zoom | - x |
| Image stabilizer | No |
| Interchangeable lens | - |
| Maximum focal length (35mm film equiv) | 35 mm |
| Memory slots | 1 |
| Camcorder media type | Memory card |
| Compatible memory cards | SD, SDHC, SDXC |
| Maximum memory card size | 128 GB |
| Internal storage capacity | - GB |
| Built-in display | Yes |
| Display diagonal | 2.7 \ |
| Camcorder type | Handheld camcorder |
| Product color | Black |
| Video resolutions | 848 x 480, 1280 x 720, 1920 x 1080 pixels |
| Maximum frame rate | 60 fps |
| Supported video modes | 720p, 1080p |
| Video formats supported | AVC, H.264, MOV, MPEG4 |
| Maximum video resolution | 1920 x 1080 pixels |
| Analog signal format system | NTSC, PAL |
| Maximum image resolution | - pixels |
| Audio formats supported | AAC, WAV |
| USB 2.0 ports quantity | USB 2.0 ports have a data transmission speed of 480 Mbps, and are backwards compatible with USB 1.1 ports. You can connect all kinds of peripheral devices to them. |
| Component video (YPbPr/YCbCr) out | 0 |
| Battery voltage | 4.2 V |
| Battery capacity | 1700 mAh |
| Battery life (max) | - h |
| Depth | 158 mm |
|---|---|
| Width | 48 mm |
| Height | 69 mm |
| Weight | 260 g |